Thursday, April 30, 2015

Nesting Bird Card by A Bushel and a Hug

Happy Thursday Junkies!
Jerri here- Is everyone getting geared up for the Blog Hop?!  I know I am SUPER excited.  We have been busy bee's getting some fabulous creations made with the new May Release stamps.  You won't wanna miss a thing so make sure you check in here TOMORROW.

Today I am sharing a card made with the beautiful stamp called Nesting Bird.  As you may have figured out by now, I like to color.  I started off by stamping this image on some Kraft paper. I used a Memento ink pad in Cocoa.  I used my Copics to lay down a base color but I then used my colored pencils to really lay some color on the image. I wanted it to "pop" against the dark brown paper.
I created small rosettes using some of the leftover patterned paper (see the video below for a tutorial on how to make them). I colored the edges of my rosettes with a Copic marker and then used my Wink of Stella on them for some added shimmer.  I also used the Wink of Stella on the eggs and the flower of the stamped image as well.   I used a gold Copic Spica pen on the nest and tree branch. 

I tried to zoom in so you could see the sparkle that the Spica pen provides.  It doesn't really show up as much as it does in person but I think you can see the little glimmers enough to get an idea.  I love that it looks like a small gold thread was woven through the nest.  I like that the Copic Spica pens have such a fine tip for making tiny hair thin lines.  I put them throughout the nest and along the branch.  

I stitched around the card for added detail and then on the base of the easel card I used another great stamp called Hope is the Thing.  A beautiful quote from Emily Dickerson.

If you would like to learn how to make a rosette like the one's shown on this card check out this video.


I hope you enjoyed today's post and I hope you get a chance to check out our blog hop tomorrow!

Have a Beautiful Day!
Jerri

Wednesday, April 29, 2015

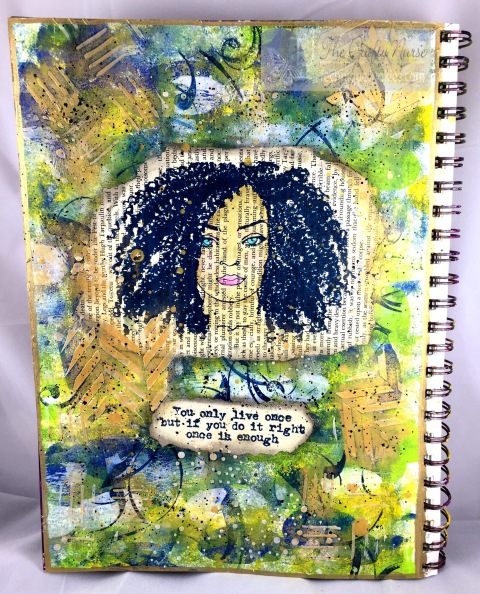
Art Journal Page by The Crafty Nurse

Hey Junkies!  The Crafty Nurse here sharing an art journal page using some gorgeous Technique Junkies Stamps called, Let's Face It 1 - #P006Classy Swirls #S505, and Mae West Sentiments #PS004.

I started by stamping Let's Face It on book paper with black archival ink and colored her in with Silks Acrylic Glaze.  To make the background I used a brayer to add Dina Wakely's acrylic paint and stamped the Classy Swirls, also with archival ink, but this time in Cobalt Blue. I didn't use the entire stamp, but portions of it while holding it in my hand. I then added some molding paste through stencils and applied the face on with gel medium.  I splattered both black and gold ink as well as edged the page with gold Krylon.  To highlight the molding paste I took Viva's Inka Gold Metallic Rub and applied it direct to paper with my fingers. I love that gold shimmer.  To ground my picture I added some Faber Castell Pitt Pen in brown around the image and smoothed it out with my fingers.  Because there was gel medium on the page if you work quickly, the ink moves well and allows a shadow to be developed without harsh lines.

Journal Page - Let's Face it I; PO006 & Mae est Sentiments PS004 - wm

I sure hope you've had a chance to visit the new Technique Junkies site as well as the Design Team blog, where there are some great tutorials.

Signing off for now,

Tuesday, April 28, 2015

Life is Like a Roller Coaster


Good morning stamping friends.  It's Beth Norman here with a very fun fold, and a favourite of mine, called Flap Fold.  I like to use this card as a gift card holder.  You can find this Flap Fold on the Fancy Folds & Motion Paper Crafts CD.


Don't you just love this Like a Roller Coaster stamp?  How true it is--one can either scream every time there is a bump or throw your hands up and enjoy the ride.

Thank you for stopping by.  Don't forget to come back to see what the design team has for you. 

Monday, April 27, 2015

Where I Needed to Be

Hi, it's Gini, and I'm back to share with you a card that uses the gorgeous Vintage Ship Collage from the Palettini Collection. After I stamped the image, I added color using Spectrum Noir Blendable Color Pencils to the images, and then filled in the background with Distress Inks. The sentiment, Needed to Be, was stamped with VersaMark ink onto vellum and then heat embossed with gold.  I always like a little dimension on my cards, so I stamped the Butterfly 5 twice with the watermark ink, embossed them, cut and layered them.  Thanks for stopping by!

Saturday, April 25, 2015

Stand Tall


Hey, there!  It's me again, Robin Redd (a.k.a. RockinReddRobin!)  
Today, I'm sharing, with you, this card I made with this adorable giraffe stamp, Stand Tall #SD601.
Who doesn't love a giraffe, right?!
http://techniquejunkies.com/stand-tall/
 I created the background using the Watercolor Paint Technique that I learned from the Sensational Stencil Technique CD.  Boy, there are SO many techniques on there I've never seen and I'm dying to try!

I used Art Anthologies Colorations to 'paint' the background, Grass and Guacamole.

I stamped the Stand Tall image with a Kaleidacolor stamp pad, Cappuccino Delight.  

I hope I've inspired you to create something today!

Thursday, April 23, 2015

Life Is a Roller Coaster....

{jane bosi}

Happy Thursday, Junkies!!  I am excited to share a new image with you today!!  When I received it, I actually giggled with joy and then, nodded my head in complete agreement!  Life is like a roller coaster!  Are you screaming or throwing your hands up in the air?  I admit, I do both!  LOL!

When I'm creating, though, my hands are up and enjoying the ride!  I started this project with a background technique found on the Bodacious Backgrounds CD.  This one is called It Takes Two--it's a fun and quick tutorial that leads to an interesting outcome!  You can view all of the backgrounds, plus find the CD link, in the Technique Junkie store or right here.

To create the illusion of movement, I stamped the Roller Coaster image three times without inking between.  Later, I used markers and sponged ink to fill in the white spaces.

That's it for today!  Thanks for stopping by--now, go get yourself inky!
TTFN and don't forget to be awesome!  Jane

Tuesday, April 21, 2015

It's Hip To Be Square


Good Tuesday morning everyone!  I'm Marilyn and I've got a couple of cute 4x4's, otherwise known as Fat Book Pages, to share with you today.  This is my first ever post to the blog and I am excited!


I started out with two 4x4 squares of watercolor paper, but cardstock would have worked just fine. I then laid out my 1" paper squares and glued them down.

Next, I stamped two awesome kitty stamps (I just love kitties!):  Meow Chicka (I laugh every time I see it) and Long Tail Retro Kitty (that's one cool cat) onto a piece of paper using black Versafine ink.

After fussy-cutting them out, I inked around the edges with black ink and then adhered them to my cards.  I then added my words, and other embellishments.

I hope you enjoyed today's little project and that it has given you some inspiration.  For more great stamps, visit the Technique Junkies website.

Until later.....................
Smiles~