Thursday, June 23, 2016

Keep Sailing Along

Hello Junkies!
Karen McAlpine with you today!   I am still very busy working on my landscaping project.  But, I just had to take some time out to work with another of the Technique Junkies June New Releases!  I made a nautical themed card in white and shades of blue.


Materials List:
Stamps: Keep Sailing from Technique Junkies
Ink: Night of Navy (Stampin Up)
CS: white, medium blue textured, navy blue
Ribbon


Make It: 


  • Make a card base from medium blue texture CS
  • Cut the white CS larger than the image and stamp Keep Sailing with navy ink
  • Layer with navy CS and add to card base


  • Wrap two blue ribbons around bottom of card
Super cute!!  I think this would be a sweet birthday or encouragement card.  And, what about a card for a baby boy??  Hmmm. I think so..... Darling!
Thanks for stopping by today.  I hope you love the June new releases as much as I do!!  The collection is just gorgeous and the stamps are so easy to adapt to any type of project.   As you can see from the Design Team projects!  Well, I hope you are having a beachy keen day!! See you next time!

Karen  McAlpine
Dreaming and Creating

Wednesday, June 22, 2016

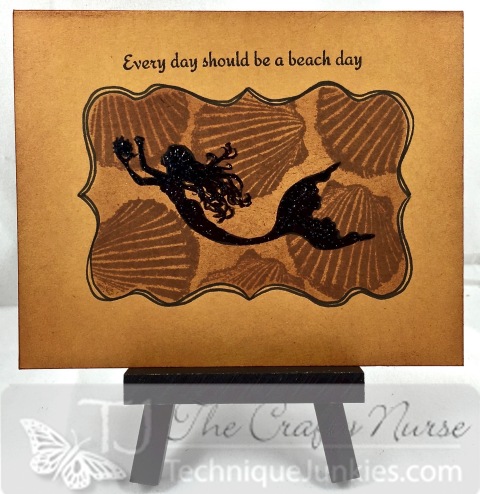
Beach Day Mermaid


Hey Junkies!

The Crafty Nurse back with some inky inspiration for this wonderful early summer day!  I hope you all get a chance to play a little in your craft room while you enjoy the gorgeous weather.

For my card today I used the new June release "By The Sea #SS060 Set of 6."  The technique today is from the Emboss or Die CD called, "Masked Spellbinders."   I also used July 2015 Palettini Collection "Shells #PS009" which really works well with this new collection. 

The sentiment is from "Beach Day #SDX071" simply stamped. After stamping the Mermaid, I colored her in with Art Anthology "Black Leather Jacket" for extra sparkle and shine.  I also added some free flow doodling around the edge of the masked area.

June

Thanks for stopping by the Technique Junkies Blog today and we all wish you lots of creative play today and always.

Bye, Bye for now!!

Tuesday, June 21, 2016

How to do the Bokeh Technique

Hello fellow stampers, it's Beth Norman here with the Bokeh technique.  It received a lot of attention, and questions, when I posted this card to my blog and TJ Yahoo group that I thought I'd share this technique with you today.

The stamp that I used is called Vintage Floral Collage.  Isn't it a pretty stamp?

This technique requires drying times.  Personally, I let mine air dry but you can use a heat gun to dry your layers.  Drying is important to prevent a big mess in your Craft White ink, and allows for a crisp black stamped image.  On that note, let's start, shall we...

Supplies:  Sticky notes, hole punches, White Craft ink pad, Distress inks (or any ink pads), black ink, sponges, (optional -- heat gun), white card stock plus a scrap piece of white card stock to use to punch your holes.
This is an optional step.  When I do the Bokeh technique, I like to have crisp white edges on my card.  To do this, place sticky notes around the edges of your cardstock, as seen in the photo.
Sponge ink onto your card stock.
Continue to sponge colour onto your card stock until it is completely covered.  Let dry naturally, or use a heat gun, to prevent your white Craft pad from becoming muddled with ink.

Punch two to three circles on your scrap card stock.
Lay your hole over your inked card stock and with a sponge, rub white Craft ink onto your card stock.
Continue adding white circles until you are satisfied.  Be sure to overhang some of your circles so that you are sponging on the sticky note, so they show a partial image once you take your sticky notes off.  You can see examples of this in the upper left corner, and if you look closely, you will see more of this done on my card stock.
Air dry or use a heat gun to set your Craft ink.
Once your background is dry, stamp out your image.
Take off the sticky notes to reveal nice white edging.  Now you can complete your card as desired, or just leave it as is.

I hope you will try this technique.  I'll be watching for it on our Yahoo group.  


Monday, June 20, 2016

Wishing every day was a beach day...

Hello Inky Friends!


Today's card is pretty quick and simple as I am working with limited access
to all my artsy supplies at the moment.  

I LOVE this stamp though and again, I think it lends itself very nicely to creating summer masculine cards ~ especially if you have a Birthday Greeting to add to it!

I used Sea Grass Lighthouse for the focal image cutting it out from the Journey Ovals die set.
I colored the image  lightly with colored pencils, added some Journey Twine behind it and
popped it off the card front. The image Beach Day was stamped along the bottom.
The cloud embossing folder is also offered from Fun Stampers Journey
and I inked up the raised side with white ink before running my blue paper through the machine!

We are just a couple short weeks to another NEW RELEASE Blog Hop and I've already seen a preview of some of the new stamps!! Mark your calendars for it now so you won't miss the hop and the sale! ;)

Until next time...

Happy Creating!

~Tonya -oxoxox-

Pebble Beach

I tried a different approach with this card using Technique Junkie Pebble Beach S699www.techniquejunkies.com/pebble-beach/.
The verse is Beach Day SDX071 - www.techniquejunkies.com/beach-day/.  

I stamped the image with Memento Flannel Gray ink on a light tan card stock. I colored the starfish and the shells with Copic markers.  I used a gold Wink of Stella pen to further highlight the Starfish and parts of the two larger shells. I layered it on gold metallic Star Dream text weight paper, and then on dark brown card stock. 

I stamped the verse with white pigment ink and heat embossed with white pigment embossing powder. The verse is stamped on the dark brown card stock and layered on gold Star D\ream tex weight paper and popped up with dimensionals.  Three areas of tiny shells are attached for texture and visual interest. 

You can look for a star fish at the beach -- and get inky when you come inside.  


Wednesday, June 15, 2016

Transparent Besties

IMG_7925

This was a fun card to make.  I LOVE all my beached themed craft supplies so I save all the scraps from them.  I had this beach transparency and thought it was perfect for this sweet stamp.
SD672_Besties

I stamped the girls with black ink onto white cardstock, cut it out and adhered it to the transparency. Then, I inked up with words with black StazOn and stamped it directly onto the transparency.  I finished it off with a tiny starfish embellishment.

Tuesday, June 14, 2016

You Are Beautiful

Good morning Junkies!  Today  I'd like to share a journal page I created using some of the newer Technique Junkies stamps.


I started out by spraying the background with Art Anthology Colorations in Salmon and Siesta Key.  Then using the Morse Code stencil, I used the Distressed Removal Technique from the Sensations Stencils CD.

Next, I stenciled Art Anthology Kona Velvet through one of the smaller strips on the Triangular stencil.  I added several random lines of this stenciling.  Next, I stamped Boom Boom Room randomly across the page.

I stamped two of the faces from the Beautiful Faces set onto a piece of cardstock and then colored them in.  I used Art Anthology Bronze Metal Effects on their face, Ferrari Sorbet on their lips, Shamrock Velvet on their irises, and Kenyan Copper Sorbet on their eyelids.  I then cut them out and glued them to my page.  Next I stamped the words "You are" and "Beautiful" onto a piece of cardstock and sprayed it with Warm Colorations.

I then took a couple of plastic circles in various sizes and colored with Cocoa and Merlot Colorbox Inks.  I glued these down with Glossy Accents so the glue lines wouldn't show through the plastic.

Finally, I outlined everything with a 6B graphite pencil then smudged it with a color shaper.

I hope you enjoyed today's page.  Until later........................


Marilyn