Thursday, June 30, 2016

New York, New York-Happy 4th!

Good morning Junkies, Pam here today! Happy Thursday to y'all. So happy to be back creating with the talented team at Technique Junkies.  In honor of the upcoming 4th of July holiday I decided to feature a fantastic background stamp New York Music with a patriotic flare.


I created a postcard" like card with a red,white and blue theme-funny we don't send postcards much anymore when we are traveling-now we have instagram and Facebook!
The background was created using a technique (my favorite) called stencil monoprint.  I used bits and pieces of a stars and stripes stencil to create the background of the postcard onto watercolor paper.  


The New York stamp was stamp in Archival black over top.  A bit of distress ink was applied to give the overall "distressed" feel.  A fun way to celebrate the fourth!


This stamp has such great detail of the skyline and super fun to use as a background.

I hope everyone has a Happy and safe July 4th! 
Embrace Imperfection,


Wednesday, June 29, 2016

Tuesday, June 28, 2016

Every Day

Good morning Junkies!  Hope you day is marvelous.  To start you off on the right foot, I've got a bright and colorful tag to share with you.


Start off by stamping Bold Shells onto a piece of multimedia paper with black permanent ink.  Sprinkle on some pigment powder in orange, red, and purple and then mist with water.  Dry and then iron flat.  Glue the paper to your tag, trimming the excess and adding that to the bottom of the tag.  There will be a gap, so color a piece of paper with the same red pigment you used to color the background and trim to fit.

Staple three dried flower stalks to the left of the tag.  Next, using soft gloss gel, add Art Stones to the bottom and then some cobalt blue glass beads to the left side.  Heat emboss three sea-themed charms with LSG Hollyhock Scarlet Plum and add to the right of the flower stalk.  Stamp Beach Day onto a piece of paper and cut out.  Arrange the words then glue down.

Last but not least, stamp Beachin' It across the colored paper part of the tag.

Hope you enjoyed today's tag.  Until later...............


Marilyn

Thursday, June 23, 2016

Keep Sailing Along

Hello Junkies!
Karen McAlpine with you today!   I am still very busy working on my landscaping project.  But, I just had to take some time out to work with another of the Technique Junkies June New Releases!  I made a nautical themed card in white and shades of blue.


Materials List:
Stamps: Keep Sailing from Technique Junkies
Ink: Night of Navy (Stampin Up)
CS: white, medium blue textured, navy blue
Ribbon


Make It: 


  • Make a card base from medium blue texture CS
  • Cut the white CS larger than the image and stamp Keep Sailing with navy ink
  • Layer with navy CS and add to card base


  • Wrap two blue ribbons around bottom of card
Super cute!!  I think this would be a sweet birthday or encouragement card.  And, what about a card for a baby boy??  Hmmm. I think so..... Darling!
Thanks for stopping by today.  I hope you love the June new releases as much as I do!!  The collection is just gorgeous and the stamps are so easy to adapt to any type of project.   As you can see from the Design Team projects!  Well, I hope you are having a beachy keen day!! See you next time!

Karen  McAlpine
Dreaming and Creating

Wednesday, June 22, 2016

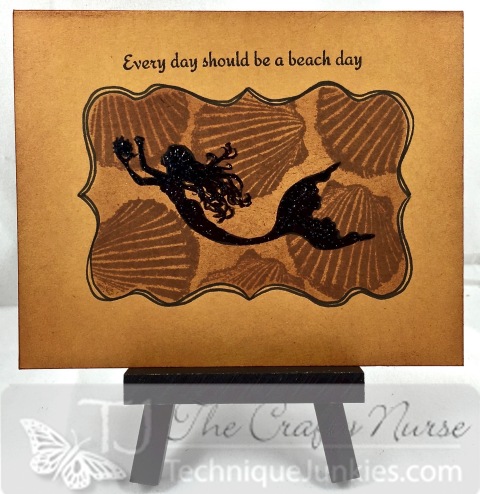
Beach Day Mermaid


Hey Junkies!

The Crafty Nurse back with some inky inspiration for this wonderful early summer day!  I hope you all get a chance to play a little in your craft room while you enjoy the gorgeous weather.

For my card today I used the new June release "By The Sea #SS060 Set of 6."  The technique today is from the Emboss or Die CD called, "Masked Spellbinders."   I also used July 2015 Palettini Collection "Shells #PS009" which really works well with this new collection. 

The sentiment is from "Beach Day #SDX071" simply stamped. After stamping the Mermaid, I colored her in with Art Anthology "Black Leather Jacket" for extra sparkle and shine.  I also added some free flow doodling around the edge of the masked area.

June

Thanks for stopping by the Technique Junkies Blog today and we all wish you lots of creative play today and always.

Bye, Bye for now!!

Tuesday, June 21, 2016

How to do the Bokeh Technique

Hello fellow stampers, it's Beth Norman here with the Bokeh technique.  It received a lot of attention, and questions, when I posted this card to my blog and TJ Yahoo group that I thought I'd share this technique with you today.

The stamp that I used is called Vintage Floral Collage.  Isn't it a pretty stamp?

This technique requires drying times.  Personally, I let mine air dry but you can use a heat gun to dry your layers.  Drying is important to prevent a big mess in your Craft White ink, and allows for a crisp black stamped image.  On that note, let's start, shall we...

Supplies:  Sticky notes, hole punches, White Craft ink pad, Distress inks (or any ink pads), black ink, sponges, (optional -- heat gun), white card stock plus a scrap piece of white card stock to use to punch your holes.
This is an optional step.  When I do the Bokeh technique, I like to have crisp white edges on my card.  To do this, place sticky notes around the edges of your cardstock, as seen in the photo.
Sponge ink onto your card stock.
Continue to sponge colour onto your card stock until it is completely covered.  Let dry naturally, or use a heat gun, to prevent your white Craft pad from becoming muddled with ink.

Punch two to three circles on your scrap card stock.
Lay your hole over your inked card stock and with a sponge, rub white Craft ink onto your card stock.
Continue adding white circles until you are satisfied.  Be sure to overhang some of your circles so that you are sponging on the sticky note, so they show a partial image once you take your sticky notes off.  You can see examples of this in the upper left corner, and if you look closely, you will see more of this done on my card stock.
Air dry or use a heat gun to set your Craft ink.
Once your background is dry, stamp out your image.
Take off the sticky notes to reveal nice white edging.  Now you can complete your card as desired, or just leave it as is.

I hope you will try this technique.  I'll be watching for it on our Yahoo group.  


Monday, June 20, 2016

Wishing every day was a beach day...

Hello Inky Friends!


Today's card is pretty quick and simple as I am working with limited access
to all my artsy supplies at the moment.  

I LOVE this stamp though and again, I think it lends itself very nicely to creating summer masculine cards ~ especially if you have a Birthday Greeting to add to it!

I used Sea Grass Lighthouse for the focal image cutting it out from the Journey Ovals die set.
I colored the image  lightly with colored pencils, added some Journey Twine behind it and
popped it off the card front. The image Beach Day was stamped along the bottom.
The cloud embossing folder is also offered from Fun Stampers Journey
and I inked up the raised side with white ink before running my blue paper through the machine!

We are just a couple short weeks to another NEW RELEASE Blog Hop and I've already seen a preview of some of the new stamps!! Mark your calendars for it now so you won't miss the hop and the sale! ;)

Until next time...

Happy Creating!

~Tonya -oxoxox-