Hello everyone!!!!
Cheri here and we're winding down to the end of the 30 Days of Christmas event.
There's still one more day to get that 25% off all the awesome Christmas stamps that Technique Junkies has in their store, grab them while you can and enjoy the discount!
It's been 30 days full of inspiration and creativity by the TJDT and I've enjoyed each and every one.
For my last post during this event, I have some bookmarks to show you and a card.
This is a front and back shot of the bookmarks. I used some coordinating scrap pieces of design paper to cover the backs. The stamps I used for the bookmarks is SS029 "Christmas Words" set of 4 stamps. The technique to create them is the easy white embossed image and sponging Distress Inks over the image to create a resist. Adding some water splatters to the sponged ink gave them a "vintage" look. I like these as card inserts for Christmas cards to special friends.
The face on this puppy just cracks me up. Another easy card. The background was splattered with white acrylic paint and once dry, I sprayed with some glimmer spray. I stamped "Ho, Ho, Ho Dog" on 80# white cardstock with Archival black ink using my Misti. In order to get a good coverage, I stamped it 3 times...I wanted him to pop right off the cs. I made a mask and covered him while I sponged a bg with Distress Ink. I again splattered some water and soaked it up with paper towels then heat dried it. I decided to add some "snow" to match the red bg, so I took my white pen and dotted it in the bg. I used Copics to color his scarf and paper pieced his hat with some red glittery paper. To frame him, I used MFT stitched arch Stax. As a final touch, I added some sequins to the bg and some glossy accents to his nose and eyes.
There you have it!!!! I hope I've inspired you and I hope you don't miss grabbing youself some of these fabulous stamps.
Cheers!
Tuesday, December 13, 2016
Monday, December 12, 2016
Day 28 of the 30 Days of Christmas!
Wow, this time has gone by very fast! Of course that is often the way it is in December! I had "planned" to post and make more cards than I was able to do. My reason is a simple one -- I just didn't have the time to make anymore cards than I made! Everyone ought to be able to understand that. They "whys" to explain my lack of time are too numerous to list but I am sure many of us have found that lack of time to be true for many things we want to do during the holiday seasons.
So here is my card for today. I will now have a Christmas card on my personal blog for the next three days. I spent time tonight making these cards.
I used some die cuts I purchased years ago. This is the first time I have used them. I used a Technique Junkie stamp - All is Calm - http://techniquejunkies.com/all-is-calm/. I cut several strips* of white card stock or the trees die and the houses and church die. *If you decide to do something like this , make sure you have at least an inche below the lowest part hillsides for each each strip. I sponged the tree strips with green ink. It didn't matter to me if the sponging was really even because I felt it added texture. I sponged the houses and church strips with a matching blue of the card stock for the base card.
I covered each strip with Versamark ink, cover it with a "snowy" embossing powder and heat set. All those strips really glisten! It was not an iridescent powder. Then I stamped the greeting at the top (allowing room for the "star.") with Versamark ink, and heat embossed with detail silver embossing powder.
I used my ATG tape runner to to adhere the strips together in an eye pleasing arrangement to me. I then ran all of the strips adhered together through my Xyron machine to get adhesive on the back side. I used my home made cloud stencil to add color and visual texture to the sky. Then I adhered the panel of trees and houses, etc to the sponged cloud panel. This was layered on blue and layered on silver, and onto the base card.
While this card is not difficult, it was a little "fussy" and time consuming, but i felt it was worth the effort.
I still have a few cards to make, and some to hand deliver, but most of my cards are in the mail. Some have received because they told me so.
I hope you have a great day -- and get inky!
Judy Jackson
So here is my card for today. I will now have a Christmas card on my personal blog for the next three days. I spent time tonight making these cards.
I used some die cuts I purchased years ago. This is the first time I have used them. I used a Technique Junkie stamp - All is Calm - http://techniquejunkies.com/all-is-calm/. I cut several strips* of white card stock or the trees die and the houses and church die. *If you decide to do something like this , make sure you have at least an inche below the lowest part hillsides for each each strip. I sponged the tree strips with green ink. It didn't matter to me if the sponging was really even because I felt it added texture. I sponged the houses and church strips with a matching blue of the card stock for the base card.
I covered each strip with Versamark ink, cover it with a "snowy" embossing powder and heat set. All those strips really glisten! It was not an iridescent powder. Then I stamped the greeting at the top (allowing room for the "star.") with Versamark ink, and heat embossed with detail silver embossing powder.
I used my ATG tape runner to to adhere the strips together in an eye pleasing arrangement to me. I then ran all of the strips adhered together through my Xyron machine to get adhesive on the back side. I used my home made cloud stencil to add color and visual texture to the sky. Then I adhered the panel of trees and houses, etc to the sponged cloud panel. This was layered on blue and layered on silver, and onto the base card.
While this card is not difficult, it was a little "fussy" and time consuming, but i felt it was worth the effort.
I still have a few cards to make, and some to hand deliver, but most of my cards are in the mail. Some have received because they told me so.
I hope you have a great day -- and get inky!
Judy Jackson
Sunday, December 11, 2016
Day 27 and the Stars are Shining
Today is Day 27 of the 30 Days of Christmas, and I am happy to show you this pretty - and simple - card using The Stars are Brightly Shining stamp.
With just a few sprays of non-traditional Barbie and Glorious Art Anthology Colorations Sprays, the background color was done. When dy, I stamped the Brightly Shining Image ove it with StazOn ink. To add a little shimmer, I sprayed Sterling Fairy Dust Shimmer Spray, then highlighted some of the words with a silver glitter pen.
Just a few more days left of the 30 days of Christmas -- and only 4 more days of 25% off any Christmas stamp. Don't miss out!
Warmest Wishes,
Pat Huntoon
With just a few sprays of non-traditional Barbie and Glorious Art Anthology Colorations Sprays, the background color was done. When dy, I stamped the Brightly Shining Image ove it with StazOn ink. To add a little shimmer, I sprayed Sterling Fairy Dust Shimmer Spray, then highlighted some of the words with a silver glitter pen.
Just a few more days left of the 30 days of Christmas -- and only 4 more days of 25% off any Christmas stamp. Don't miss out!
Warmest Wishes,
Pat Huntoon
Saturday, December 10, 2016
Day 26 of the 30 Days of Christmas
Welcome! Today is Day 26 of the 30 Days of Christmas, and I am happy to show you this elegant card that uses the Merry Christmas Wishes stamp as a focal image. The image was stamped and embossed with silver embossing powder, then I rubbed green dye ink over the top to highlight the tree shape. The background is the Palettini Vintage Music Background stamp.
This is one of those cards that the internet does't do justice to -- so much prettier in person!
In any case, there are only a few more days of the sale -- 25% off all stamps in the Christmas Category. Get yours today!
Warm regards,
Pat
This is one of those cards that the internet does't do justice to -- so much prettier in person!
In any case, there are only a few more days of the sale -- 25% off all stamps in the Christmas Category. Get yours today!
Warm regards,
Pat
Friday, December 9, 2016
Day 25 - Nuvo Mousse Rub on Embossing
Today is day 25 of the 30 Days of Christmas, and today I am introducing a fun new product into the Technique Junkies store: Nuvo Mousse Embellishment.
Add texture to your card stock with an embossing folder. Then simply place your finger into the Mousse -- pick some up with your fingertip. It has a soft, silky texture.
Then simply rub the Mousse lightly over the texture portion of the card stock.
To finish my card, I used one of the sentiments from the Christmas Ornaments Trio Set,and layered it over black and red sparkly card stock.
The second piece uses the Indian Gold Mousse over textured snowflakes, but this time, I used Art Anthology Colorations sprays on the background:
To finish this card, I used the Joyeux Noel sentiment over layers of snowflakes. Note that the white centers of the snowflakes use the white Nuvo Crystal Drops.
I hope you were inspired today.Make sure to take advantage of the sale before it runs out!
Pat Huntoon
These little jars of mousse are amazing. They feel like silk when touched, apply beautifully, and dry very fast. I haven't ever used anything like them! They can be applied with a spatula through stencils, directly onto the paper, rubbed into texture, painted on, and so many other ways.
Today I am rubbing them over the texture of embossed card stock to add shimmer to my Christmas Card creation.
While you are checking out the new NUVO Mousse colorsonline, don't forget that ALL stamps in the Christmas category are 25% off through December 14th. Time is running out on this offer! Simply place any Christmas stamp in your shopping cart and the 25% discount will be automatically applied to your purchase. No coupon codes required.
Our first look uses Nuvo Mousse in Pretty Platinum over an embossed grey background.
Then simply rub the Mousse lightly over the texture portion of the card stock.
To finish my card, I used one of the sentiments from the Christmas Ornaments Trio Set,and layered it over black and red sparkly card stock.
The second piece uses the Indian Gold Mousse over textured snowflakes, but this time, I used Art Anthology Colorations sprays on the background:
I simply used three Colorations sprays over the background: Siesta Key, Plush and Patience. Once dry, I added embossed texture and used my fingertips to apply the Indian Gold Mousse to the raised areas.
To finish this card, I used the Joyeux Noel sentiment over layers of snowflakes. Note that the white centers of the snowflakes use the white Nuvo Crystal Drops.
I hope you were inspired today.Make sure to take advantage of the sale before it runs out!
Pat Huntoon
Thursday, December 8, 2016
Day 24--The Thirty Days of Christmas--Two projects
Hello Junkies!
Karen McAlpine with you today! Welcome to Day 24 of the Thirty Days of Christmas Event with Technique Junkies!
The Design Junkies have lots of ideas for holiday cards and to get you in the mood for the season,
The Technique Junkies will be celebrating the Holidays with ............
The Design Team will be sharing Christmas/Holiday projects using Technique Junkie Stamps. All Christmas stamps will be on sale during the event--
Karen McAlpine with you today! Welcome to Day 24 of the Thirty Days of Christmas Event with Technique Junkies!
The Design Junkies have lots of ideas for holiday cards and to get you in the mood for the season,
The Technique Junkies will be celebrating the Holidays with ............
The Thirty Days of Christmas
When: November 15 - December 15The Design Team will be sharing Christmas/Holiday projects using Technique Junkie Stamps. All Christmas stamps will be on sale during the event--
25% off!!
On my day 24 projects, I used TJ stamps (which are 25% off) and a non- Christmas stamp. See all The Christmas Sale stamps here
Make It:
Inside of the Card:
Change up!!
I'm Dreaming of a White Christmas Chicken !!?? Now, I know you have a bird or chicken lover on you card giving list. They will love this little Christmas Chicken card. And, this card also shows how you can use non-Holiday stamps to make holiday cards.
Stamp this sweet little chicken with red ink and pair with red and green papers. Stamp the sentiment from the Red or White Christmas stamp; cut out and layer with green CS. Tie ribbon in bow.
I hope you are enjoying all the Technique Junkies' Holiday projects! Don't forget to grab you favorite stamps while the 25% sale is on. See you again soon!!
Karen McAlpine
Dreaming and Creating
Materials List:
Stamps: Christmas Ornaments Trio Set (25% off) from Technique Junkies
Ink: Archival Cobalt and Black
CS: white and navy
Metallic Marker
Twinkling H2O's watercolor paints
Paint brush
Silver and navy ribbon
Make It:
- Make a card from navy CS
- Stamp three of the hanging ornaments with Cobalt Archival ink on white CS
- Dip a wet brush into the watercolor paints and add splotches of color to the background-- the ornaments will not smear because they were stamped with Archival ink.
- Add dots with a metallic marker and run the maker along the edges
- Add stamped piece to card
- Stamp Merry Christmas (also included in the Ornament Trio stamp set)with black ink in lower corner
- Tie ribbon into three bows and add one to top of each ornament
Inside of the Card:
Change up!!
I'm Dreaming of a White Christmas Chicken !!?? Now, I know you have a bird or chicken lover on you card giving list. They will love this little Christmas Chicken card. And, this card also shows how you can use non-Holiday stamps to make holiday cards.
Materials List:
Stamps: Chicken and Red or White Christmas (sentiment) both from Technique Junkies
Ink: Red
CS: white, red, green
DP: MME Found Christmas pad
Snowflake ribbon
Stamp this sweet little chicken with red ink and pair with red and green papers. Stamp the sentiment from the Red or White Christmas stamp; cut out and layer with green CS. Tie ribbon in bow.
I hope you are enjoying all the Technique Junkies' Holiday projects! Don't forget to grab you favorite stamps while the 25% sale is on. See you again soon!!
Karen McAlpine
Dreaming and Creating
Wednesday, December 7, 2016
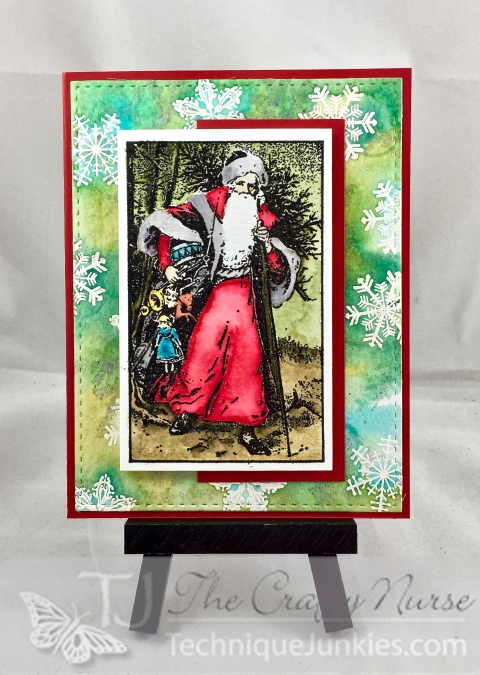
Father Christmas - Day 23 of 30 days of Christmas
Hello Junkies!
The Crafty Nurse here celebrating Day 23 of the 30 Days Of Christmas. Pat is generously offering 25% off all holiday stamps over at the Technique Junkies store through December 15th.
I've featured a favorite TJ stamp, "Father Christmas" which I watercolored with Distress Markers. The background uses another holiday staple, called Snowflakes, which I heat embossed in white and used the Stained Resist Tutorial from the Artistic Effects CD. I finished off with some Distress Mica Spray for some glitz.
We would love for you to follow the Design Team Blog for more Christmas ideas using the Technique Junkies stamps. There are only a few days left so we hope you've enjoyed the cards and found inspiration for your holiday card making.
By for now,
Subscribe to:
Posts (Atom)