Wednesday, July 31, 2019

Masked Backgrounds


One of the first reasons I fell in love with Technique Junkies stamps were their awesome backgrounds.  Today I played around with several backgrounds and a masking technique.  Remember you can get 10% off your order using my discount code TJ10Stephanie.


After spending time last week with my sister's cat Simon, I was inspired to make some cards featuring Coffee Kitty ... this stamp is very easy to cut for masking (I just cut off the whiskers from my mask, and it worked just fine).  I started by using my MISTI to stamp him on a white cardstock.


I stamped him a second time on masking paper to cover up my first stamped image, and then I positioned my Textured Newsprint background and stamped it in Fantasia Versafine Clair Ink.


I trimmed to even up the white border and then mounted my image on a purple card base.  I paired him with a sentiment from I've had my Coffee.


I finished with a few purple sequins.

The great thing about a mask is that you can use it several times.  Just be sure the ink on the masking paper is dried, so you don't rub it onto your next card (don't ask me how I know this).  I paired the Coffee Kitty with the Flower Doodles Background using Brown for the Cat and Tiger Lily Orange for the background.


For this cat, I paired him with a sentiment from Cat Greetings with the coordinating sentiment on the inside.


I hope I've given you some fun ideas for how to use your Technique Junkies background stamp collection ... go give masking a try.


Tuesday, July 30, 2019

Get Well Soon

Hello fellow stampers!  Enjoying this summer heat?  I sure am!

My mojo has found it's way back to me, after a long hiatus, and I got six cards made over the weekend.

Today, my card used A Colorful Life Stencils paired with Summer Bouquet and Get Well Soon.

I started out placing my stencil over 110 lb white cardstock and misting it with Thulian Pink Shimmering Bliss.  The shimmer that shows up is so awesome. Next, I added my flowers and sentiment.

These stamps, stencils, and any other product you choose to purchase (excluding clearance rack) are subject to 10% off simply by using my code TJ10Beth. 

It won't be long now before our August 1st release is upon us.  I'm so excited!

Cheers!


Monday, July 29, 2019

Faux Heat Embossing With Shimmering Bliss Spray!

Happy Monday!

This is a quick and easy card using Shimmering Bliss directly on a stamp to give the look of heat embossing. Bet you didn't know you can stamp with it! 

1. I made a washy watercolor background and let it dry
2. Using my MISTI, I stamped the Texture Nautilus stamp using a brown waterproof ink. 
3. I sprayed the Texture Nautilus stamp with Worn Saddle Shimmering Bliss and stamped again.
4. Let dry and add sentiment (Saltwater Heals).

Don't forget to add the code TJ10Jeanne for 10% off at Technique Junkies! 


Here's a closer look


Hope you enjoyed my project!

Sunday, July 28, 2019

Love Letters In The Sand

Hello, Lynda Joy here with a card using the Zen Shells stamp from the July release...
I also used the a stamp from the older Seashells Set of 5 for the verse. 

I stamped the Zen Shells stamp onto white cardstock, inking the stamp with different shades of mini distress pads.  For the verse, I white embossed it onto a die cut heart, and added it with foam tape.  Some satin ribbon finish off the panel,which I attached to an A2 card.

Easy-peasy!  I love quick, easy cards that look, elegant.  

I hope you enjoyed the July release stamps and the designer's inspiration for you this month.  

Use my code, TJ10Lynda, to get 10% off your purchases.
 
Thanks for visiting.  See you soon for the August stamp release on August 1st!

Blessings,
 

Saturday, July 27, 2019

Just Keep Swimming


Hello Technique Junkies!
It's Ceal here to share with you today a card using the Just Keep Swimming from the July release.
I created the background using Alcohol ink and then used the Alcohol lift to add the image, so fun and super easy! 
You can save 10% on the stamp and your entire order by using my code TJ10Ceal at the checkout

Happy Stamping! 


Friday, July 26, 2019

TJ Inkspirations: Pixie Spray Stencil Revolution!

I have been bursting at the seams with excitement about today's email! I have known for a while that this was all coming together, and I just received a HUGE shipment of Pixie Spray -- now I can share!!

Pixie Spray
What is Pixie Spray? It is a light-tack stencil adhesive that will change the way you create with stencils. I know that sounds like an exaggeration, but trust me, once you use this spray, you will get addicted to having beautiful, crisp stencil projects created with both hands (since one doesn't need to hold down a stencil) and without painter's tape.

Today's video shows you how to use the spray with Shimmering Bliss, AND with Dye Inks.  I JUST brought the 2" x 2" Aladine IZINK Ink Pads into the store --I have been working and creating with them and I felt compelled to share the love with you. These lovely little inks have a beautiful foam pad, and at $2.99 they are priced right, too.  

All of the inks are available individually, of course, but if you are a get-it-all kind of person, you might want all 20 of the inks for just $49.99 - 15% off!

Aladine IZINK Dye Inks
 I blend these inks with Ink Blending Brushes in the video - also new to the TJ Store. They are, by far, the easiest and best way I have ever blended ink.
Ink Blending Brushes


Okay, now it is time for the video. Get ready for the Stencil Revolution!

Pixie Spray Stencil Revolution
I hope you are a little inkspired by today's issue. See you next week!
 
Sincerely,
 

Pat Huntoon
Technique Junkies LLC 

Wednesday, July 24, 2019

Faith In Dreams

The card I am sharing with you today is truly different for me. I messed around with some fun products and love how it turned out. Look very closely at the green portion of the card...see that ghost image? I love it!


Here is a close-up:


I played around with some of the new Aladine Izink Pigment Inks (Cactus and Mango). These are dreamy inks. Very vibrant and easy to work with. This is a new line being carried by Technique Junkies and they come in many beautiful colors, including Pearl finishes. I simply used the included eye dropper from the bottle and dropped several drops of both colors on my glass mat, then smooshed my cardstock around. I added a few more drops of the Mango directly to the cardstock for larger pops of color. 

Next I stamped the image (Butterly Dreams SD775) in Versamark Ink and clear embossed it. The next step was to take a black inkpad (I used Gina K Amalgam) and smooshed that over the entire piece, then gently wiped away the ink from the embossed area. The image turned out subtle and eerily beautiful. I added the sentiment (Faith In Your Dreams SDX121) to the black area and embossed it in white. I added a gem butterfly for a little pop of bling, then trimmed down the entire piece and attached it to my A2 card base.

This just proves that it's good to experiment and try something new. You never know what you'll end up with, and you may end up with something you love!

And if you'd like to add of these products to your stash, simply use the code below to save 10% off your entire order!

Til next time, 
Keepin' it inky!


Tuesday, July 23, 2019

Flirty Flamingo

 Happy Tuesday all, Kia here with you today along with my Flirty Flamingo friend, known as Foot Down.

As I was making this card I thought I was also filming it, but alas my camera was in photo mode, not video mode. Grrr to myself!

First I started with the backgrounds, one having multi colours using Infusions in Frankly Scarlett, Emerald Isle, and Lemoncello the other in the Lemoncello with Daniel Smith Cadmium Yellow added to brighten. Both were done using Arches Cold Press 140lb water colour paper.
 I wanted a lattice like frame, but I did not want the whole card done for obvious reasons. Cold Press paper is thick which would end up causing problems with the design, and I wanted some of the variations in the colours to show.

Using My Sweet Petunia's Cut-Align large ruler I cut the largest piece of background paper in strips measuring 3/8th inches thick from the cut line. 

I wanted the lattice in the corners only. For my A2 card I did 3 rows on the left and right side of the card, and two rows at the top and bottom of the card. 
On my card base I did the lattice design and once completed put something heavy on the completed ones until I completed the others. I then went about gluing everything in place. 

To differentiate the side strips I went down the sides with my Nuvo Aqua Flow Pen in Apple Red. 

In my Misti I stamped the Flamingo on the yellow background piece, inked with the metallic copper ink and embossed with Copper Embossing Powder. I sponged around the sides of the panel with Copper Metallic ink, then attached to my card base using fun foam and Scorpal Tape. I added a few drops of Copper Penny and Autumn Red Crystal Drops.

To finish I went over the Flamingo using Nuvo Aqua Shimmer. It doesn't show up in the picture but IRL it looks great. 

I hope you have enjoyed today's card and thank you for joining us.
Here is a discount for you.

Saturday, July 20, 2019

Shimmering Waters and Dream Without Fear


Hello Saturday and thank you for stopping by the Technique Junkies post! This is Janelle today roping up a dreamy and lovely card!

This card came out crystal clear for me, it was just a matter of getting the ropes colored and trimmed within a frame. Once I put this card together, I realized I did it the long and arduous way, so I'm going to suggest something much more manageable!
Stamp and color the Ropes on white cardstock then create a mask for them before spraying Lapis Lazuli and Miami Vice Shimmering Bliss Spray randomly over the masked image for a simple watery effect. 
Stamp the Dream Without Fear sentiment and trim to the desired size for the card, then use it as a guide to where you'll want ropes to overlap. Make a small pencil mark where you'll want to start and stop the overlap as a guide. Use a craft knife or utility knife to trim along the rope between the pencil marks. This will be where the sentiment paper edge will be tucked underneath the rope. Glue sentiment into place. Glue onto a card front.
I spent a long time cutting around all the ropes with long breaks between for neck and shoulder stretches, so I highly recommend not doing that. I layered it over a thoroughly sprayed piece of white cardstock. It gives it dimension, although using a gray marker or pencil before masking and spraying would do the same effect.


Thank you for stopping by today and wishes for many crafty moments in your weekend!

Friday, July 19, 2019

Shimmering Sky Backgrounds

I had a blast creating in my stamp studio this week, and really enjoyed using some silhouette stamps (both released, and soon-to-be-released) with my Shimmering Bliss Sprays. I thought it would be fun to share the technique for creating sky backgrounds using the sprays. They are so easy to do!

I want you to try them, too! All of the Shimmering Bliss Sprays are 15% off through July 25th so that you can get some and start creating your own beautiful backgrounds!*

Want to see them in action? Here are some examples:

Shimmering Sky Backgrounds


Aren't they gorgeous? So easy to do, too.  Here is the How-To video:
Shimmering Sky Backgrounds for Silhouette Stamps

*Shimmering Bliss Discount is not available on wholesale accounts. Only available on the individual bottlesa (not on the "Get it All" pack). Not available for orders outside the United States.
I hope you are a little inkspired by today's issue. See you next week!
 
Sincerely,
 

Pat Huntoon
Technique Junkies LLC 

Wednesday, July 17, 2019

Wreath Wishes


I love mailing flowers ... they last forever and never need to be watered.  Remember, you can use my discount code TJ10Stephanie for 10% off your Technique Junkies order.

Today I'm sharing a card where I tried too incorporate some of the coloring techniques I learned in a recent class with Kathy Racoosin (I still need lots of improvement, but the only way to get better is to practice, practice, practice).


I started by stamping the Wreath Wishes stamp on the textured side of watercolor paper using my MISTI and Amalgam Ink.  I left my stamp in place, because I wanted to come back and stamp one more time after I finished coloring.


One of the tips from Kathy was to lay down some marker before you start coloring with pencils.  I used one of her favorite Copic colors for doing that and also used a very light blue green Spectrum Noir marker for the leaves.


Next I worked to really sharpen my pencils to a very sharp point and tried to use a lighter hand with my shading (still need more work on both).  I tried to be fearless and just let myself color.


I combined pinks and purples for the blooms ... and blues and greens for the leaves.


This stamp set has two sentiments that fit perfectly inside the wreath to produce a 4 1/4" square card ... perfect to pop in the mail to let someone know they are on my mind.


Tuesday, July 16, 2019

Vintage Lighthouse

Hello fellow stampers!

Everywhere I turn, I see nautical cards, household decor, etc.  I'm feeling extra nautical this summer because my husband bought a cruising boat this summer, so much of my free time is spent at the marina on the boat.

It's extra fun working on nautical cards, now that I have a boat, and there is no lack of nautical images at Technique Junkies.

Here I used Ropes on my background, coloured in two different colours using my Misti, and Vintage Lighthouse in my foreground.

You can get these, and any other product that is not in the clearance rack, for 10% off with my code TJ10Beth.


Don't forget to come back tomorrow for some more inspiration.


Monday, July 15, 2019

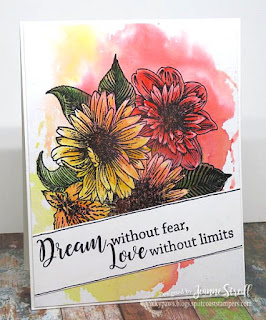
Dream Without Fear

Happy Monday!

Sometimes a card comes together really fast and still looks great. This is a good example of that happening. I always have a stack of backgrounds in my stash. This one is watercolored. I had planned to use it for another projects but the colors seemed wrong so I put it away for later use. Well... when I saw the Summer Bouquet image I knew it would be perfect! I stamped in black ink and then added a little shading and the leaves with markers. I finished the card off by adding the Dream Without Fear sentiment. Ta dah! Done. 


Hope you enjoyed my project!

Sunday, July 14, 2019

Putting My Foot Down

Hello!  Lynda here with a card for you from one of the July release stamps.
Isn't this Zentangled flamingo adorable?  I thought so.  And it's the perfect verse to go with her!

I used the TJ stamp Foot Down.  I stamped it onto white card stock, and colored her with markers.  I cut along the right side, following the contour of the image.  On another white piece of card stock, I stamped it again, onto light blue card stock.  I brushed on some blue ink along the edge where the words are.

I added the cut-out panel to the blue panel along the left edge.  I used foam tape to give it dimension.  I added the whole shebang to a pink glitter panel, and added that to an A2 card.

Inside:


For the inside, I stamped the Flamingo SD890 stamp, twice.  I added some pink ink with a brush.

Have you had a chance to check out this fabulous release at Technique Junkies?  If not, you can find all the stamps HERE.   The release post with all the designer's links is on the IO blog HERE.


I hope you enjoyed my card, and were inspired.  Don't forget, use my code, TJ10Lynda, to receive your 10% discount on your entire Technique Junkies order! 

Thanks for stopping by the Technique Junkies blog today!

Blessings,