Showing posts with label Shimmering Bliss Sprays. Show all posts

Wednesday, February 9, 2022

Young at Heart | Technique Junkies New Release

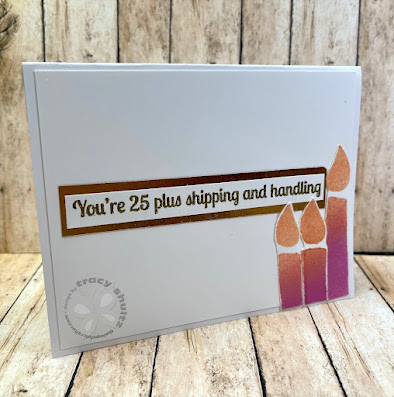
Hello!  Tracy Shultz, the Hopeful Crafter, sharing a card that I created using the new Inside Out: Young at Heart (set of 10) (#SS145) and Shimmering Bliss Sprays (Just Squeezed and Thulian Pink). The Inside Out stamp sets offer both the outside sentiment and the inside sentiment. The Young At Heart Set of 10 set features birthday themed stamps for the outside of the card and snarky (funny) sentiments for the inside of the card. 
Save 10% on all non-sale items with my code: TJ10Tracy   (excludes sale items).

The candles are a stencil from A Colorful Life Designs: Big Candles Stencil   
The inside/snarky/funny sentiment is pictured above. Both the Outside and the Inside sentiments on my card were heat embossed with Nuvo Gold Enchantment sparkle embossing powder. I also cut some candles (sprayed with Shimmery Bliss Spray) and included three of them inside the card with the sentiment. 

How To Make this card:
1. I used VersaMark ink to heat emboss both the inside and the out sentiments with Nuvo Gold Enchantment sparkle embossing powder. 
2. I trimmed the sentiments and adhered them to a mat layer. For the outside sentiment, I sprayed Just Squeezed Shimmery Bliss spray onto a piece of  scrap paper for a perfectly matched mat layer. I adhered the sentiment with foam tape. For the inside sentiment I used copper foil cardstock as a mat layer. 
3. I placed a piece of 4.25" x 5.5" Accent Opaque cardstock in my splat box (I use this when using sprays or splattering ink, etc.)
4. I placed the Big Candles Stencil from A Colorful Life Designs on top of the cardstock and sprayed Just Squeezed and Thulian Pink Shimmering Bliss spray over the stencil, which allowed the mica spray to settle into the open sections of the stencil. If you are not familiar with Shimmering Bliss Spray, it is a Technique Junkies product: https://techniquejunkies.com/shimmering-bliss/
5. I removed the stencil and allowed the spray to dry.
6. Shimmering Bliss sprays contain mica, and need to be set to avoid the product rubbing off on the recipients hands when they open their card.  I used Aqua Net hairspray to set my Shimmery Bliss Spray
7. I used stitched rectangle dies to die cut the panel and a mat layer using
 copper foil cardstock.
8. I added a few orange sequins to the front of the card. I actually sprayed several card panels using the stencil and shimmering bliss, so cut out some of the candles from one of the sprayed panels. I added these three candles to inside the card panel.
 
The card above features the "Young at Heart" sentiment on the outside and the "Slightly older in other places" sentiment on the inside. I created a YouTube with step by step instructions on how to make this card: https://youtu.be/gCv7VjrC0Cs   The Blooming Heart stamp is from Technique Junkies. It can be found here https://techniquejunkies.com/blooming-heart/

Here's a look at all the new stamps in this release techniquejunkies.com/february-2022-new-stamp-release/ 


 This release is so much fun. If you're like me and you have to have all the stamps in this collection, there is a "Gotta Have It All" bundle: 

 
Save 10% on all non-sale items if you use my code: TJ10Tracy (excludes sale items and bundles). 
Thank you for visiting today. 


Tuesday, September 28, 2021

Card Inspiration | Encouragement Card Ideas


Looking for encouragement card ideas? Today I am sharing with you two card variations using the “Rain Sentiments Set of 6” stamp set and the new “Rain Stencil” both from Technique Junkies. 

Both the stencil and the sentiments set are part of the September 2021 New Release, which features lots of seasonal items, including autumn and Halloween-themed stamps. But, for as much rain as we have been getting lately, I was inspired to play with the rain-themed stamps and stencil first.


I started with some watercolor cardstock and the rain stencil. I used a bit of Liquitex modeling paste (a really nice texture paste) with a palette knife and created a basic stenciled image.


The texture paste is porous, so I knew that I was really just creating an “embossed” looking background for my card. In other words, if I added sprays or other color, it would color the paper AND the stenciled image as well. Once the paste was dry, I sprayed ONE SPRITZ of Shimmering Bliss (Dolphin Cove) aimed from one corner of the card panel. 


On my craft mat, I mixed some Aladine Izink Ice with some glitter and used a palette knife to push it through the stencil. Once it was dry, I used a circle punch to punch out “raindrop” circles for my card. I used a scrap from an inked background to stamp my sentiment and emboss in white embossing powder. With a black Micron pen, I doodle-outlined the umbrella and my punched circles. As a finishing touch, I drew little circles here and there on the card to complete the “doodling” look. 


For the second card, I really just played around with some of my Shimmering Bliss Sprays… a few colors here and there… red, yellow, brown, just created a nice inky background. When it was dry, I used some Pixie Spray to hold down the rain stencil and then I pushed some brown Izink Ice Glaze through the umbrella. 


I had some leftover glitter glaze from my previous card, so I used that for the raindrops. I added a few pieces of random washi tape, and stamped and die cut the sentiment. Finally, I had some leftover raindrop-punched circles, so I adhered them every here and there and then I inked the edges of the card.


I like the combination of glittery rain against the neutral tones of the rest of the card because it provides a nice contrast.


You can check out a bonus card using the "Rain Stencil" and the Aladine Izink Ice mixed with glitter - watch my latest process video HERE!


Hope these projects inspire you to get creating! Thank you for looking!


Tuesday, September 14, 2021

Ideas for Background Stamps | Easy Window Card


Give your projects a little variety when it comes to using your background stamps! One way to create variety is to simply add a window. You don’t need special fancy acetate sheets (if you don’t have them); simply use a deli container or any clear flat packaging. Using Archival Ink, stamp your background on a pre-cut white card panel. Today, I am using the “Pile of Leaves” background stamp from Technique Junkies.


The "Pile of Leaves" stamp is part of the September 2021 NEW Release! You can save 10% every day at Technique Junkies with my personal coupon code to YOU: Use TJ10ERIN at checkout!


Use washi tape to temporarily adhere the stamped panel onto the front of your actual card base. Open up the card base and die cut a circle or other shape out of the front of the card. Then, remove the white stamped panel and glue the acetate (or clear plastic) to the back. It won’t matter that you can see the glue; it will be hidden when you adhere it to the card.


You can add any sentiment inside the card you want. I added a simple “Thank You” stamped image and embossed in white. To get my placement just right, I used my stamping platform and I also used the packaging from the stamp to help line up the sentiment on the platform. I wanted to make sure you could see the entire sentiment through the window, even when the card was closed.


I wanted to add one single colored leaf over top of the outline-stamped pile of leaves. So, I used some Shimmering Bliss Spray on some scrap cardstock and after the spray was dry, I stamped the background stamp on top. Then, I fussy-cut out one single leaf from the spray-inked paper.


The leaf was going to hang over the window a little bit, which was a nice touch. But when a leaf accent hangs over the window in the front, that means that you will also see the back side of the leaf accent through the window when the card is open. So I stamped again on a second piece of inky paper and glued it to the inside of the card, against the leaf showing through. 


For a finishing touch, I added some metal corner embellishments. And that’s it!


Thank you for looking! 


Sunday, April 11, 2021

Where Flowers Bloom


Good morning, Junkies!  It's Holly posting today, and I'm here to share this shimmery ombre card I created for Technique Junkies.  This beautiful new stamp is called Where Flowers Bloom, and I embossed it with white powder onto some white cardstock.  I sprayed the top area with Festive Flamingo Shimmering Bliss and the bottom with Just Squeezed Shimmering Bliss.  This created a beautiful ombre effect with a gorgeous shimmer which you can see in the picture below.  


I used the Festive Flamingo Shimmering Bliss to spray some seam binding as well.  I covered the ribbon with the spray and then scrunched it up with my fingers before letting it dry.  I love that distressed look of the ribbon with the shimmer everywhere. 

Please use this code, TJ10Holly, when you shop at Technique Junkies to get 10% off your order.  There are hundreds of stamps to choose from as well as the Shimmering Bliss sprays and foils and A Colorful Life Designs stencils.  


Saturday, April 10, 2021

Garden Tools

 Hi there!

It's my day to post on the Technique Junkies Design blog.  I have two cards to share today, just in time for the planting season! Things are beginning to pop out of the ground and bloom, here in Southeast Missouri. What fun this stamp was to create with!   

For the first card, the background was spritzed with Chestnut Mare Shimmering Bliss, over top of 'Brick Wall', A Colorful Life Stencil'. I adhered the brick panel to a card base, and set it aside to dry. Next, S902 'Garden Tools' was stamped onto white cardstock, colored with Copics, distressed with Ink Blending Brushes and a variety of Distress Oxide Inks, and a circle was cut out of the panel. One of the garden tools, and the hose were also fussy cut from what was left over after the circle was die cut. The sentiment was stamped onto a piece of cardstock, the same as the base color, and was spritzed with Chestnut Mare Shimmering Bliss. The circle, tools, and sentiment were then adhered to the card base. This will be fun to send to a gardener that we know!


Next up is another card made with S902 'Garden Tools'. The image was stamped, colored with Copics, and the background was added with A Colorful Life Designs Stencil 'Grunge Dots'. The panel was then distressed with Distress Oxide Ink and Ink Blending Brushes. 


The sentiment on the inside is from SS134 'In the Garden'.  
Here is the inside of the second card:


I am SO enjoying this April release, and hoping that you like it, too!

Don't forget that you can ALWAYS save 10% on any order by entering TJ10Patti at checkout!


Now, be sure to head over to the Technique Junkies store and check out the incredible March release!

Thanks for stopping by,
Patti J.

Thursday, March 18, 2021

Lots of Dotted Blooms

  Hi there!

It's my day to post on the Technique Junkies Design blog, and I'd like to share four cards that I created, with some new release products!

The S897 Dotted Blooms background stamp was featured on all four of these cards. Hopefully, you will enjoy seeing how different each one looks, just by changing up colors and techniques a bit. I love this stamp - it makes me think of my teen years! Yes, I was definitely a bell bottom wearing hippie!

This card features:
S897 Dotted Blooms 


What better way to start out, than by using a classic black and white theme? The white heat embossed image is so vibrant on the black background!

The next card features: 


I got a little silly with this one. I scrunched up a piece of saran wrap, and just pounced it on several different colors of ink. Then, the focal panel was stamped with black Versamark ink. I trimmed the panel, adhered it to a card base, and did some scrunching on the sentiment panel. I stamped it in blue (in real life, the blue ink matches the blue scrunching - on the big screen, not so much). The sentiment was popped up with some foam squares, a piece of tulle was glued behind it, and ta-done!


The next two cards feature:


So, for the above card, I used some Shimmering Bliss sprays on my Gelli Plate. I've never tried to do this, so maybe I made up a new technique, who knows? I generously sprayed the three colors of Bliss (the only 3 that I own so far) directly onto the Gelli plate. Next, I did the unthinkable. I just laid the stamp directly onto the spritzed gelli plate, left it a few seconds, then pulled it up, and laid down a sheet of cardstock. Does it look like the Dotted Blooms stamp? Nope. Do I like the outcome? Heck, yeah!!!

This next photo hopefully shows a bit of the sparkle and shimmer of the Shimmering Bliss. The sentiment was stamped with Versafine Black ink, and a strip of Washi Tape was added prior to finishing the card.


For this last card, I sprayed some of the blue and pink Shimmering Bliss onto the Gelli plate, deliberately leaving a couple sections a bit lighter, by spraying less of the Bliss there. I quickly pressed down my cardstock, and rubbed for a bit, to make sure I had good coverage. Next, I stamped the Dotted Blooms with some awesome pink ink, and finished up the sentiment in Versamark black..


Again, I'm hoping this photo shows a bit more of the shimmer of the Bliss, and beautiful stamp details.


Happy to see you here today!

Don't forget!!! You can always save 10% on any order by entering TJ10Patti at checkout.

Now, be sure to head over to the Technique Junkies store and check out the incredible new stamps 
this month!


Thanks for stopping by,
Patti J.