Saturday, April 28, 2018

Poppy Bouquet with an Emboss Resist Background


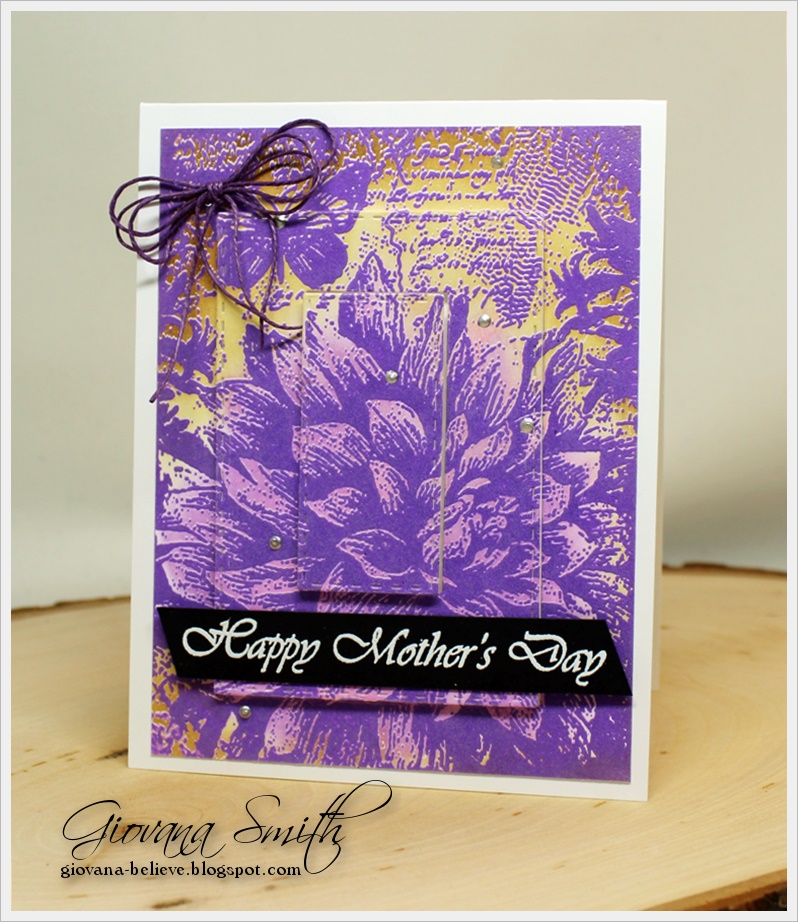
I love the time of year when flowers bloom and show all their unique and beautiful color. Janelle Stollfus here today to share a watercolored emboss resist using Color Burst and A Colorful Life stencil from Technique Junkies!

While shopping today
why not get 10% off
regular items!
Use TJ10Janelle
during checkout.


This close up of the technique highlights masking the main image, today it's Poppy Bouquet, and ink directly over a stencil onto the watercolor paper.

Here is the list of supplies for the project:

  1. Set up a palette that has wells with Colorburst colors that are diluted with water. Violet, Lemon Yellow, Orange, Phthalo Green and Terre Vert were used.
  2. Stamp Poppy Bouquet with waterproof ink onto watercolor paper. Set aside.
  3. Stamp Poppy Bouquet onto sticky notes, as many to cover image, and trim out.
  4. Place sticky notes on the colored image and tape Dream Words Stencil over the masked image.
  5. Firmly press watermark or embossing ink pad directly on the stencil then pull stencil and mask away from paper.
  6. Heat emboss with white embossing powder. Tip: Use a dry watercolor brush to whisk away any powder that may have clung to the image.
  7. With a ruler and pencil draw a faint line on the upper and lower half of the paper parallel to the first embossed stencil to help align the stencil for two more embosses.
  8. The line spacing on Dream Words is enough to stencil in the space between each line. Position so it fits between the first embossed stencil. 
  9. Repeat taping the stencil, inking and embossing the bottom as well as the top half of the paper.
  10. Now it's time to paint over the embossed stencil. The example used Ultramarine Blue and Violet.
Remember the 10% off code during checkout!
TJ10Janelle


So glad you stopped by! Happy crafting with your Technique Junkies goodies this weekend!

Friday, April 27, 2018

TJ Inkspirations: Ombre Resist with Galaxy Color Bursts

There is something quite special about Ken Oliver's Color Bursts.  I think it is the ability to add such intense color to any project, using many different techniques to do it.

Today I bring you a quick video using the new Galaxy Color Burst set - which in itself is unique. The Galaxy set contains 5 bottles of Color Burst colors (all "space" themed), PLUS a bottle of liquid platinum metal. I show you how to incorporate that metal into the project for a colorful shimmery look.

One more thing - there is now a link to ALL the videos I have created at the top of my website, listed under "Video Tutorials." If you are on a mobile device, you may need to scroll down to "more information" to see the link.  I thought I might just make it easier to get inspired!


Ken Oliver Color Burst_ Galaxy Set


Ombre Resist with Galaxy Color Bursts

Here is the artwork from the video:
Ombre Resist with Color Bursts


and the video:

Are you ready?

We have TWO stamp releases in May - one on Tuesday with our brand new stamps for May, and one May 15th introducing fun new stamps with an exclusive line of stamps from the fabulous Rita Barakat!

I hope you are a little inkspired by today's issue. See you next week!
 
Sincerely,
 

Pat Huntoon
Technique Junkies LLC 

Thursday, April 26, 2018

Happy Mother's Day!


Hello friends! Giovana here today with another Mother's  Day card idea. 
This time I used "Peony Collage" and the sentiment is from "You are the World"

This project was very easy to put together, here are the details:
Stamp the Peony Collage image on a piece of white cardstock in Wilted Violet Distress Oxide.
Apply Clear embossing powder and heat set.
Sponge image using Worn Lipstick Distress Oxide and Vintage Photo Distress Ink.
Trim image to 3.75" x 5", then die-cut the image a couple of times using rectangle dies.
Adhere outside layer direct to cardstock, second (middle one) with 1 layer of foam adhesive and last center with double lined foam adhesive.
Stamp sentiment on a piece of black cardstock in Versamark Watermark, then add white embossing powder and heat set, trim and add to card.
Embellish card with purple twine and liquid pearl dots.


Remember you can get these stamps with a 10% discount using my code TJ10Giovana

Hope you like this card and give it a try.
Have a fantastic day!

Tuesday, April 24, 2018

Sweet and Fragrant

Hi fellow stampers.  Beth Norman here with a stencil card.  Did you know we carry a large line of A Colorful Life Stencils?  Not only can you get 10% off when you purchase stamps,  but you can use my code TJ10Beth for stencils or any other product, including Ken Oliver's Color Burst powders that I used on my card.


Steps to making this card:


1.  Cut cardstock to 5" x 5"
2.  Lay your stencil down on top of your paper (Scribble Rose is not yet available but there are plenty of other stencils that will give the same effect so feel free to browse A Colourful Life Stencils.)
3.  Tap asssorted colours of Color Burst Powders lightly over your paper.
4.  Spritz with water and see the magic happen.
5.  Add a sentiment.  Here I used a sentiment from Sentimental Sayings.
6.  Leave stencil on your cardstock until almost dry.


Monday, April 23, 2018

Just Wing It!

This was a fun card to make.  I used this lacy stencil from A Colorful Life Stencils - 
http://techniquejunkies.com/a-colorful-life-stencils/ . I used layers of color with Nuvo Mousse - 
http://techniquejunkies.com/products-and-accessories/nuvo-mousse/ . I used several shades of blues and purples. The Technique Junkies Stamps is called Just Wing It - 
http://techniquejunkies.com/just-wing-it/ .  The skin, eye brows, and eyelashes are colored with Copic markers.  Then I used the same lovely shimmery NuvoMousse colors to add eye shadow -- so fun!

I have this lovely fringe yarn in my collections and thought the shades were just perfect for this feminine and frilly card.  

I had fun creating this card and hope you like it!

Please remember to use TJ10Judy to get a 10% discount on all stamps and products not already on sale on the Technique Junkies website - http://techniquejunkies.com/ .

Have a terrific day -- and get inky!!

Judy Jackson

Sunday, April 22, 2018

Simple Elegance

Hello Technique Junkie fans!

Today's card is full of elegance but super easy!  I used the Black and White Swirls Stamp and my MISTI for this wedding card.  You can purchase this stamp and get 10% off of your entire cart with code TJ10LeeAnn.


Using the MISTI, I stamped  the image on an angle in the upper left corner of my cardstock; the MISTI allowed me to stamp the image multiple times to get a solid, inked image.
Once I was happy with the black image, I moved the paper slightly to the left.  And when I say slightly I mean like 1/16 of an inch or so.
After cleaning the stamp, I inked it up with a light grey ink and stamped a drop shadow on the image.


I used an edge die on the lower portion of the panel and then inked up the Love Complete sentiment and added that.  I love the font for the word 'Love!
The panel is popped up on dimensional adhesive.  I kept the embellishments simple with 3 gold pearls.

That's all for me!  Thanks for stopping by and have a blessed week!


Lee Ann
greytpapercrafts.blogspot.com

Saturday, April 21, 2018

Stencil Rings


Hello Technique Junkies!
 It's Ceal here to share with you today, a card using one of our April Releases, Stencil Rings.
You can receive 10% off your entire order  (excluding new releases) by using 
my discount code 
TJ10Ceal

 I love this background stamp it is so versatile. You can ink it up in different colors and make it colorful as I did or you can ink it up all in one color, either way it makes a fun background.


To create my card I started with a white top folding card base and a panel of Bermuda Bay cardstock and a panel of watercolor cardstock cut down with a stitched die. I used the Original MISTI to ink up my stamp so that I could over stamp it in different colors and it still stamp in the same exact spot. 
The inks I used are Wilted Violet and Peacock Feathers distress oxides and I just inked portions of the stamp with each, spritzed it a little with water and then stamped it. So fun


Remember to use my code for 10% off everything but new releases 


Friday, April 20, 2018

TJ Inkspirations: Watercoloring with Glitter Gloss

I have something to admit.  I have been holding out on you.

About a month ago, I got the new Nuvo Glitter Gloss Aqua Pens into my office, and I have been taking them to tradeshows with me. They have been FLYING off the shelves, just by having people swipe them across a black piece of paper or a colored image.

So WHY haven't I showed you them before today? Well lasst week was the first time I was able to play with them and to make sure they were "all that and a bag of chips."  I have to LOVE what I sell - otherwise, what is the point?

Well, I am love struck once again. These Glitter Gloss Aqua Pens add a fine shine of glossy glitter to EVERYTHING you put them over. They dry glossy, and the glitter stays put. I have been glossing EVERYTHING.  The biggest difference between these Glitter Pens and others I have used is simple: These Aqua pens add an EVEN sheen, without any puddling. They have just the right amount of glitter-liquid ratio.

 Today's tutorial uses the Glitter Gloss pens to create a water colored look --- both with Distress Markers and with Nuvo Glitter Markers..

The glitter gloss markers are available in packs of two for $8.95, and I also made a bundle out of ALL the Glitter markers too. You can find that bundle here.  There are 17 markers in the bundle for $47.95 - less than $2.85 per marker.

Glitter Marker Bundle


Nuvo Glitter Gloss Aqua Pens


Watercoloring with Glitter Gloss

Here is the artwork from the video:
Palettini Vintage Floral


and the video:

Watercoloring with Glitter Gloss
I hope you are a little inkspired by today's issue. See you next week!
Sincerely,

Pat Huntoon
Technique Junkies LLC 

Thursday, April 19, 2018

Birthday Birds Bearing Bright Bouncy Balloons

Greetings!  And welcome.  Can you say 'birthday birds bearing bright bouncy balloons' quickly three times?  If so, good for you!  I was feeling a little silly when I made this card.  These birds just make me want to giggle.
 STAMPS:  Party Chicks - Set of 12  
               Donuts Happy Birthday 

I stamped four of the smaller birds in the set onto some white card stock and watercolored them with Tim Holtz distress inks.  I added them onto a layered card with foam tape, then added some die-cut balloons (a balloon die from my stash), added some white pigment ink for highlight, and drew strings with a black micron pen.
For the Happy Birthday verse, I stamped the Donuts Happy Birthday onto a scrap piece, and copied it to 40% on my printer.  I cut them out, ran yellow and red stamp pads over them, and foam taped them to the card. 

 Want to save 10%?  
Use code TJ10Lynda at Technique Junkies!

Come on over to our Technique Junkies Facebook Group and join in the fun!  We would love to see what you are doing with TJ stamps.  Don't be shy....share!   
 Blessings,
 

Wednesday, April 18, 2018

SPRING IN A JAR

April 18th and it's still snowing in Michigan. Hope it's warmer in your neck of the woods! Since it's still so cold and dreary, I needed to make a springy card and used two of my favorite stamps to do it:  Incrediball Canning Jar and Love and Laughter Floral. I tweaked it up just a little by doing a little masking.


First step was to make the card base. I took white cardstock and stamped the jar using grey ink. I placed a sticky note across the top of the jar and stamped the floral image in green. Using colored pencils I colored in both images and extended the stems to the bottom of the jar. The sentiment was stamped and the panel trimmed and attached to the card base.

For the flowers, I simply placed dots of Nuvo glue where there were buds on the stamped image and added Flower Soft petals. I love the dimension!


Here are the stamps set used:


Note: The flower is attached to the sentiment. I cut mine apart for more versatility. You could also use a masking technique if you don't like doing surgery on your stamps!

Did you know you can save 10% on these and most all of the stamps and products available at Technique Junkies? Simply use the code below at checkout.

If you are still experiencing the winter doldrums where you are, what better way to bring a little Spring into your world than with some fresh new stamps! If you are already getting to enjoy Spring, make it better with stamping treat for yourself!

Til next time,
Keepin' it inky!


Tuesday, April 17, 2018

BEGAN TO FLY

Hello Technique Junkies Stamps fans!  

So happy you've joined us today.  

I adore the April 2018 stamp release from Technique Junkies Stamps.    There's something for everyone in there.  Did you get a chance to shop for your favorites?  If you would like to shop more and would like a discount on them, please go ahead and use TJ10Cheri.  You'll get 10% off your entire order.  


One of the sentiments that I loved from this release is "Began to Fly", so I created this very simple card using that sentiment, and "Butterfly 2".  I colored the butterfly with Copic markers and lightly sponged some Antique Linen diress ink around the image.  I then stamped a white panel with the background stamp "Herringbone Tweed" in a light grey in randomly and in second and third generation stamping.  I cute a negative space in that panel and adhered my image panel behind it.  I then framed the whole piece with a frame die in dark purple.  

There's so much creativity going on using Technique Junkies Stamps as well as our FaceBook Page.  There's also a Technique Junkies YouTube Channel, hosted by our creator, Pat Huntoon where she demonstrates lots of techniques for card makers.  Check them all out. 

We also have a monthly challenge. (This month it's an adorable sketch)  In order to win this challenge you must use Technique Junkies Stamps in your creation.  You say you don't have any TJ stamps?  Well....don't forget...I have that10% discount code  which will let you get 10% off every and/or any stamps you want in the store and it also applies to the Ken Oliver Colorburst pigments.  


Monday, April 16, 2018

Technique Junkies Sketch Challenge Winner!


Thank you to everyone that entered our challenge!
Look for a new challenge later today!!!

The winner of our Technique Junkies Sketch Challenge:


Please contact Jeanne for prize information within 7 days.


Have a great day!

Sunday, April 15, 2018

Gypsy Soul Cat ATC


Hi! Jeanne here today! 

I created the background for my ATC with Color Burst (see colors below). When my background was 
dry I stamped Vogue Kitty using my MISTI in black ink  ink and colored with Studio 71 markers
The sentiment is from Soul of a Gypsy.

Would you like a discount? Use code TJ10Jeanne at Technique Junkies!


Use this code for a 10% discount!

Have a great day! Jeanne

Saturday, April 14, 2018

Butterfly Woman for Mother's Day


Happy Saturday Technique Junkies fans! Janelle Stollfus here with the new Butterfly Woman stamp and sentiments from the April release!

Shopping at Technique Junkies today? 
Use code TJ10Janelle for a
10% discount on regular items!


Besides the remarkable Butterfly Woman stamp, I've added sentiments to make them excellent Mother's Day cards. Here's how I made them.

Happy Mother's Day Spattered Ombre Background Card (first card in my post)
  1. Stamp Butterfly Woman with black ink onto Spattered Ombre paper (mine was leftover from another project, but it's so easy to make if you don't have some prepared.)
  2. Stamp sentiment with black ink from All The Moms below the image.
  3. Trim to 3-1/4 by 4-1/2 inches.
  4. Frame with a complementary color cardstock, mine is 1/16 inch (about .1 cm) bigger on all sides.
  5. Adhere to folded 4-1/4 by 5-1/2 inch card base.
Colored Butterfly Woman on Sponged Background
  • Butterfly Woman
  • Began to Fly
  • White and colored cardstock
  • Black waterproof Ink Pad
  • Distress Oxide Ink Pad (Carved Pumpkin used)
  • Pan Pastels or Chalks
  • Alcohol Markers or Colored Pencils
  • Adhesive
  • Sponge or Dauber
  1. Stamp Butterfly Woman and Began to Fly with black ink onto white cardstock.
  2. Color Butterfly Woman with markers or colored pencils in a 3-4 color theme. Blue, orange, yellow and brown were used.
  3. Trim to 3 x 5 inches and color around the woman with blue pastel or chalk on sponge or dauber.
  4. On a 4 by 5-1/4 inch white cardstock sponge Distress Ink starting from the bottom or top edge until the ink is very light almost to the middle. Sponge from the edge stopping farther away from the center until the desired look. Repeat on opposite edge.
  5. Adhere sponged background then colored image onto folded 4-1/4 by 5-1/2 inch card base.


Thanks so much for stopping by today!
Headed to Technique Junkies to shop?
Use code TJ10Janelle 
for 10% discount!

I hope you're inspired to dig into your Technique Junkies stamps and supplies for some craft time real soon! 

Friday, April 13, 2018

TJ Inkspirations: Glitter swipe resist

Today I have a very easy tutorial for you using Nuvo Glitter Markers. This is an easy resist technique with an shimmering end result.

It just so happens that I JUST received my shipment of the brand new Nuvo Glitter Markers. With this addition of 6 gorgeous markers, it brings the total number available to 15; a great number of markers for coloring a ton of images.

I have a quick chart below of all of the colors. I also put the 6 new markers into a bundle at 10% off, so if you already have the other three sets of markers, this is a good way to add the other 6. I love these new colors!

Nuvo Glitter Markers Color Chart


Glitter Stripes with Glitter Markers

Here is the artwork from the video:
Love Script and Fluff your tute
Vintage Flourishes and Fairy Tale Flowers


and the video:
Glitter Swipes with Nuvo Glitter Markers

I hope you are a little inkspired by today's issue. See you next week!
Sincerely,

Pat Huntoon
Technique Junkies LLC