Saturday, June 30, 2018

Flamingo Love


Hello Everyone! 
It's Ceal here to share a clean and simple card with you using a couple of stamps from our June release.  I don't know about yours but June was was a crazy busy month for me so CAS is the way to go to make a quick and easy card.

Remember you can save 10% on your entire order everyday excluding new releases and clearance by using my code TJ10Ceal


To create the card, I started with a Flirty Flamingo card base and a white panel cut down with a stitched die. I stamped the Flamingo Background in Flirty Flamingo ink and then stamped the greeting on a panel also cut down with a stitched die for the focal point. 


Friday, June 29, 2018

TJ Inkspirations: Glittering Sunflower Card with Customer Envelope

Sunflowers are such happy flowers. Who can look at them and feel anything but the warmth of the sun? Add glitter to the card, and it is just something that makes everyone smile.

This card is one that we are rolling out into our "Friday Night Make and Takes" at several of the shows we are attending this summer. Although it is not a complicated card, it is pretty, and I have a couple of tips in the video you may have not seen, including making a custom-size envelope. And the Nuvo Glitter Markers

always add that special touch to any project.
Here is the S805 Sunflower Stamp we are using:
S805 Sunflower Duo

And this is the SD896 Sunflower Sentiment we use inside the card:
SD896 Sunflower Sentiments

Glittering Sunflower Card with Custom Envelope
Sunflower set

Here is the artwork from the tutorial: 

Enjoy today's video!

Thursday, June 28, 2018

Learning To Sail My Ship

I don't know about you, but I do not have many masculine stamps in my stash.  I lean toward flowers.  But, when I saw the ships and maps stamps in the new June stamps, I decided they would make the perfect addition to my collection.  If you haven't seen the June release, check out the hop HERE.
This stamp, LEARNING TO SAIL, is the perfect size for layering.  I layered it up, and attached it to a blue A2 card.  
On the card front, I created the background using one of my favorite background stamps, the Technique Junkies 
STENCIL RINGS.

You can add these stamps to your stash at a 10% discount by using my code, TJ10Lynda at the checkout at the Technique Junkies store. 


I hope you are enjoying your summer.  Be sure to visit in a couple of days, July 1st, when the new July release will be revealed with the July New Release Blog Hop!  

See you there!
 

Wednesday, June 27, 2018

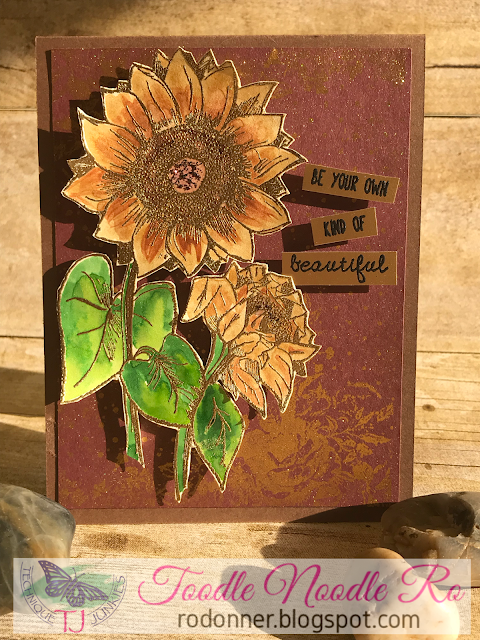
Sunny Sunflowers

Hey, Junkies! It's Ro again and I've been playing with some awesome stamps! And today, it's all about shine!

I used one of the new releases this month, Sunflower Duo (S805). I absolutely adore this stamp and it's versatility. I also used Floral Dot (S803) and Typewriter Set (SS064). They all played so nicely together!


This card started with a simple A2 card base in a brown cardstock.  For the first layer, I selected a raisiny colored cardstock and, using some Versamark, stamped the Floral Dot background. I selected a pot of Perfect Pearls (Gold) and brushed it all over the stamped image. I trimmed it down slightly and attached it to the card base.

For the next step, I stamped Sunflower Duo on some white cardstock, again using Versamark, but this time I embossed it with some gold embossing powder. Using some Luminarte Mica Pigment Paint (I've had these for ages and still love them!), I added some color to the stamped image. I then fussy-cut the image and mounted it to the card using foam tape. The sentiment from the Typewriter Set was stamped on gold cardstock using Versamark and black embossing powder. The image was trimmed down into three blocks and attached to the card with foam tape.  A little bit of Stickles in the center of the flowers for a little extra twinkle, and the card is complete.

Just look how shiny this card is (IRL it is glimmering!). I'm loving it!


Looking to treat yourself (or a friend) to some great new stamps? Just add the code below at checkout and save 10% off your purchase! Go ahead. You know you want to. lol
Hope you enjoyed my project today and are inspired to try adding a little shine to your next card. 

Til next time,
Keepin' It Inky!


Tuesday, June 26, 2018

WHEN YOU GO THROUGH DEEP WATERS

Hello Technique Junkies Stamps fans!  

I am in love with the stamps I'm using for my card project today, "Swirl Turtle" and "Psalms of the Sea-Set of 6".  I think they pair beautifully together.  I also used "Paint Rings" from the November 2017 Release in the background.

If you'd like to own these stamps and would like a discount - I can help you out.  Just put them in your shopping cart (and any other TJStamps you might want) and put this discount code TJ10Cheri in the "coupon code" area when you checkout and enjoy the savings.


To create this card, I cut a panel of 140# watercolor paper and with the stamp in my MISTI, I first stamped the turtle in Distress Oxide Inks, (Broken China, Peeled Paint and Faded Jeans) in areas around the stamp, keeping the blues toward the outside edges and the green toward the inside areas.  I did this several times until I was happy with the layers of inks.  I left the turtle stamp in the MISTI.

I then took my aqua brush and with clear water, used the inks to watercolor the areas inside the inked lines.  I blended and often blotted the ink to get highlights and depth.  Once I was happy with the blended colors, I heat set the inks.  

I then created a mask for the turtle and using the "Paint Rings" stamp, I lightly stamped the background, using the same colors and blending technique with a wash.  Again, I heat set the background. 

Before die cutting the panel, I placed it back into the MISTI and inked the turtle once again but with Distress Oxide Ink "Fossilized Amber" right over the previous stamping.  I did this several times, until I got this amazing texture on the shell...I don't know if it shows up well from the photo, but in real life it's gorgeous.  

For a final touch of texture and detail, I added Glossy Accents to the bubbles around the turtle.  This was such a fun card to create.  

Thanks so much for stopping by and I hope you found some inspiration here today and will experiment with your inks and stamps as watercolors.  

Be sure to check out the new monthly challenge - you could win some fabulous stamps from Technique Junkies Stamps store.  You do need to use TJS in order to get in the drawing, and if you don't own any, then don't forget to use my coupon to get what you would like at a 10% discount and then go ahead and join the challenge and a chance to win.  

Also, join our FaceBook Page and post your creations using TJS - and please visit our YouTube Channel for some great techniques.


Saturday, June 23, 2018

With That Smile, Choose Joy!


Hi crafty junkies, it's Janelle here for a Saturday project idea!

There is a 10% discount waiting for you!
Shop at Technique Junkies and use
code TJ10Janelle at checkout.
That's it!

Okay, this new June stamp, That Smile, is pure fun! I wasn't sure how I wanted to color it at first, but with a loose line image like this photo style stamp, watercolor is a good match. If you don't want to color, it's just as cool on color cardstock!

My background needed to complement the image, so I grabbed a monoprinting plate (there are a few brands out there now like Gel Press, Gelli Arts, and Speedball), Stencil Rings stamp, plus some acrylic paint. More information will be below.

The last part was matching the image with a sentiment and with so many options at Technique Junkies it was hard to decide, but then I found a great one with Things I Want to Do stamp set.


Supplies:
  • That Smile
  • Stencil Rings
  • Things I Want to Do
  • Nuvo Glitter Marker - Blushing Carmine in Ember Glow Set
  • Gel Printing Plate
  • White and black cardstock
  • Waterproof Black Ink Pad
  • Acrylic Paint - Purple Red, Transparent Red Medium, and Naphthol Crimson
  • Brayer/Rubber Roller
  • Watercolor Paints
  • Paintbrushes
  • Glue
Instructions:
  1. Apply a few drops of acrylic paint onto gel plate and roll out with a brayer.
  2. Press white cardstock onto the plate and peel off.
  3. Apply another color of paint onto gel plate, this time stamping off with Stencil Rings, then quickly press the same white paper onto the plate and peel off.
  4. Add more detail by sponging a third paint color on Stencil Rings stamp and stamp directly onto monoprint paper. Set aside to dry.
  5. Stamp That Smile with waterproof ink onto white cardstock and paint with watercolor.
  6. Stamp sentiment next to the image and assemble with a black cardstock layer onto a folded 4-1/4 by 5-1/2 inch card base.
  7. Use Blushing Carmine Glitter Marker to draw a frame on the monoprint layer.
That's it from me for today! Go forth and have a crafty me-time!

Remember to add a 10% discount to your order! Use code TJ10Janelle at checkout


Thank you for stopping by! 
Find more Technique Junkies project by me on my blog at 

Friday, June 22, 2018

TJ Inkspirations: The Midas Touch

In January I attended Creativation, the Hobby and Craft tradeshow for retailers (You might know of it as CHA). One of the things I was most excited about was this gorgeous pen called the Midas Touch. They FINALLY arrived! I put together a quick video for you so you can see them in use. I hope you like them as much as I do!

I used the S701 Itoh Peony Stamp for this technique:


S701 Itoh Peonies
Midas Touch Aqua Shimmer Marker

Here is the artwork from the tutorial: 
 

And another view, where the gold is not as evident:
 
Enjoy today's video!
The Midas Touch
The Midas Touch
    
I hope you are a little inkspired by today's issue. See you next week!
 
Sincerely,
 

Pat Huntoon
Technique Junkies LLC 

Thursday, June 21, 2018

Flamingo Happy Birthday


Hello friends! Giovana here today bringing a super cute and tropical card!
For this card I used the new "Flamingo Background" also "Donuts Happy Birthday" and "Rainforest" background.

Details:
  •  Start stamping the Rainforest background in green ink, add bits of dark green to the image to some of the leaves. Die-cut panel.
  • Stamp Flamingo Background in Pink Ink, then add dark pink to the wings. Stamp the flamingos again in Versamark Watermark, add clear embossing powder and heat set.
  • Sponge the background with Mustard Seed Distress Ink, then splash little bits of water. Die-cut panel
  • Stamp Happy Birthday sentiment on a piece of clear vellum in Jet Black Stazon Ink. Die-cut piece.
  • Add all panels to a white card base.

If you would like to get these stamps with a 10% discount, you can use my code TJ10Giovana

Hope you like it.
Have a fantastic day!


Wednesday, June 20, 2018

Distressed Glue Backgrounds

The current Technique Junkies Technique Challenge is Distressed Glue.   I had never tried it, so I dove right in.

Remember, if you go shopping at Technique Junkies, use my discount code TJ10Stephanie at checkout for 10% off your purchase.

I cut a piece of white cardstock into fourths and created four different backgrounds (if you're gonna get messy, you might as well do several).


I used two different combinations of blue & green ink with a plan to go in with yellow for my third color after the glue.  I was pretty messy with my ink blending, since I knew it likely wouldn't affect my finished design.


After the ink dried, I sprinkled some water on a few of the cards and then I applied good old Elmer's Glue All in diagonal smears across my inked backgrounds.

This is what my backgrounds looked like after they dried and I applied Scattered Straw Distress Ink over the top.


You can see the nice contrast in the areas that weren't covered with glue.


I used the City Watercolors Background in Black Stazon Ink with my first background ... I love the streaks in the sky.


The sentiment is from Typewriter Set.  I punched it with a circle punch to look like a rising sun (or setting sun depending on your perspective).


I used the same City Watercolors Background on the brighter green/blue background ... this time with the Soul to Dance sentiment.


For my final card, I used the Floral Dot Background and a sentiment from With Sympathy.  This background technique is perfect for this beautiful grungy background.

I hope you'll find your bottle of glue and have some fun with us at Technique Junkies (remember ... you could win a $25 gift certificate if you use your Technique Junkie Stamps).


Stephanie Severin


Monday, June 18, 2018

Secrets in the Sand!

All of these lovely stamps are from the Technique Junkies stamps set Mermaids Kisses - www.techniquejunkies.com/mermaid-kisses-set-of-5/.  I used Twinkling H2O's to watercolor the images with a beautiful simmer!The background was stamped with an acrylic block pressed with ink pads and spritzed with a  bit of water.  I drew in some sea weed.  The verse is heat embossed.  

 You can get 10%  off of everything else that is not on sale by using the code TJ10Judy.

Have  a wonderful day, and get inky!!

Judy Jackson

Sunday, June 17, 2018

Sunflower Sentiments

Hello Technique Junkie Friends!

Today I am not sharing a Father's Day card!  When I prepared for this post, I totally forgot about it being Dad's Day.  So, today you get a Get Well card made with one of the June Release stamps, the Sunflower Duo stamp.  Looking to shop? You can get 10% off your order with code TJ10LeeAnn .


This beauty was perfect for a technique I had been wanting to try- Copic coloring over distress ink.  I started by smooshing distress inks on my craft mat, spritzing them with water and then pressing my watercolor paper into the inks.  I dried the ink after each layer applied.  Once I had achieved the desired effect, I stamped the Sunflower Duo on top of the dried distress ink with Memento Black Ink.  Using Copics, I then added color/shading on top of the distress ink.
Once I was done coloring, I did a version of the clipped corner technique, only this time instead of a corner, the right side was clipped.  The image was then matted and adhered to the card base.
My sentiment is from the Grand Greeting Sentiment Set.  It was heat embossed in white on vellum.
Lastly, I added a small scallop strip and some sequins for interest and sparkle.

Thanks for stopping by!  Hope you all enjoy the day and get to squeeze some crafty time in!


Lee Ann
greytpapercrafts.blogspot.com

Saturday, June 16, 2018

Map Collage


Hello Technique Junkies!
It's Ceal here to share another sample with you using a June release stamp, Map Collage
Remember you can save 10% off your order excluding new releases and clearance by using my code TJ10Ceal
To create my card I started with a Smoky Slate card base and a watercolor panel. I used the Daniel Smith iridescent collection to color the image. After it was all colored in and dry I used a postage stamp die to cut down the panel. 
Masculine cards can be hard sometimes but this stamp makes it simple especially if someone you love ha a salt life. 


Friday, June 15, 2018

TJ Inkspiration: Distress Oxide Reinker Watercoloring

I am militant about purchasing the matching reinker whenever I buy a new ink pad. When I started collecting Distress Oxides inks, it was natural for me to buy the reinker...and of course, I had to look for new ways to use them, too. Today I am happy to share this technique showing how to water color with the reinkers.

When I first started playing around with the idea, I think I was most impressed with how the reinkers looked when they dried.  It is a very pastelly/chalky look that is very color intense.  Not only that, but the entire process was remarkably easy and forgiving (make a mistake? Just add water or dab it with a paper towel!). I was sold and knew I had to share it with you.

I used the SS075 Watermelon Summer Set for this technique:

SS075 Watermelon Summer_ Set of 3
Distress Oxide Reinker Watercoloring

Here is the artwork from the tutorial:
Watercolored Watermelon Summer

Enjoy today's video!

Distress Oxide Reinker Watercoloring
    
I hope you are a little inkspired by today's issue. See you next week!

Pat