Showing posts with label Ro Donner. Show all posts

Wednesday, January 20, 2021

Pretty Lipstick

Hello, Stamping Peeps! I've been busy busting this blustery weather with some fun me time in my craft room. What better way to get through the winter doldrums! I had so much fun creating the card I have for you today. I used a couple of OBG (oldie but goodie) stamps along with a Colorful Life stencil to put together this card:

No-One Will Notice (SD1003)
Red Lipstick Day (SD687)

I started by creating an A2 card base (a great place to start, right?) and added a metallic blue piece of cardstock. On a piece of white cardstock, using my MISTI, I stamped both the sentiment and the image, then trimmed down the panel. Using some Pixie Spray (where would I be without this stuff!), I placed my stencil over my panel and began inking the areas around the sentiment and image using Tumbled Glass Distress Ink. I was careful to leave my stamped areas un-stenciled. I added some of the Distress Ink to the edges of the panel, then colored in the image. I went over some of the words in the sentiment, along with a couple elements in the image, using my favorite Kaisercraft Gel Pens. I attached the panel to the front of my card and added a couple baubles for interest.

I love how the card turned out and can't wait to send it to one of my friends!

Hope you found a little inspiration today. Don't forget, you can save 10% off your purchases at Technique Junkies by using my special code below:

Happy stamping!

Til next time,
Keepin' it inky!


Wednesday, January 6, 2021

Inside Out: I Love Snow (Not!)

Hi, Stamping Friends! It's Ro here with you today. I have been having a blast playing with the newest Inside Out set, I Love Snow. The sentiments in this set are an absolute hoot! The card I created today has both the outside and the inside on the outside, which leaves a great space inside for a personal note!

INSIDE OUT: I LOVE SNOW (SS130)
Coffee Kitty (SD735)

This card expresses my sentiment EXACTLY! lol

It was a simple card to create. I started with some Kraft cardstock which I made into an A2 card base. I added a couple of sticker snowflakes and rounded the corners. On another piece of Kraft cardstock I used a die to cut out a large oval and added a black shaded border using Black Soot Distress Oxide Ink with an Ink Blending Brush. I popped that panel onto the front of the card using foam adhesive. On some white cardstock, I stamped the Kitty (not one of the new releases), colored in the cup and eyes, and cut it out (I use a Brother Scan-N-Cut because I'm just not a fussy-cutter type person). I placed the cutout on the panel and added some more sticker snowflakes and dots. I also added a heart to the cup. The sentiments were stamped on black cardstock and white embossed. I trimmed them down and cut the edges. I popped those on the card with foam tape and added a couple more stickers.

If you're curious about all the sentiments included in this newest Inside Out set, here they are:

And the best part is, all the new stamps are on sale until the 8th of the month! You get 15% off all new releases. AND...if you add my special discount code below, you get another 10% off the new stuff, and 10% off everything else!


In case you missed the big release on the first and would like to see all the stamps, just click on Technique Junkies January Release. Want them all? We've got a deal for that too! You can save 25% off the regular retail bundle price. Here they are:

If you are ever looking for inspiration for any of the stamps, simply look on that stamp's page and there are samples from the Design Team. 

Well, that's it for me today. Hope you found a little spark of inspiration, and maybe even a giggle.

Til next time,
Keepin' it inky!


Wednesday, December 9, 2020

New Year, New Hope

So it's December and the holidays are just around the corner. Are you ready yet? Got those cards ready to mail? I know I'm still cranking away on mine. But I did a little ahead and do a New Years Card. Pretty simple actually.


I adore this new stencil from TJ. It's called Champagne Flute and it's a 6" x 6" stencil. I used Nuvo Embellishment Mousse (Mother of Pearl) and some ivory cardstock cut and folded to a 5" x 5" card. Once dried, I added some color to the champagne using both a Nuvo Glitter Marker and a Nuvo Midas Touch Aqua Shimmer Pen. I wanted a nice sparkle. 

Using the New Year New Hope (SDX179) stamp, I gold embossed onto another piece of ivory cardstock, trimmed it down, cut a gold mat, and attached it to the card base using foam tape. I added some gold border strips to finish off the card. I think it's very elegant. What do you think?

If you feel inspired to grab some holiday stamps for yourself, simply add my special code below at checkout and you can save 10% off your purchase.

Also, there is a massive inventory reduction sale going on right now. Save 35% off a huge selection of stamps. On top of that, the 10% off code gives you a total of 45% off the stamps on sale! What a deal! Maybe you want to add some to your own stocking and help Santa out! lol

Well, I'm off to make some more cards! Happy stamping! Happy shopping!

Til next time,
Keepin' it inky!


Wednesday, November 25, 2020

Faith and Warm Wishes

Tomorrow is Thanksgiving and Christmas is right around the corner. Are you ready?  I've been keeping busy in my craft room making seasonal cards and I have two to share with you today.

FALL LEAVES (S864)
LOVE, FAITH & PEACE (SS123)

I am so in love with these stamp sets! The Fall Leaves background just seems to sing to me and beg for beautiful colors. And the sentiments in Love, Faith and Peace are so timely and encouraging.

To create this card, I began with a white piece of cardstock and stamped the leaves image using Versamark, then embossed with a gold glitter embossing powder. I used the Ink Blending Brushes to add some beautiful color with Distress Oxide Inks in Wild Honey, Mustard Seed, Mowed Lawn and Fired Brick. Then I added a gorgeous shimmer with some Just Squeezed Shimmering Bliss. After trimming the panel down I added a mustard cardstock mat and attached it to an A2 Kraft cardstock base. Using some rust cardstock, I created a banner and attached that to the card. On the mustard CS I stamped the Faith sentiments and trimmed them to the desired shapes with an oval die (Faith) and scissors. I inked the edges with Distress Oxide Ink and added them to the card along with a couple of enamel dots.

The next card I have to share with you is a Christmas one. 

POINSETTIAS (SS099)

This set is just beautiful for the holidays. It includes a large and small poinsettia and two sentiments. 


I selected the smaller of the images, stamped it using Versafine Clair Ink in Nocturne. I then colored it using colored pencils and cut it out. The sentiment was stamped onto some gold vellum using the same ink. The piece was torn across the top and bottom and adhered on the sides only to an embossed background panel of dark green cardstock. Those were attached to an A2 card base. I cut out a frame from metallic green CS and placed that on top of the layered card. The Poinsettia was attached using foam tape.  

So, there ya have it. I hope I was able to give you a little inspiration and encouragement with my projects today. Don't forget you can save 10% off all products through Technique Junkies by adding my code at checkout:

I am wishing you and your loved ones a safe and loving Thanksgiving Day. Stay healthy, stay positive.

Til next time,
Keepin' it inky!


Wednesday, November 11, 2020

BEAUTIFUL BIRCH

I hope everyone has been enjoying this new release! I've seen so many great card samples my mind is spinning with ideas!  I have another card to share with you using two of the new stamps, easily done with a little masking!


ADVICE FROM THE FOREST
 BIRCH TREE BORDER

To create the card, I started by making a mask of the birch trees. I stamped them in brown ink, using the mask to cover up areas so the trees filled the background. I trimmed that piece and attached it to a brown A2 card base.

I stamped the sentiment on some ivory cardstock and matted with a frayed paper, which I then attached using foam tape to give it some dimension.

I love the sentiment...especially during these crazy times...it's really GOOD advice! In case you didn't catch the deals, you can purchase the entire release which includes all 15 stamps and 2 stencils for only $99.99. That's a savings of $30.79!!! 

For those of you who would love to add only a few stamps to your collection you can save an ADDITIONAL 10% off by using my special code below.


Enjoy your fall weather! It's a perfect time to spend some quality crafting time!

Til next time,
Keepin' it inky!


Wednesday, October 28, 2020

Jingle Bells

Halloween is right around the corner, so that means Christmas isn't too far off, right? Well, I've been busily making Christmas cards and I have one to share with you today. It features two new finds for this month: Joyful Jingle and Jingle Bells Stencil.

I used some Christmas paper I had in my stash to cover the base of the card. I pressed a Versamark pad through the stencil onto a piece of cardstock and embossed it with. a glittery gold embossing powder. I trimmed that piece down, added some ink with a blending brush, and attached a burgundy cardstock mat. I added that to my card base. I then stamped the sentiment on another piece of cardstock, once in black and once with versamark, and embossed with the same powder. I also added ink to that and a burgundy mat. On the back of that I added some foam tape and a cut of twine. That was attached to the card base, along with a couple of gold embellishments to finish off the card.

Now, just in case you were really hoping to see a Halloween card, here is one I made last year using Howl-o-Ween. Still a favorite of mine.

Don't forget you can save 10% off your purchases at Technique Junkies by entering the code below at checkout:

Happy Halloween, Merry Christmas, and all that jazz!

Til next time,
Keepin' it inky!


Wednesday, October 14, 2020

Oh, Christmas Tree!

It's never too soon to start your Christmas cards. And this month's release will surely inspire you! I've been enjoying making some cards with a few of the new ones, plus an OBG (oldie but goodie). Here is my card with all it's layered glory!

I created the background first by stamping Snow Covered Pines with black ink onto two pieces of white cardstock. I used the MISTI so I could stamp it multiple times onto each piece which gave me a full, rich sky. I trimmed down one of the images and attached it to my black A2 card base. I added a few "twinkly" stars with the Nuvo Glitter Gloss Aqua Pen.

The second image I had stamped was trimmed down even more...I removed the entire sky above the trees! The width and bottom were trimmed to the same size as the base image. Using foam tape, I attached that layer to the base image then added some beautiful shimmer to the trees with the Aqua Pen. It's hard to capture in this photo, but the shine on the trees and stars is really stunning IRL.

I stamped the sentiment from the set Oh Christmas Tree. This set includes four sentiments, one of which I used on the inside of the card as well. Here is what that set includes:

I love the different fonts and variety of sentiments in this set. Once I stamped my chosen sentiment, I trimmed it down and added a black mat to it. That was then attached with more foam tape to create three layers on this card. Here you can see the dimension:


For the inside of the card, I used another sentiment from the Oh Christmas Tree set, plus the Dotted Merry Christmas. I just stamped both of those onto white cardstock, then added a couple of  "stamped off" (stamp once onto scratch paper first, then onto your card base) images using a tree from the Christmas Trees set of 6. This one is the OBG which I find myself using time and again on my Christmas Cards (Love using them to decorate the envelopes!). Here is the completed inside:


I love the simple beauty of this card. While I probably won't do multiples with all the layers, this card would be easily mass-produced using a single layer of the trees.

I hope this gives you a little inspiration to work on your Christmas Cards. If you like these stamps (there's even a special deal on the entire new release for the "Gotta Have It All" folks!!!), you can save an extra 10% off your order by entering my special code below at checkout.

Til next time,
Keepin' it inky!


Wednesday, October 7, 2020

Love it when I get Christmas cards knocked off my list. Mine are all different, so I love it when I have a great variety of stamps to work with. The October release has some awesome options. I used a couple of them to make today's snarky Christmas card.

BAH HUMBUG (SD1044)
INSIDE OUT: 12 COOKIES (SS125)

You will get so much use out of these sets...the inside out set has 10 stamps included:


Look at all those sentiments! Rather than doing one sentiment on the outside and one on the inside, I opted to use both on the outside and I will put a sweet greeting on the inside.

I used the character from Bah Humbug (I simply trimmed off the sentiment, but you could mask it if you don't like doing stamp surgery).


I love the look of kraft cardstock and thought it went along perfectly with this style of card. I stamped the critter on white cardstock and cut it out, attaching it with foam tape. The sentiments were stamped directly on the card base, and I added a hand-drawn border for a little more whimsy.

Don't forget....you only have until the 8th of this month to save that extra 15% off the new releases, so you may want to order quickly! PLUS...you can save an extra 10% off your WHOLE PURCHASE by entering my special code below:


And if you are one of those Gotta Have It All peeps (guilty!), you can get the whole release for a very significant savings! Normal value is $144.78, but it can be yours for only $108.59. That's a $36.19 savings!

The set even includes two brand new stencils! How fun!

Hope you are inspired to get busy on your holiday cards! Leave me a comment and let me know what you think of this release!

Til next time,
Keepin' it inky!


Wednesday, September 30, 2020

There for You!

I get to share the last card of the month! I used both Leaves & Dragonflies and Gnomies Forever to create this elegant card to send to someone (male or female) to let them know they have someone in their corner.

It was a very easy card to create. I simply used Versamark to stamp the Leaves & Drangonflies backgorund, then heat set with gold embossing powder. I trimmed the panel down into three panels (I cut off an extra smidge so I could have a nice gutter between the panels). I adhered them to a kraft card base. On another piece of kraft, I stamped the sentiment from the Gnomies Forever set. I trimmed a "v" on one end and wrapped the other with twine. This was attached to the card using foam tape. 

A very simple card, yet so pretty IRL. 

Be sure to come back tomorrow for the October release! There are a bunch of awesome new stamps that you are not going to want to miss!

If you want to shop before then, simply add my code TJ10Ro at checkout to receive a 10% discount on your order.

Til next time,
Keepin' it inky!


Wednesday, September 16, 2020

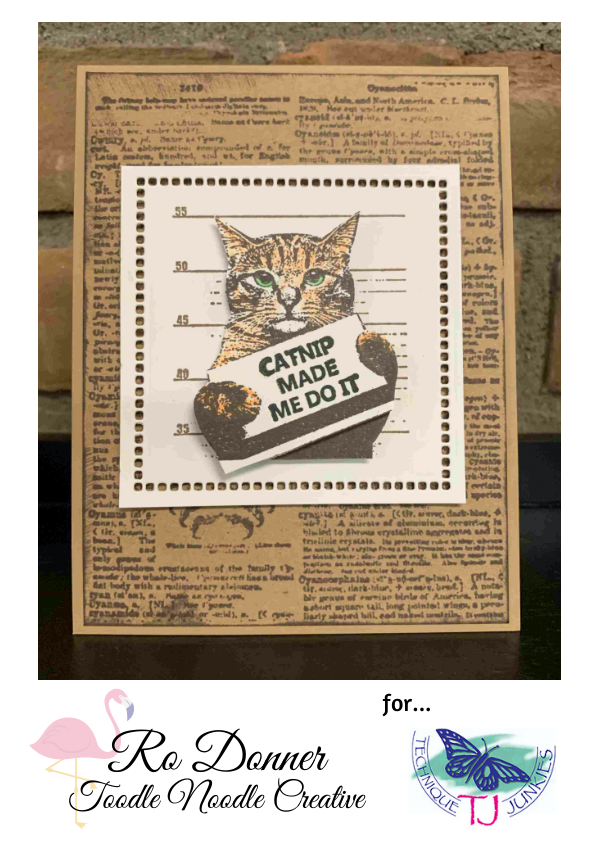
FRAMED FOR CATNIP

Oh my gosh! I am so in love with the Kitty Mug Shot set. I have been having so much fun making cards. I think this one is my favorite yet, though!
KITTY MUG SHOT (SS112)
VINTAGE DICTIONARY (P012)

If you look closely, you can see it's a very dimensional card. Four layers! The white frame is popped up on the base (layers 1 and 2). The cat is popped up (layer 3). And the sign is popped up (layer 4).

To create the card, I stamped Vintage Dictionary onto kraft cardstock, trimmed it down, inked the edges with brown ink, then attached to a kraft card base.  I then stamped the Kitty Mug Shot in brown in onto white cardstock three times and colored them. The first one I used for the frame base and cut it out with a die cut. The second I trimmed out only the cat. And the third I trimmed out only the paws and sign. Each were attached with foam tape. 

I am lovin' it!!! This set is so fun! It comes with seven different sentiments.
 
Aren't they a hoot? 

I hope you are enjoying the change of weather. As the days get cooler and shorter, spend more time in your craft space. Make cards! If you are looking to add to your stash, you can save on the purchase of your stamps from TJ. Simply enter the code below at checkout!


Hope you enjoyed my project today!

Til next time,
Keepin' it inky!