Thursday, November 30, 2023

It's Deb here with another stamp from the November Stamp Release . I used the Fall Mushroom stamp and I have to say that lately I have had a thing for mushrooms !! I have a new mushroom notebook made by a friend, a sweatshirt and a coffee cup . Does anyone else share my latest obsession ???  I had planned on coloring the image but when I stamped it on a piece of patterned paper, it really created a fabulous look that needed nothing else !!


  • I stamped the mushroom image on a patterned paper with Memento Tuxedo Black ink .
  • The sentiment was stamped on a piece of cream cardstock with Memento Rich Cocoa .
  • I embossed a piece of red cardstock with the Sizzix Winter Woodland embossing folder.
  • The embossed panel was adhered to a Kraft card base.
  • The stamped image was cut with a square die   and adhered to the embossed panel .
  • The sentiment was adhered below the stamped image with foam tabs .
  • I placed a black rhinestone on each corner of the sentiment.

I love this combination of black and red !! Do you ?? Have you had a chance to check out all of the new release stamps at Technique Junkies ??  Fall Mushroom is just one of their new images. Take some time to do some shopping for yourself and be sure to use my code - TJ10Deb - for a 10% discount.   Thanks for stopping by . Happy Stamping !!


Wednesday, November 29, 2023

Old, Loved and Rescued


Hello TJ Crafty Friends,

In the November release was a sentiment that says ~ The Best Things in Life are Old, Loved and Rescued. Have you seen it yet?
Well, the first thing that came to my mind when I read that was ~ sweet old dogs. And on September 10, 2023 my husband and I adopted an 8 year old dog (he's the short one on the left), named Snoopy Snuffles, to add to our family.  Our 13 year old, Junior (on right), needed a companion after he lost his best friend.

I just LOVE THIS STAMP!  Can't you see this on animal rescue cards to donate to rescue organizations for fundraising?  I sure can.

If you'd like to make this card or one similar here's what you need:

White or cream color card stock size A2 (1/2 sheet of card stock folded in half)
3 neutral print or light tan buttons
Black ink pad
Vintage photo distress oxide ink pad (a light tan ink pad could be used also)
Brown, red, light sage and gray markers (or colored pencils could be used here)
Water pen or paint brush and water
Foam strips
Scissors 
Glue
Plaid ribbon

1) To begin I used the concrete texture background stamp with a vintage photo distress ink pad to give an aged look to the background of this card. I also used the ink pad around the perimeter of the card.

2) Next I stamped the Let's Roll (old dog in truck) stamp on the left side and the sentiment on the right side in black ink.  I wiped off the word Loved with a paper towel and used a red marker over the word. I did this to create an emphasis on the word LOVED.

3) I wanted a soft red look on the pick-up truck to go along with the old/aged theme of this card so I put a little red marker on my acrylic block and used a water brush to pick up some ink and color the truck. You could use a red ink pad on your block in place of the marker. I added a little gray marker to the door handle and a hint of light sage to the area in front of the truck (the area through the windshield and right upper corner of that stamp).

4) Next I cut out 4 strips of scrap card stock to make a photo frame to go around the old dog in the truck stamp (called "Let's roll").  Colored the strips with brown and gray, mitered the corners (cut angles) and put strips of foam tape behind them creating an old photo frame look.

5) To finish this up I glued on a bow and 3 buttons as shown.

Thank you for stopping by today. I hope you enjoyed this card design. This one came from the heart. 
Comments always welcome.

Happy Stamping,

AJ & my old dogs Snoopy Snuffles & Junior

***Save 10% off your purchases with discount code TJ10AJ***


Tuesday, November 28, 2023

Holiday Spirit

Hello Junkies!  (Chris here)

I have a little to share with you today.   TJ has the best snarky stamps.   This one is perfect for those non-traditional Christmas cards.  I stamped the sentiment in Avocado ink to match the wine bottle.  To incorporate a pop of red I matted the front panel on a muted red card base. I accented the card with wine bottle and glass die cuts.  I used vellum to make the glass.   On the inside I put a glass with wine in it...so show they did get in the Holiday Spirit!.    I hope you get a chuckle out of this. 

Materials:

STAMPS: use code TJ10Chris to save 10%:

You can see a full supply list on my blog


No copics today

Monday, November 27, 2023

Various Animals

Hello. Jeanette here with three more cards featuring stamps from the November release. These three all include animals.


Technique Junkies Old Loved and Rescued:

I also used the Puppy Pals stencil that is available at Technique Junkies.


Technique Junkies Bear:


I also used a sentiment from the Technique Junkies Inside Out Twisted Encouragements stamp set.


Technique Junkies Wolf and Throw Me to the Wolves:


I hope you have enjoyed this month's release as much as I have.

If you like saving money - and who doesn't - please use the code TJ10JEANETTE when checking out at Technique Junkies to receive a 10% discount.

If you'd like to see other cards I've made using Technique Junkies stamps/products, you'll find them on my blog - HERE.

Sunday, November 26, 2023

Wild and Free Bear


 Our Bear is fierce - fabulous for any masculine or inspirational card. It is stamped here, with just a touch of colored pencil added for highlights. I paired the Bear stamp with the Wild and Free stamp and layered it over patterned paper to complete this card. The stamps may be found here:

Friday, November 24, 2023

Fun and Snarky Slimline Birthday Card


Hello everyone, and Happy Saturday.  It's Design Team Member Michael here with a fun slimline birthday card that is perfect for your BFF or other close friend or family member, that can take a good joke. Although, I don't think my BFF would "LOL" if I sent her this card.  :-)  When I saw the first line in the new "Old, Loved, and Rescued" stamp, the idea for this card immediately popped into my head.    

The first thing I did was to make my slimline card base using white cardstock - 8" x 9.25", scored in half for a 4" x 9.25" card base.  Then I printed one of THESE digital confetti papers and adhered it to the card front.  I also stamped Old, Loved, and Rescused on a piece of white cardstock.


Then I cut a piece of white cardstock 3.25" x 8.25", stamped Slimline Candles using black ink, added Yellow Stickles to the flames, and set it aside to dry.


Once everything was dry, I colored the candles using some fine-tip markers, adhered it to a piece of fun foam, and then the card front.  Then I cut apart the words in the Old, Loved, and Rescued sentiment that I wanted to use, layered them on a piece of black cardstock, and then I adhered them to the card front.  


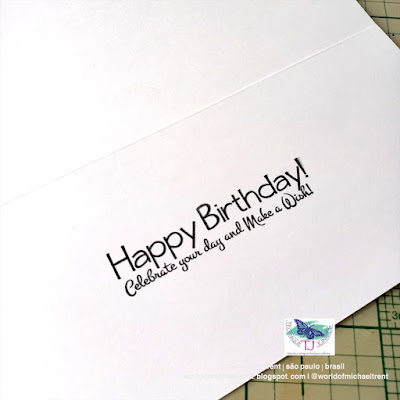
To finish off the card, I stamped the Happy Birthday sentiment from the Grand Greetings, Set of 5 - on the inside of the card.  And, lastly, I added more stickles to the candles to give them some shimmer and shine.

Here's the final card again - front and inside.


I'd love to know what you think of this card idea.  If you love the stamps I used in this card, remember to use my discount code to save 10% at checkout on the Technique Junkies website - TJ10Michael.  

So, do you have a BFF in your life that would LOL when received it?  Let me know by leaving a comment below.  Until next time - 

Hugs from Brasil.

~Michael

Thursday, November 23, 2023

Go ahead and try...


 The detail on this new Wolf stamp is incredible!  I paired it with this super sentiment and used three shades of grey cardstock and some die cut trees to create the scene.  Get it and all the other wonderful new stamps HERE. Using my code TJ10FAITH will give you a 10% discount on your purchases!

Wednesday, November 22, 2023

Wild and Free Among the Aspens


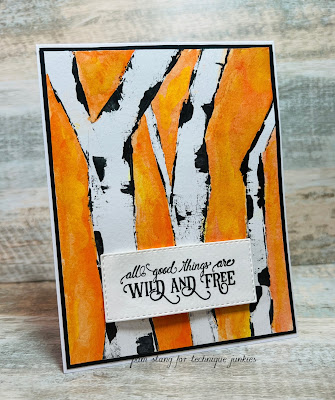
Good day, my friends! Today I am showcasing the new sentiment Wild and Free. I painted my background on watercolor paper. The trees were done by using black acrylic paint and a cut up gift card. So fun and easy to do. The background was done with some orange and yellow watercolors. The sentiment was stamped and cut using a stitched die. It came together quickly! For this, and so much more, check it all out here. Use my code TJ10Pam at checkout if you're so inclined!

Happy Thanksgiving and I hope everyone has a wonderful day!

Pam


Tuesday, November 21, 2023

Be Creative

 Yes - be creative - get those ideas flowing.

This new stamp from Technique Junkies

Vintage Script Collage will do it !!!

Had so much fun putting this together.  Lots of little bits

and bobs and lace and beads

Paired the stamp with an older saying 'something creative' as

it just seemed to fit with what I was doing 

Even under the vellum butterfly I stamped some script

Check out my blog for more

dar's blog (blog-dar-blog.blogspot.com)

And be sure to use my discount code when shopping

TJ10Darlene

Monday, November 20, 2023

Autumn Splendor


 The Fall Mushroom stamp from Technique Junkies is all the best of autumn! The mushroom scene was colored with Copic Markers and is paired with the Splendor of Nature sentiment. The background uses the Pile of Leaves background stamp, colored direct-to-stamp with Catherine Pooler Ink. The stamps may be found here:

Sunday, November 19, 2023

Blessed Christmas Berty Bouquet


Our delicate Christmas Berry Bouquet stamp is so pretty, easy to color, and perfect with the simple Christmas Blessings Sentiment. The background is designer paper from my stash. The two stamps are here:

Saturday, November 18, 2023

Be Bold, Be Brilliant, Be You

 Hello Crafty Friends - 

Today's design uses the November new release stamp set Vintage Script Collage paired with the Typewriter Set. Check out how this card came together by following the instructions below. 

  1. I began by cutting a mat out of gold foil card stock. 
  2. I stamped the Vintage Script Collage in black ink on white card stock. 
  3. The images were colored using Spectrum Noir Tri Blend Markers .
  4. I stamped the typewriter on white card stock and fussy cut it out. 
  5. I stamped the sentiment "Be Bold, Be Brilliant, Be You" in Versamark and heat embossed it in gold. 
  6. I put all the layers of the card front together then used 3-D foam tape to pop up the typewriter. I added gold thread behind the paper of the typewriter and there you have it. A quick and simple card. 
How pretty is this butterfly!! I am a lover of all things butterflies. 

I like the look of the roses. Antique Pink and Green go so well together. 


I hope you were inspired. Thank you for stopping by. When you purchase these products don't forget to use code TJ10Shalana to get a discount during checkout. Happy Crafting! 


Friday, November 17, 2023

TJ Inkspiration: Thanksgiving Diamonds


Add that WOW Factor!

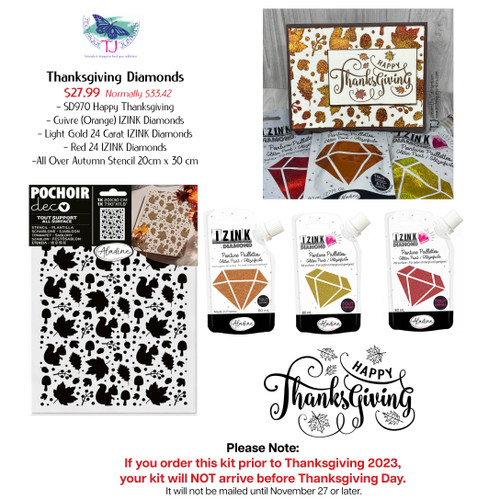
Aladine IZINK Diamonds are amazing through stencils! Easy to use and easy to clean, they add the wow factor to your cardmaking projects. Watch Pat Huntoon create an easy Thanksgiving card with just a few swipes of the palette knife. All of the items used in this video are here:

https://techniquejunkies.com/thanksgiving-diamonds-kit/


Please note: Orders will not be shipped or received before November 27th. Please be aware that your kit will NOT arrive before Thanksgiving.

The video is HERE ( or click on the image below):

Thanksgiving_Diamonds_Kit__88219 image

Thursday, November 16, 2023

Have a Merry Berry Christmas

Deb here with two of the November Release stamps - Christmas Berry Bouquet  and Scripted Merry Christmas . I think these work so well together and this card was finished in less than 30 minutes ! It's always nice when you are able to sit down and create a card that seems effortless .


  • I stamped the Christmas Berry Bouquet with Tuxedo Black Memento ink on a piece of cream cardstock.
  • The image was colored with my COPICS and Flair pens.
  • The sentiment was stamped below the bouquet with Lady Bug Memento ink.
  • I adhered a piece of holly patterned paper to a white card base. 
  • The completed stamped panel was trimmed and adhered on the right side of the card base, leaving a strip of the patterned paper showing on the left side.
  • A thin strip of red textured cardstock  was adhered along the left edge of the stamped panel.

Christmas is getting closer each day. Have you started your holiday cards yet ?? If you decide to do some holiday shopping for some fun stamps, you can use my code - TJ10Deb - to save 10% at Technique Junkies . I hope you all are staying warm and cozy and finding some time to be creative..

Wednesday, November 15, 2023

Trying to get into the Holiday Spirit


Hello TJ Crafters!

Are you trying to get into the Holiday Spirit?  Me too.
And there's obviously more than one way to do that (wink)!

On this card I made it pretty fast and pretty funny! 
I paired the new #SD1277 The Bottle Won't Open with the funny By Us ladies.


To create this fun and quick card you'll need:

Blank A2 card (1/2 piece of white card stock folded in half)
Red, green and black ink pads
Red and green markers
Optional:  red glitter and glue

1) I used a stamping platform and lined up my "The bottle won't open" stamp so it would stamp about 1/2 inch to 3/4 inch down from the top of the card.  You can eyeball it.

2) Next I applied the green ink pad to the top portion of this stamp then stamped it. If it needs to be darker - apply more ink and stamp again.

3) Now apply the red ink pad to the lower portion of the sentiment stamp.  Re-ink and stamp again if you need it darker.

4) Remove that stamp from your stamping platform and line up your By Us stamp.  Ink it up with black and stamp it below the words. As you can see in the example below you'll stamp it close to the sentiment.

Last - color your holly berries and leaves - and snazz up those ladies with color and glitter. 

*** I hope you get into the Holiday spirit soon ***
*** Save 10% Off everything with discount code TJ10AJ ***

Happy Stamping,

AJ ~ Art Cards with AJ

P.S. Did you see the entire November Release? You might want to check it out! There's of picture of the Gotta Have it All release below my card.


Tuesday, November 14, 2023

Beary Fun

Hi Junkies!  (Chris here)

Again, I'm in love with this realistic style stamp from Technique Junkies.   This bear is amazing.  I wanted to create a scene where he was walking in the woods.   I used an embossing folder to create the trees.  On the debossed side of the paper I carefully stamped the bear.  It gives the illusion that the bear is behind the trees.   I added some blue ink and glitter to create a wintery feel.   I felt like it still needed something...so I splattered silver sparkle watercolor all over to create a snow storm.   I'm so glad I did.  The card has the perfect amount of sparkle. 

Don't forget to scroll down and see the bonus card.   After making a winter scene, I wanted to make a summery one too. Which one do you like better?

Materials:

STAMPS: use code TJ10Chris to save 10%:
You can see the full supply list on my blog


No copics today

Monday, November 13, 2023

Encouragement


Hello, Jeanette here. I have two more cards to show you that feature stamps from the November release as well as a couple of previously released stamps.


Technique Junkies Vintage Script Collage:

The sentiment is from the Technique Junkies Inside Out Twisted Encouragements stamp set.


Technique Junkies Splendor of Nature:

I also used the Technique Junkies Stormy Sea Border stamp.


There are so many stamps and other products to love at Technique Junkies so be sure to check the store often. 

If you like saving money - and who doesn't - please use the code TJ10JEANETTE when checking out at Technique Junkies to receive a 10% discount.

If you'd like to see other cards I've made using Technique Junkies stamps/products, you'll find them on my blog - HERE.

Sunday, November 12, 2023

Red Glittered Christmas


Our Scripted Merry Christmas stamp looks so pretty atop the Holly and Berries stamp on the bottom! A little glitter ribbon and Berries colored with a glitter pen adds sparkle. This is such an easy, sparkly Christmas Card!

Stamps may be found here:

Saturday, November 11, 2023

Yes, You Can Make a Holiday Card in 5 Minutes (or less)


Hello everyone and Happy Saturday!  Ity's Design Team Member Michael here and, yes, you read the title of this blog post correctly.  Holiday cards in 5 minutes (or less). I made these two Christmas cards using embossing folders from my stash and the new Scripted Merry Christmas

Let me explain how...start the clock.  

Card 1 - Holly Leaves Background


  • I made an A2 card base using white cardstock and adhered a piece of Christmas paper to the front.
  • I die-cut a piece of white cardstock using a 4" x 5.25" stitched rectangle die, embossed it with the Holly Embossing Folder (37-1987) from Cuttlebug/Provocraft (retired), and adhered it to the card front.
  • Using an oval scalloped die, I die-cut a piece of red mirror cardstock.
  • Next, I stamped Scripted Merry Christmas on a piece of white cardstock, die-cut it using an oval die, adhered it to my red scalloped oval piece, and then to the card front.
  • To finish off the card, I added a few red enamel dots.  
Card 2 - Christmas Ornaments Card


  • I made an A2 card base using white cardstock and adhered a piece of Christmas paper to the front.
  • I die-cut a piece of white cardstock using a 4" x 5.25" stitched rectangle die, embossed it with the Christmas Ornaments Embossing Folder (37-1989) from Cuttlebug/Provocraft (retired), layered it on a piece of white fun foam, and then adhered it to the card front.
  • Using a scalloped circle die, I die-cut a piece of red mirror cardstock.
  • Next, I stamped Scripted Merry Christmas on a piece of white cardstock, die-cut it using a circle die, adhered it to my red scalloped oval piece, and then to the card front.
  • Because of all the texture in the embossed image, I did not add any enamel dots. 
I really made these two cards in less than 5 minutes.  I love how the embossing folder kicks them up a notch and by using a simple sentiment like the Scripted Merry Christmas, you have a card worthy of sending to anyone on your list.  

Thanks so much for stopping by the blog today.  I'd love to know if you like this idea and if you use embossing folders for your holiday cards.  If you like the Scripted Merry Christmas stamp or anything else on the Technique Junkies website, you can save 10% at checkout by using my code - TJ10Michael.

Until next time...

Hugs from Brasil.

~Michael