Showing posts with label TJ Stamps. Show all posts

Wednesday, January 20, 2021

Pretty Lipstick

Hello, Stamping Peeps! I've been busy busting this blustery weather with some fun me time in my craft room. What better way to get through the winter doldrums! I had so much fun creating the card I have for you today. I used a couple of OBG (oldie but goodie) stamps along with a Colorful Life stencil to put together this card:

No-One Will Notice (SD1003)
Red Lipstick Day (SD687)

I started by creating an A2 card base (a great place to start, right?) and added a metallic blue piece of cardstock. On a piece of white cardstock, using my MISTI, I stamped both the sentiment and the image, then trimmed down the panel. Using some Pixie Spray (where would I be without this stuff!), I placed my stencil over my panel and began inking the areas around the sentiment and image using Tumbled Glass Distress Ink. I was careful to leave my stamped areas un-stenciled. I added some of the Distress Ink to the edges of the panel, then colored in the image. I went over some of the words in the sentiment, along with a couple elements in the image, using my favorite Kaisercraft Gel Pens. I attached the panel to the front of my card and added a couple baubles for interest.

I love how the card turned out and can't wait to send it to one of my friends!

Hope you found a little inspiration today. Don't forget, you can save 10% off your purchases at Technique Junkies by using my special code below:

Happy stamping!

Til next time,
Keepin' it inky!


Wednesday, September 30, 2020

There for You!

I get to share the last card of the month! I used both Leaves & Dragonflies and Gnomies Forever to create this elegant card to send to someone (male or female) to let them know they have someone in their corner.

It was a very easy card to create. I simply used Versamark to stamp the Leaves & Drangonflies backgorund, then heat set with gold embossing powder. I trimmed the panel down into three panels (I cut off an extra smidge so I could have a nice gutter between the panels). I adhered them to a kraft card base. On another piece of kraft, I stamped the sentiment from the Gnomies Forever set. I trimmed a "v" on one end and wrapped the other with twine. This was attached to the card using foam tape. 

A very simple card, yet so pretty IRL. 

Be sure to come back tomorrow for the October release! There are a bunch of awesome new stamps that you are not going to want to miss!

If you want to shop before then, simply add my code TJ10Ro at checkout to receive a 10% discount on your order.

Til next time,
Keepin' it inky!


Wednesday, September 16, 2020

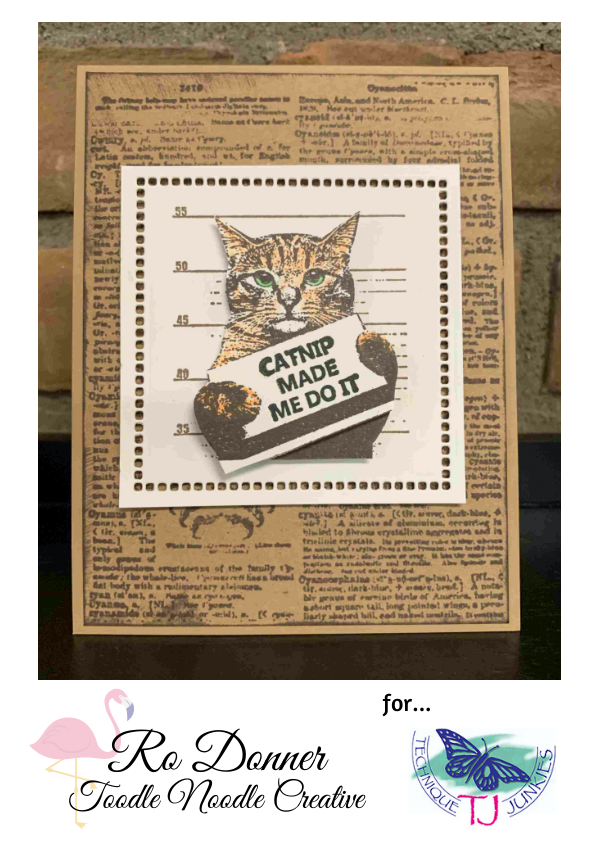
FRAMED FOR CATNIP

Oh my gosh! I am so in love with the Kitty Mug Shot set. I have been having so much fun making cards. I think this one is my favorite yet, though!
KITTY MUG SHOT (SS112)
VINTAGE DICTIONARY (P012)

If you look closely, you can see it's a very dimensional card. Four layers! The white frame is popped up on the base (layers 1 and 2). The cat is popped up (layer 3). And the sign is popped up (layer 4).

To create the card, I stamped Vintage Dictionary onto kraft cardstock, trimmed it down, inked the edges with brown ink, then attached to a kraft card base.  I then stamped the Kitty Mug Shot in brown in onto white cardstock three times and colored them. The first one I used for the frame base and cut it out with a die cut. The second I trimmed out only the cat. And the third I trimmed out only the paws and sign. Each were attached with foam tape. 

I am lovin' it!!! This set is so fun! It comes with seven different sentiments.
 
Aren't they a hoot? 

I hope you are enjoying the change of weather. As the days get cooler and shorter, spend more time in your craft space. Make cards! If you are looking to add to your stash, you can save on the purchase of your stamps from TJ. Simply enter the code below at checkout!


Hope you enjoyed my project today!

Til next time,
Keepin' it inky!


Wednesday, September 2, 2020

Bad Cattitude!

Did you all enjoy seeing the great new releases yesterday? I know the Design Team had a blast creating them. It's my turn to post today and I was so geeked to be able to use the Kitty Mug Shot set for this card. I think this may be my favorite stamp this release! The sentiments that come along with it are just too funny. Here is my card:

KITTY MUG SHOT, SET OF 8

Here's a breakdown of what comes in the set...

I know you giggled a little when you read them. Anyone who knows cats can appreciate every one of these. 

My card was super simple to create. Perfect for a beginner stamper or someone that needs a quick card. I just used some designer papers for the background and wrapped it with a ribbon and simple bow.

I stamped the kitty with brown ink and used a marker to add a little color. I stamped the sentiment in red so it would stand out a little. It's so easy to line up your images if you use a stamp positioner. I used the MISTI. I trimmed it down and added a mat. 

Well...I'm off to make more kitty cards! I MUST do one with each sentiment. 

Love this stamp as much as I do? It's on sale through the 8th of the month!!!! And just enter my code at checkout to receive an additional 10% off everything in your order!


Happy shopping and happy stamping!!!

Til next time,

Keepin' it inky!


Wednesday, August 5, 2020

LOVIN' THE SNARKY!

Hey, Junkies! Ro here today to share an adorably fun and snarky card with you. I'm using one of my favorite stamps in this new release on this card, along with another favorite OBG (oldie but goodie). 

GLUESTICK (SDX171)
COFFEE KITTY (SD735)
This snarky sentiment is just too funny (and so true!!!). I paired it with the Coffee Kitty...the look on this cat's face is perfect for some of the snarky sentiments that Technique Junkies carries. You may remember Prison Orange that was released this past March. Coffee Kitty went well with that too! If you'd like to see that post from my blog, CLICK HERE.

This card was super fast and easy. I stamped the sentiment off-center of a die cut and matted panel. I stamped and cut out the kitty and attached it to the panel, which was then attached to an A2 card base. Using a fine black marker, I added the whimsical border.

Have you checked out all the new stamps released this month? Do you love them? Well, if you're the "Gotta Have It All" girl like I am, you can purchase the entire release for some great savings. Here's a pic of the whole kit and kaboodle for August.

AUGUST 2020 GOTTA HAVE IT ALL BUNDLE
Of course, all these stamps are available individually as well. If you'd like to purchase any of them individually, CLICK HERE.  And the best news yet is that they are all on sale until the 8th of this month! Plus, you can save some additional cash by entering my special code below. That's a whopping 25% savings!


Well, I'm off to do some more fun stamping with this great new release! Hope you found some inspiration today!

Til next time,
Keepin' it inky!


Wednesday, July 22, 2020

SENTIMENTAL TULIP

Hi, Happy Stampers! It's Ro here today to share my love of some sentiment stamps that are available through Technique Junkies. I don't know about you, but sometimes the hardest part of making a card is figuring out your sentiment. Well, I have a little secret....Simple Sentiments. Here is a sample created with a newer stamp set and a sentiment from the Simple Sentiments series.

First off, I love this image stamp. So much fun to color! And it is one of those great background stamps that you can use for a myriad of occasions. I stamped it on a good quality cardstock and colored it using Faber Castell Polychromos Pencils. I added a beautiful shimmer (see below) with some Dazzle Shimmering Bliss Topper

I have to admit, I love a little shimmer on my cards! And this Dazzle certainly fills the bill!  I added some torn paper to the background piece and attached them to an A2 card base. Next I added the sentiment, also with a torn paper background to the top to finish off my card.

Now let's talk sentiments. I love, love, love (did I mention love?) the Simple Sentiments sets. Whether you like a more chunky style like the A series, a cleaner font like the B series, or a vertical font like the C series, you are sure to find one to perfectly capture the message you want to share on your project.  Admittedly, I will use the B series the most since I like a clean look. But I have used the A series quite a bit too for the cards that need a bolder sentiment. I have compiled the complete series of stamps in a few images below so you can see them all and see which ones are your favorite.

I keep these sitting on the "easy access" portion of my stamping area. I reach for them so often, they earned their own spot of honor. I can always find just the right sentiment for my project.

Are you as charmed by these as I am? Would you like to save 10%? Just enter my code at checkout.

Who doesn't like to save a little dough, am I right? I encourage you to check out all the great images and sentiments available at Technique Junkies. I'm sure you will find just what you're looking for!

Hope you found a little inspiration and some good information here today. Let me know your favorite style of sentiment!

Til next time,
Keepin' it inky!


Wednesday, June 24, 2020

Thanks for Your Service

I have a different kind of thank you card to share today. This one has a very patriotic flare which would work great for military, but would also work well for first responders and healthcare workers.


I used a few fun products to create this sparkly gem. You can see from the close-up how this card shines!

Here is what I used to make the card, along with the links:

A COLORFUL LIFE: STARS STENCIL (6X6)
and PIXIE SPRAY

BRAVE HEARTS
I also used Thermoweb Transfer Gel Duo, Diamond Chips Transfer Foil, and Nuvo Glitter Markers.


For the background, I used a black piece of cardstock. I applied Pixie Spray to the back side of the stencil and placed it on top of the cardstock. Using a spatula, I applied the Transfer Gel through the stencil. I removed the stencil and washed it quickly so the gel didn't dry on it. I let it dry while I worked on the other parts of the card.

I stamped the image from Brave Hearts (It is one stamp, but I did a little surgery and cut the words apart from the image for more versatility) using Versamark. I added red and blue embossing powder and heat set the image. I then added a little twinkle by coloring over parts of the image with Nuvo Glitter Markers.

I stamped the sentiment, heat embossed it in black, and trimmed out a banner shape.

After the gel had dried on the black cardstock, I added a piece of foil to it and ran it through my laminating machine. The beauty about this gel is that it works with a die cutting machine just as well. So you can use either a laminator or die cutting machine to adhere the foil to the gel. I removed the foil (save that piece because it can be used again with the unused spaces...I'll tell you how). I trimmed down the piece, attached it to the A2 card base, and added the stamped/embossed images with foam tape. Done!!!

Now that little piece of foil left over can be used a couple of ways. You can laser print a black square, place the foil over it and laminate it, which will give you the reverse image. You can use the transfer gel and add foil to spots. Or you could gel a square area and apply the foil to get the reverse image. Waste not, want not!

I hope you were a little inspired by my project today. I also hope you have been playing along with the card challenge here at Technique Junkies. Grand prize is a set of the whole July release of stamps!

Also, don't forget you can save 10% on all these products by entering the code below (the code NEVER expires so keep it handy!)
Til next time,
Keepin' it inky!


Monday, June 22, 2020

#Summer Challenge - Little Treasures


I used Pretty Pots and Little Treasures to create this card.  They were colored with Copic markers.   I used Dragon Skin stencil from the  A Colorful Life Stencils.   Ink Blending Brushes were used to color the background and the envelope. 

ALL of the items in the Summer & Beach categories are 20% off through June 30, 2020 by using the coupon code Summer2020 at checkout.  A good  way to save some moolah!  

See Pat Huntoon's  blog post on June 9 for the full details about the Summer Challenge.  There is a HUGE PRIZE at the end of the  three weeks of the challenge! 

Have a wonderful day and get inky!


Wednesday, June 10, 2020

Narwhal Wobble Card

Hello, Technique Junkie fans! It's Ro here today to share a fun wobble card using a super fun stamp set. Here is my card:

These are the products I used and some alternate suggestions.


OCEANS OF LOVE, Set of 9
Look at all the fun stamps in this set!
A COLORFUL LIFE: CURRENTS
This stencil is not currently available through Technique Junkies,
(
It can be purchased through A Colorful Life Designs)
but below are a couple of great alternatives. 
A COLORFUL LIFE: WAVES
This is a great stencil alternative available through Technique Junkies.
BUBBLE FLOW
This stamp would make a terrific background for any of the images
in the Oceans of Love set.
One of the things I love about this this card is the spring feature of the narwhal.


And this card was a breeze to create! I started with an A2 card base and added a teal mat to it. Using Technique Junkies Shimmering Bliss (Mermaid and Miami Vice), I applied color on the base and through the stencil. This detailed stencil was very easy to use...I simply sprayed the back with Pixie Spray which holds the stencil in place. I trimmed down the stenciled piece and added a white mat to it. Just look at that shimmer!
Next I stamped the narwhal image on white cardstock and colored it with Polychromos pencils. After adding a layer of shine using a Nuvo Glimmer Gloss Aqua Pen, I trimmed it out, attached an Action Wobble to the back and placed it on my card. I then stamped the sentiment onto teal paper and trimmed it down. I matted that with white, and attached it to my card, adding a few enamel dots to the card for interest.

If you follow my blog (Toodle Noodle Creative), you noticed a similar card I did earlier this week using the Purrmaid. This stamp set is just too fun!


If you like any of these products available through Technique Junkies and want to save a little on their purchase, simply enter the code below at checkout.  This 10% discount is good any time and never expires. So keep it handy for all your Technique Junkies purchasing!


Hope you enjoyed my card and found a little inspiration. 

Til next time,
Keepin' it inky!