Thursday, April 30, 2020

Stairway to the Stars

Hi everyone!

It's my day to post on the Technique Junkies Design blog, and I wanted to share two cards using 'Stairway to the Stars', and the 'Messy Diamond Grid' Stencil.

For this first card, the girl, stars and sentiments were masked off, and the stenciling was done with Distress Oxide Inks. I then removed the masks, and stamped the girl again. I liked how it sorta gave her a shadow...


For this card, I simply misted the above stencil with water, and flipped it over onto a white panel. After the ink dried, I stamped everything in a bright blue ink. Next time, I will mask the girl off, so the stencil doesn't show through!


Hope you love this stamp as much as I do!!!

Don't forget!!! You can save 10% on any order by entering TJ10Patti at checkout.


This was so easy to create! Hope you will give it a try!

Now, be sure to head over to the Technique Junkies store and check out the incredible new stamps this month! 

Thanks for stopping by,

Patti J.

Wednesday, April 29, 2020

Your Wings Are Ready

Using a graduation stamp set, I created a card that doesn't necessarily have to do with graduation! Whenever I get a set, I try and think of different ways to use it. Sometimes it means cutting it apart, or sometimes that could mean using a sentiment intended for one thing for a different purpose, which is what I did here.

The sentiment is from the set "Graduation Greetings" which includes 11 stamps! 
GRADUATION GREETINGS

The stencil I used is from A Colorful Life. To create this very simple card, I sprayed the back of the stencil with Pixie Spray Then using some of the beautiful dye inks from Aladine (Aurora, Encre, and Ocean), I blended the inks through the stencil with the Ink Blending Brushes, which make blending through stencils a breeze! I trimmed down the piece to slightly smaller than an A2 card (which is 4.25" x 5.5").

After stamping the sentiment in black, I attached the stamped piece to a yellow A2 card base.

I love how the card turned out. It's simplistic yet pretty. If you like any of these products and want them in your own stash, you can save 10% at checkout simply by entering the code below. This code NEVER expires and is good on any of the products carried by Technique Junkies!


Thanks for stopping by today. See you soon!


Til next time,
Keepin' it inky!


Tuesday, April 28, 2020

#WWDB Challenge Bee Well Soon


Happy Tuesday!

Did you hear about the Technique Junkies #WWDB challenge?
  The theme this week is Get Well. 

Full details about the challenge, how you can join, and be eligible to win one of four $50 gift certificates (one for each week of the four week challenge), can be found on Pat's post HERE.   

My card uses Bee Quotes & Weathered Wall
Use code TJ10Jeanne for 10% off at Technique Junkies


Hope you enjoyed my project!


Monday, April 27, 2020

WWDB Challenge Card 4 - Thoughts of You


Have you seen anything about using foils with your Big Shot or similar machine?  That is how I added foil to this background with a stencil.  Isn't it gorgeous?  

The stencil I used for my card is called Flowing Drops.   It is A Colorful Life Designs stencil.  The stamp is Milk Bottle Bouquet.   I colored it with  Copic Markers. I used an oval die and very carefully cut it so that the bouquet was not cut.  Later I cut around it.  I die cut an oval frame that looked like lace on the edge.  I cut it out of Vellum because I wanted to have a lacy look.  I layered them all on the stenciled foil background.  I was so happy with the final look! The verse at the bottom of the vase is from Sentimental Sayings

The greeting on the inside was too long when left in a strip with this orientation.  So I cut off the "Get" from the stamp and used my MISTI to be sure the two stamp sections were straight.  

For the envelope, I used Raining Confetti stamped in a light blue for the background and on the envelope flap. U stamped Milk Bottle Bouquet on the left front corner.  I slipped a scrap piece of paper inside the envelope so when I colored the bouquet with my Copic markers, the ink wouldn't bleed through to the back of the envelope.

I do not have a laminator machine for using the beautiful foils out there.  I cannot do a video but I will show you step by step as much as possible.

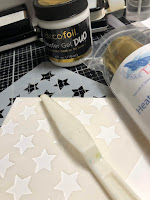
1. You will need a stencil, a palette knife, a piece of card stock, Pixie sprayfoil,  and Decofoil Transfer Gel/DUO.   Spray the back of the stencil with Pixie spray so that you have no leakage under the stencil. Wait a few seconds and then place the stencil sticky side down on the card stock. Scoop up some of the Duo Gel and spread it across the stencil covered card stock. You do not want it to be thick but full coverage. If it is too thick, it will take a long time to dry.  If it is too thin, you won't get good coverage. Then carefully lift the stencil off of the card stock.  Immediately wash the stencil and the palette knife.

2. Now the Transfer Gel/Duo must dry before you can apply the foil.  If you are in a hurry, use your heat gun to dry it.  This may cause it to bubble a bit and it will slightly change the texture when you apply the foil.  Otherwise, let it dry naturally.  It will take 20 to 30 minutes to air dry, perhaps longer in thicker spots.  The Transfer Gel/Duo will be translucent when dry. 


3.  Then place the foil cut to size on top of the Transfer Gel/Duo.  The colored side needs to be UP. Then sandwich it in between 2 plates for your Big Shot machine (or similar). You may need to add a shim - I did because it didn't have quite enough pressure.  

4. Wind it through back and forth and then remove  the plate and the foil. Tada! Beautiful!

5. If you do not use Pixie spray, and if you spread too much gel, and it leaks it could end up with card stock looking like this.  I think you need to be careful and choose one where the openings are not as close together as this one.   But that  is my experience.  I may have also used too much of the Transfer Gel. I have not done very many of these and I am sure I need more practice.  Even my stars have some boo boos on them.  


So now save some moolah on this technique and use TJ10Judy when you check out.  

Hope your day is splendid, and you have a chance to get inky. 


Sunday, April 26, 2020

Get Well Bouquet in Blue


This week we are focusing on get well cards for the WWDB (What We Do Best) challenge over on the Technique Junkies Facebook group.  I stamped the beautiful new Milk Bottle Bouquet stamp with blue ink and then brushed the same blue ink all over the edges with an ink blending brush.  The sentiment is from the Floral Framed Sentiments set, and I stamped it with the same blue ink.  For my envelope, I inked up the bouquet with the blue ink, but I stamped it off on scratch paper first before pressing it down on my envelope.  

Come join us in the WWDB challenges!  You could win $50 just for playing along!


Saturday, April 25, 2020

The Juggle is Real...No matter WHAT age you may be...


And 10% off if you use TJ10CARMEN


I know, I know..no excuses. 

But you HAVE to understand the week I've had.

First, there came the news that school has been cancelled until 2030. Or some date so far in the future I despair of ever ridding my home of "hormonal y-chromosome ordure". 

THEN, the wireless went down Thursday night and didn't reappear until an hour and a half ago. And due to my being a chronic procrastinator, I didn't have this post ready and now I'm late. 

And then it was my birthday.

It all started with a call from my mother on Wednesday.

"Happy Birthday!", she sang. "I remember 52 years ago having my first child, a little girl, and you were so beautiful! I held you in my arms and for whatever reason, I decided I wasn't going to name you Rosie, as I'd planned all along. I would name you 'Carmen' After the beautiful opera of the same name". 

"You said you named me after the, and I quote, 'cute little Puerto-Rican dancer from the Dick Clark show that could really move!'", I said.

She sighed, deeply, "I just loved how she danced!"

"Also," I reminded her, "you said when you went into labor and they doped you up on Scopolomine, all you remembered is the doctor holding up his hand and snapping each finger of his glove in some weird, creepy manner."

"Oh, I'm sure that was a hallucination." she said, thoughtfully.

"So you remember me being born?"

"Wellllll..." she tutted, "maybe not actually being born but I remember my beautiful girl!"

"Mother," I said, sternly, "there no pictures of me as an infant and, according to you, it was because I was born an entire month late, and due to the fact my head was lodged in your pelvis that extra month, I was born with a deformed, pointy head!"

"It wasn't deformed, it was just...um...misshapen." she said, warily.

"Dad said I was so weird looking that he showed me off as a future lab experiment that would make him a millionaire!" 

"That was just the alcohol talking, dear. Don't believe everything you hear." she said, briskly. "But let's get to the good part! What do you want for your birthday?"  

"Well, I think I'd..." I began.

"Now wait!" She interjected. "Remember what happened last year! We went out shopping because you said you wanted clothes for your birthday. So, I bought you clothes and then you ruined it all by losing weight and not being able to wear them!"

"I wouldn’t call that ruined…", I said, slowly.

"The year before that you wanted Botox and you wore that out after two months!" she said, sternly.

I gritted my teeth. "I happen to have custody of your three grandsons. But if I turned them over to you to raise, I bet that Botox would last..." I began.

"But who's keeping count?" she broke in. "Let's just concentrate on the positive. What do you want this year?"

I took a deep breath, "Mom, I want a kayak."

There was silence for a moment. Then she said, "But can you swim?".

Look people, I’m certainly not one-up on this parenting game. I wouldn’t even call myself accomplished. I think my claim to fame is that I have survived puberty of three boys and managed to keep my car dents to a minimum and my sanity, thanks to good medical care, excellent pharmaceuticals and virtual therapy.

I’m calling that a win.

But, what I can say is when it comes to things like rollerskating, bicycling or… I don’t know… swimming, I know exactly which child is independent in what medium and which child needs to be accompanied by myself, a guardian and back up EMT.

And extra virtual therapy.

But when it comes to swimming… Swimming!  How do you not know if your kids can swim or not??

Obviously, she forgot the many checks she wrote to the YWCA in Greensboro, where I learned to swim. Not to mention all those summers I spent at camp Tapawingo, where I was a counselor and forced to swim with young children in the resident lake, which caused trauma I struggle with to this day.

Whether that trauma is confined to just swimming in lakes, being around hordes of small children or both, I’ll have to continue to work out in counseling.

But how does she forget those years of my strapping a Styrofoam bubble to my back and jumping off the diving board until I worked up my courage to dive? And all in front of her!

What about all those summers at the Moose Lodge Pool? Or down in Florida where I swam in those crystal clear waters… Until I saw a manta ray under my raft, a horse shoe crab stalking me and the movie Jaws… then it was over for me. But that’s not the point!

"Are you still there?" my mother asked

"Here, mom. And yes, I can swim."

"Do you have a life jacket?"

"Yes, mama I have a life jacket."

"Well, I’ll pay for the kayak but I’m not sending the money until I see a picture of you in your life jacket! Don't think you can trick me… You’ll never know when I’ll show up down at the lake! And if you’re on that boat without a life jacket then that’s it… no more kayaking for you..

Just my luck. My mother doesn’t remember whether or not I can swim but she sure remembers how to ground me

Friday, April 24, 2020

TJ Inkspiration: WWDB Challenge Week One Review and winner

What a fun week we had with the What We Do Best Challenge (WWDB) Challenge! We had wonderful participation from customers and the Technique Junkies Design Team.  I compiled the video below with all the art - I hope you are inspired to create some thank you cards of your own.

What We Do Best Challenge Week One Technique Junkies
This week, all customer entrants were "put into a hat" and one name was drawn randomly to win the $50.00 gift certificate to the Technique Junkies store! This week, our winner is...
Rachel Duong!
Rachel submitted several entries this week, and like all the others, was a great inspiration. Rachel, watch your email for your gift certificate.

Week Two is upon us, so our theme this week is to make Get Well cards.  Do not feel that each card has to say "Get Well Soon", but keep the cards in the spirit of the theme. Don't forget the envelope!

To get us jump-started, here is the first card of the week, from me:
Groovy Flowers Mask with Grand Greetings
To make my card today, I used Pixie Spray on the Groovy Flowers Mask (A Colorful Life Designs Stencils, available from Technique Junkies) to hold it firmly while blending  Distress Oxide Inks with Blending Brushes. The Get Well Soon Sentiment from the Grand Greetings Set was added over the top, and it was layered to help pop the colors. 

Just as a refresher, here is the challenge again:
Our challenge will run for four weeks, with each of the four weeks featuring a different theme. Each week, you can make one or more cards with envelopes using Technique Junkies stamps within a weekly theme. Simply post them to the Technique Junkies FaceBook group OR email them directly to me.  

Each week, one of the challenge cards will be selected RANDOMLY and will win a $50.00 gift certificate to the Technique Junkies online store!  

That is $50.00 PER WEEK that we will be giving away with this challenge!

Here are the "rules" and the themes:
1. Create a card using Technique Junkies Stamps or Foils. Please, no other companies' stamps on your creations. Dies, stencils and other embellishments are welcomed, but kindly remember that it is a company-sponsored challenge.
2. You must include a decorated envelope with your card entry.
3. Email your card to phuntoon@optonline.net OR post to the Technique Junkies Facebook Group with the following hashtag: #WWDB. 
4. You may post a different card every day. Cards that have been posted to the Technique Junkies FaceBook group prior to the start of the challenge may not be used in this challenge. Each card posted must be made by the poster and only be posted once during the contest.
5. One submitted entry (card) will be selected randomly at the end of the week, and a $50.00 gift certificate winner will be announced on this email and to the FaceBook group on the following Friday.

Here are the themes:
Week Two: 4/24 - 4/30 Get Well Card:
Must also include a decorated envelope.
Week Three: 5/1 - 5/7: Thinking of you card:
Think shut-ins and other people struggling with the situation. Again, you need to include a decorated envelope.
Week Four 5/8 - 5/14 Encouragement card:
Pretty broad spectrum here - but inspiration, thinking of you, thank you, all encompassed here, too. Again, an envelope is necessary.

I can't wait to see what you make!
I hope you are a little inkspired by today's issue. See you next week!
 
Sincerely,
 

Pat Huntoon
Technique Junkies LLC 

Thursday, April 23, 2020

Live Life in Full Bloom

Hello friends!
It's Giovana here today with a very simple card.

Details:
Stamp Precise Posy on white cardstock, add white embossing powder and heat set.
Blend Distress Oxides  (use your favorite colors)
Trim panel and adhere it to a white card.
Add panel to Pink card base.
Stamp sentiment from In Full Bloom Sentiments Set on Vellum, die-cut it and adhere it to card.


You can save 10%  adding my code TJ10Giovana on your order.

Hope you like this project!
Have a wonderful day!

Wednesday, April 22, 2020

#WWDB You Are Simply Amazing

Happy Wednesday!

Did you hear about the Technique Junkies #WWDB challenge?
  The theme this week is Thank You. 

Full details about the challenge, how you can join, and be eligible to win one of four $50 gift certificates (one for each week of the four week challenge), can be found on Pat's post HERE.   

My card uses Simply Amazing and a stencil (Splash) from A Colorful Life Designs.  
I used white modelling paste, let dry completely and then inked the edges in blue. 

Use code TJ10Jeanne for 10% off at Technique Junkies


Hope you enjoyed my project!


Tuesday, April 21, 2020

How to Make a Waterfall Card


Today I have a waterfall card tutorial for you.  It's an old technique which I'm bringing to the foreground.  When I saw my background, called Farm Animals, I wanted to pair it with a variety of farm-related stamps.

Typically, this card requires an extreme amount of photos.  Wanting to stay with my personal "10 photos or less" you will see my completed embossing, stamping, and inking throughout this tutorial.

Paired with Farm Animals, is Chicken Wire 2, and funky chickens Keep Chickens-set of 13.


1- Standard card 5 ½” x 4 ¼” (yellow mat)
1- 1” x 4 ¼ “ Brad Strip (black, embossed with gold Chicken Wire 2)
1- 5 ½” x 4 ¼” Layering Piece (black)
1- 5 ¼” x 4” Layering Piece (green/blue bg stamped with Farm Animals)
1- 1 ¾” x 8 ½” Waterfall Strip (black)
3- 2¼” x 2 ¼” Squares (black)
3- 2″ x 2″ Squares (White stamped with Keep Chickens)
1- Tab (yellow with gold embossed Chicken Wire 2)

Score the waterfall strip at 1 ¾, 2 ¾, and 3 ¾. There will be an area of 4 ¾ remaining
On your unscored portion of your tab, decorate and or stamp as desired.  Add tab along the right hand side of your long strip.  If you do not have a tab, you can hole punch and use ribbon or string.
To further explain my background and images I took this photo to show you a close up of them.  For my background I stamped out Farm Animals with black Momento and let dry overnight.  You can use a heat gun to speed up drying time, but I tend to let everything air dry naturally.  Using Shimmering Bliss "Miami Vice", I gave a light spray to my stamped background before I added my mattings and card front.

My funky chickens called Keep Chickens was stamped out on my white 2" x 2" squares, and coloured with Prismacolor coloured pencils.  Using my blending brushes, I blended a coordinating ink around the edges.  These brushes are the bomb!  Not only for the flawless blending results but in price.  These brushes sell for double the cost on many websites.
My small strip was heat embossed in gold using Chicken Wire 2.  Adhere that strip to the card front.  From the bottom of the strip, to the bottom of the yellow outside edge, is 1".
Turn your tab strip over and adhere your first image just a little to the right of the score line.  If you put it right on the score line, the waterfall will not be as effective.

Add your second image just to the right of the score line.
Add your third image just to the right of the score line.
Using glue dots or Redline tape, add your strong adhesive to the top of the long strip on the underside of the long strip where I added my 2" squares.  WARNING:  A strong adhesive has to be used, or this waterfall technique will fall apart and not work.  Tape runner is not strong enough.
Taking the strip in hand, draw upwards and press the edge where you added strong adhesive, down on the right hand side of your strip (here it is where I stamped Chicken Wire 2).


Your waterfall card is now ready to use.  Have fun!!


Monday, April 20, 2020

Put Your Tail in the Air

Happy Monday! 

I have a card to share today using Tail in the Air from the April release
Isn't he cute?

Did you hear about the Technique Junkies #WWDB challenge?
  The theme this week is Thank You. 

Full details about the challenge, how you can join, and be eligible to win one of four $50 gift certificates (one for each week of the four week challenge), can be found on Pat's post HERE.   


Hope you enjoyed my project!

Sunday, April 19, 2020

Thank You Bouquet

Hello!  Lynda Joy here, with a card featuring a lovely bouquet stamp from the April release.  
Technique Junkies stamps:
Milk Bottle Bouquet 
You're In My Prayers 

I stamped the bouquet onto white card stock, and lightly stenciled a background with a stencil from my stash.

I white embossed the verse, and added it with foam tape, layered the pieces, and added to a pink A2 card front.  

Inside:

I hand wrote the thank you verse.

I am using this card for my day three card for the Technique Junkies WWDB challenge.  The theme this week is Thank you, and I know the perfect mail person (our is a lovely young lady) who deserves a big thank you!

Full details about this challenge, how you can join, and be eligible to win one of four $50 gift certificates (one for each week of the four week challenge), can be found on Pat's post HERE.   

And here is the card with my matching envelope:
 
Don't forget to use my code, TJ10Lynda, for 10% off your entire purchase at the Technique Junkies store!
Thanks for your lovely comments!

Blessings,