Wednesday, June 17, 2015

Art Journaling with Cottage Rose

I love to art journal. Sometimes I write a ton, and then gesso over it, feeling like I got something out of my system. Sometimes I like to make pretty backgrounds with favorite quotes and just consider the time well spent. I think the trend of adult coloring books is great - because it makes art accessible to everyone. But stamps do the same thing, and we've known this forever!

I started this week's page with inspiration from my own garden:
What could be prettier? I made an art journaling page, with a sketch from the photo above which I watercolored using Art Anthology Colorations as a basis for it. Then I thought... I want to make a companion page. So this time, I took step-by-step pictures to share with you!
My recent trend has been to begin with a blend of Art Anthology Colorations sprays all over my background, with a stencil, or not, and followed by using my Palettini P020 Wasted stamp with Gesso or white acrylic paint, randomly on the background. This particular sheet has some heat embossed designs on the corners as well to resist the sprayed color.

Next, I stamped P022 Cottage Rose in Stazon Jet Black onto the background, along the right hand side.

I designed this stamp so that it is relatively easy to create a continuous border with it, by flipping the stamp in the opposite direction. This way it doesn't look like the same image, repeated. In this picture you can see where the two images 'connect' although I'll be taking a journaling pen to the leaf to complete the cross-hatching between the two pieces. You don't have to line things up perfectly for them to work!

I painted Art Anthology Buttercream Sorbet onto the roses. Then I liberally applied Mi-Bella Sorbet paint (deep pink) in a circular motion and dabbing in places to align loosely with the petals of the roses.

I then painted the leaves using Art Anthology Velvet paint in Basil. This paint has a matte finish, versus the shine and shimmer of the Sorbet paint, so that the leaves will become more of a part of the background.

Now it's time to dirty up the background and bring in the elements that I used on the facing page. First I applied Ranger's Snowcap paint to the P020 Wasted stamp and randomly applied this over the flowers and leaves as desired.

Then I used P010 Travel Documents with Stazon Midi Cloudy Sky (gray) and stamped it randomly in the empty spaces. With this image you can clearly see how translucent the paint is; and how much depth you can create by layering all these elements.

As a final step to the background design, I stencilled Art Anthology Sorbet in Drab, along the left hand bottom corner through a honeycomb design. I added a bit of this in Buttercream as well along the right side to create a faux beeswax appearance.

I stamped the sentiment, PD010 Art Mistakes, in Stazon Jet Black to finish the page.
So now we have two facing pages for my art journal. Cohesive design makes it work together!

Take a look at my Palettini Collection, designed exclusively for Technique Junkies


Tuesday, June 16, 2015

Here Kitty

Good Tuesday morning Junkies!  I've got a couple of ATCs to share with you today, using some of my favorite Technique Junkies stamps.  Gotta love those kitty cats!


So Lucky was created using the Gel Medium Resist technique.  I used Art Anthology Colorations in Plush, Patience, and Juicy along with their Morse Code stencil.  I stamped one of the new June releases, Friend Like You, onto a piece of card, cut it out and separating the sentiment, and then colored it in with Art Anthology Tango and Kona Velvet.  I positioned the trimmed sentiment directly above the kitties.


Stare was created using the Colorful Resist technique.  I used Art Anthology Colorations in  Wild Orchid, Peacock Feathers, and Grass along with their Bubbles stencil and the Paid in Full & Plaster Swirls stamps .  I stamped Kitty Watching, cut him out, then colored his fur with Art Anthology Ash Velvet and his eyes with Limeade Velvet.  The sentiment People Will Stare (small) was stamped onto a piece of previously colored watercolor paper I had laying around.

These and other wonderful stamps are located on the Technique Junkies website.

Until later......................


Marilyn

Monday, June 15, 2015

Another June Release!

I always forward to new releases from lots of stamp companies -- but particularly from Technique Junkie Stamps! Pat Huntoon is really trying hard to broaden the breadth of variety of her stamps. She knows full well that not every stamper likes the same kind of themes for the stamps they buy and use. But the last few stamp releases have been wonderful!  Gorgeous stamps, and made of wonderful red rubber.  Have you looked at the new releases for June yet?  http://techniquejunkies.com/new-stamps/june2015-release/

These two cards are made with a new stamp for June called Sea Waves - S628, and a stamp from the May Release called Old Friends - S623. 

With this card I used a cloud stencil and a mask for the setting sun to create the sky and background.  I cut the waves from the stamped image to create a bit of fun!


The Sea Waves stamp fills in all of the background for this card.

I used Copic markers to color in the ladies and the boat for both cards.  The Sea Waves were stamped on card stock after I used the Antique Glimmers technique to create the colors in the waves. 

Have a wonderful day - and get inky!


Saturday, June 13, 2015

Join me for a Cup of 'Joe

Happy Saturday Junkies! I can't think of a better way to start my Saturday or any day for that matter than with a nice cup of joe!  I am a coffee-aholic that is for sure, so of course when I saw the Coffee Beans Background stamp from TJ I just had to have it!


For this card I use the background stamp to alter the script patterned paper by stamping in Versamark Ink, embossing with clear embossing powder and inking over with Gathered Twigs distress ink. 
This is a perfect background to compliment the Tim Holtz Fresh Brewed die cut that I used for the focal point.


This past weekend I got to visit with Pat and Sally Lynn at the Heirloom Rubber stamps shows.  What an incredible display of stamps they had on hand and I was able to add to my collection of TJ goodies.  So of course this week I wanted to play with them all....here are a few bonus tags I made while playing and experimenting with my new stamps!

The stamps used above are Big Bee and Be Silly (right) Rain Dance (left).


 Thanks for joining me today and be sure to check out all these great stamps and soooo many more at the TJ store
Embrace Imperfection!
Pam


Thursday, June 11, 2015

Technique Junkies-Seahorse Card using Texture Paste

Happy Thursday Junkies-
Jerri here with your Thursday inspiration!

Today I am sharing a card I made using the Seashorse stamp from Technique Junkies.


A while back, I purchased some of the Ranger texture paste and now I am in LOVE with the product.  It was fun, and so easy to work with.  It adds great dimension and texture to your project.  Here's how I made this card:
  1. I put a stencil on top of a piece of water color paper.  Using a spatula, I spread a thin layer of texture paste on top.  Carefully remove the stencil.  Clean your spatula and stencil immediately. Allow the paste to dry on your card before moving on to the next step. For this card I cut out my own stencil using Life Is A Beach Cricut Cartridge.  If you would like to try using Texture Paste, check out the stencils for sale at Technique Junkies in the Products and Accessories section.
  2. I stamped the Seahorse image using green distress ink and then embossed over the top with clear powder. Why did I do this?   I wasn't sure if I would be spraying the card with water later and therefore wanted to use a solvent ink but I only had Stazon in black.  I didn't want the seahorse to have a stark black line so I used the same green I would be rubbing on the card later and embossed it.
  3. I colored in the seahorse image using a watercolor technique.  I used my paintbrush, my distress inks and some water to get this look.
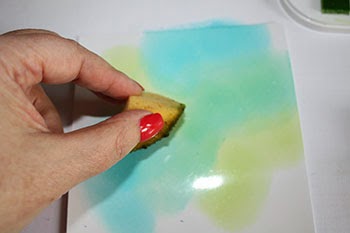
  4. I used green and blue distress inks and rubbed them on the card using a blending tool.  If you don't have a tool, you can use a sponge or Makeup wedge. 
  5. I let water drip off of my fingers onto the page to create the "bubbles".  When doing this I tried to avoid the seaweed and the seahorse.
  6. I used a Wink of Stella Pen to put sparkles on the seaweed and the seahorse. You can't see the sparkle in this picture but in person it adds just the right amount for some shimmer without being overdone.
Don't forget to check out the Technique Junkies Website to see all of the wonderful stamps and products available for your own inspiration and projects.  

Have an AMAZING day!!


Jerri

Wednesday, June 10, 2015

Hot Glue Stencils

Hey Junkies!  The Crafty Nurse here with some inky fun using stamps from the June Technique Junkies Release and a home made stencil.  Would you believe these "sketchy" flowers were made in less than 5 minutes using hot glue?  Yep, hot glue.   I've seen many stamps and dies in this shape and you can create these in no time at home. What's even better, the hot glue stencils pair perfectly with the techniques on the Sensational Stencils CD.


All you need is a non-stick surface and hot glue.  Simply start in the middle and create circular motions outward.  You DO want some of the lines to touch so the flower stays together.  It also looks more like pedals once the ink is applied if they are touching.  That's it.  While you have your glue gun out, you can make other types of pedal flowers, circles, geometric or organic designs.  How fun is that?

I sprayed several panels using Dylusions and Lindy's Stamp Gang Sprays. 

My first card  uses Lindy's Stamp Gang Sprays and the Technique Junkies June Release Sentiment, "Different Flowers."  I know my sister would love this card.  The Technique is called "Stencil Spray Fun and is found on the Sensational Stencils CD."


My Second card also uses the "Stencil Fun Technique," but with Dylusions Ink.  If you look in the background I added another TJ Stamp called "Whimsical Garden" using Versamark ink.   The "Different Flowers" sentiment is stamped with Versafine Black Onyx ink and embossed with clear powder.


I hope you'll head on over to the Technique Junkies store and check out more of the new June Release stamps.  While your there, pick up the Sensational Stencils CD and make your own hot glue stencils!

Happy Inking
The Crafty Nurse


Tuesday, June 9, 2015

Art Squared


Hello, Beth Norman, here with a short tutorial for you that is simply called Art Squared.  This is a great card for many occassions by simply adding a sentiment in place of all the picture stamps.  I have scraps left over so I'll eventually post another card using this style.


Supplies:  Kaleidacolor ink pad (or a variety of ink pads), sponges, glossy cardstock, white cardstock (not shown), paper trimmer and StazOn


Using a regular piece of white paper, stamp out your plan.  This will allow you to make any adjustments as necessary.


Using your sponge, ink up glossy cardstock.


Using your choice of adhesive, glue down your image onto your cardstock in which you have laid out your design plan.  My choice of adhesive was the use of my ATG gun.  Continue adding your inked pieces until your design plan is fully covered.

STAMPS USED:


TIPS:

  • Colour two identically sized (scraps will do too) pieces of glossy cardstock with ink.  This will allow for any mistakes.  For example, when I first stamped out my Bold Daisy, they were just blobs because I used a juicy pad.  On my second attempt, I did not re-ink and pressed out two flowers
  • To keep an exact size of paper, place your blade at the bottom of the glossy paper and cut upwards.  Cutting downwards may make your glossy cardstock uneven, as I found out.
  • Cut your design plan slightly smaller than finished size to avoid white edges to show.  
  • Let your StazOn images to completely dry before adhering them to your cardstock.  It takes StazOn to dry a little slower compared to regular ink on regular cardstock