Monday, October 10, 2016

Naughty and Nice!

Greetings Inky Friends!!


Today I'm sharing a fun technique using Distress Stains and a Shimmer Spray.
I began by adding stains directly to my background stamp.
I "activated" the stains using the Dylusions Mica spray which has a shimmer in it.
I was afraid that color would over power the stains, but it did not! I would suggest a translucent shimmer spray but I did not have one available at the time of creating :)


I then took some Distress ink and sponged around the Swaths of Texture background piece.
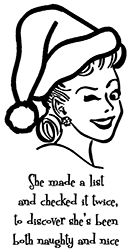
My focal image uses one of the New October Releases called Mrs. Santas List
I colored her using Distress Markers and the green piece used behind her was a
scrap left over I had from another project.
Of course I had to add some more shimmer so I added glitter to her santa hat.
I love the vibrant and retro feel of this card. One of my favorites yet!


Until next time...
Happy Creating!
~Tonya~  oxox

Saturday, October 8, 2016

A Naughty but Nice card

Hello All Lanette Here!

Well it may be October and I am decorating my house for Halloween.... But my craft room is all ready starting to look like Christmas! So with the count down on for Halloween I thought I would share a sassy little Christmas card with you.


Featuring a one of this months new releases....


Products Used: Technique Junkies Mrs. Santa's List Stamp, Art Anthology Sorbet, Ranger Archival Ink, Copic Markers & Glitter Cardstock.


Here is a better look at the stamp I used today...


Thank you so much for stopping by today! 
I hope that I have inspired you in some way!


Monday, October 3, 2016

Joyeux Noel!

I have been having fun with the Art Anthology Coloration sprays this month!   They were sprayed on a white sheet of card stock.  I used Technique Junkies Father Christmas - http://techniquejunkies.com/father-christmas/ - as my focal image and the newly released Technique Junkie stamp called Joyeux Noel - http://techniquejunkies.com/joyeux-noel/__. 

I stamped Father Christmas in a medium brown ink.  I used a gold Wink of Stella pen to highlight different areas in the stamped image.  Lot of card stock layers - including a text weight gold card stock - and a ruffled ribbon at the bottom of Father Christmas help to make the card unique and rather simple to complete.  I used three different punches for the embellishment.  I first stamped the greeting with black Versafine ink, covered with detail black embossing powder, and heat set. Then i punched out the saying making sure I had most of the image.  Then I punch a layer of gold text weight card stock, and a circle of the green color.  It is popped up on the right side with dimensionals, and the left is only adhered with two sided tape.

Don't forget that all of the Technique Junkie Christmas release stamps are on sale for 15% off through October 10!

Have a wonderful day -- and get inky!

Judy Jackson

Saturday, October 1, 2016

Welcome to the Hop - It's Lookin' Like the Holidays!

Welcome! Today is October 1st and the Technique Junkies Design Team is celebrating the October Release stamps with our monthly Blog Hop. Even though the stamps were pre-released earlier in September, its time that we shared the team's inspiration.

And, of course...the October Release Stamps are 15% off, too, until October 10th. Simply add your selection to your shopping cart, and the stamps will be discounted at checkout.

Ready for some inspiration?

First, we have this Christmas Canine, called Ho Ho Ho Dog:

Of course, we can't have a Christmas Dog without a feline counterpart! The Christmas Mug Shot stamp is proving to be very popular -- it's just so much fun!


And finally, this pretty, celebrating Turkey Day, with the Thanksgiving Blessings Set:

There is so much more to see! Follow along with the hop to see what the design team has in store for you (including more on my own blog, at the end of the hop):

Design Team Blog: http://techniquejunkies.blogspot.com (you are here)


I hope you enjoy the hop -- see you on the back end!
Pat Huntoon

Thursday, September 29, 2016

Ghostly Halloween Party Invitation

Hello Everyone!
Another rainy day here in Michigan, USA.  Great excuse to hang out, make a few cards, and do a bit of blogging.  I would like to share with you Halloween themed party invitations in two colors.  I stamped a spooky ghost on chalk board paper with chalk inks.  I used two of the new release September collection from Technique Junkies.  Take a look.


Materials List:
Stamps: Ghost and Be Scary (Sentiment) both from Technique Junkies
Ink: Cloud White and Persimmon Versa Magic Chalk ink; black dye
CS: black chalk board, gray, orange
DP: Halloween prints
Gray Mesh trim
Tissue Paper
black ribbon
Label Punch


Make both:

  • Make card bases from gray and orange CS
  • Add a layer of DP to each card
  • Glue the mesh on the gray card, the tissue and black ribbon (with a knot in one end) to the orange card


  • Stamp the Ghost on the chalk board CS with chalk ink and add to each card
  • Stamp the sentiment with black dye ink and punch out label shape
  • Add label to card
  • Tie a bow in black ribbon and to gray card


Super fun scary invitation.  This card would work equally well as a Halloween card.  Check out all the New Releases.  Also, the October new Releases are up on the site a bit early! Enjoy looking at those too!!  See you next time!!
Karen McAlpine

Tuesday, September 27, 2016

Fright Night

Hello folks.  Beth Norman here with a card that was super fun to make, and although it was a little intimidating for me, I took on the challenge and am happy with the results.

I started by brayering SU's Crushed Curry onto the cardstock.  Next, I stamped out Technique Junkies Witchy Moon, and then fussy cut it, masking it with a Post-it Note.  I brayered the top third of the card front with Pumpkin Pie and then added just a hint of Rich Razzelberry.

Using SU's birch tree embossing folder I embossed my image.  I then used Early Espresso and brayered the raised birch trees with a very light hand.

Lastly, I added Fright Night to the card.  The sentiment was sponged with Rich Razzelberry.

Thanks for stopping by.


Monday, September 26, 2016

Have Courage

Greeting Inky Friends!


I decided to pull out an OLD TECHNIQUE from the archives of
TJ Newsletters! This one is called "Chalk Dragging" and is from April 2003, Volume 1, Issue 4! However I used 'updated' materials that I didn't know about (if they were even available then?) like Pan Pastels! I tried it first using just one color and then decided to use
2 on the second piece and liked that result better.


I inked the It Takes Courage stamp in a Clear Pigment Ink Pad (Versamark would work too!) and pounced/sponged the same Pan Pastel colors over the image to set it. The beauty with Pan Pastels is that you can erase it! So i erased around the image and words but not too heavy so I can leave that ghosty look to go along with the dragged look. I then folder over a couple piece of Washi Tape to create little flags and popped up the whole image.


I encourage you to take a look at past techniques and try your hand at 'updating' the technique or using your updated supplies and seeing what you end up with! Who knows? You may end up with a totally new technique in the process!

Until next time,
Happy Creating!
~Tonya oxoxo