Showing posts with label Christmas Cards. Show all posts

Thursday, December 12, 2024

Brightly Shining

Deb here with a quick and easy holiday card . I used the Brightly Shining stamp and created these 2 cards in no time at all.The hardest part was trying to decide which papers to use. on my card bases. I finally chose the Star of Bethlehem paper pad from Hobby Lobby .


  • I stamped the image with Impression Obsession mini ink pads - Canary & Navy - on white cardstock.
  • The images were cut with a scalloped oval die.
  • I adhered the patterned paper onto Kraft card bases.
  • A large gold rhinestone was placed in the center of the large star on each card .
  • On the card on the left, I also placed navy rhinestones in each small star.
  • The sentiment ovals were adhered to each card front with foam tabs.

Now is the time to do some shopping for new stamps - everything at Technique Junkies is 30% off !! And if you use my code - TJ10Deb - you will save another 10%. This sale has been extended through December 15 at midnight EST.


Thank you for stopping by to see my latest cards.I'm about finished all of mine for Christmas .. Now I just need to get them mailed out . I started addressing envelopes in November, which was a big help. I'll see you soon with more Technique Junkies inspiration. In the meantime, be sure to check back here for my teammate's creations.

Sunday, October 23, 2022

Santa Shaker Card


Good morning!  It's Holly posting today, and I have a fun shaker card to share with y'all today.  I used the beautiful new Classic Santa stamp from Technique Junkies and stamped it with red ink onto some white cardstock.  Then I cut down some clear packaging and taped three sides onto the back of the Santa panel.  With one side left open, I poured some sequins into the front of the Santa panel and then taped the last edge to the back to create the shaker piece.  I die cut some letters from black cardstock to create the fun sentiment - Ho Ho Ho.  After I glued the letters down, I adhered the shaker panel to some black cardstock and then to a red card base.

Please feel free to use this code, TJ10Holly, when you shop at Technique Junkies.  You will save 10% off your entire order, so grab this Classic Santa and check out the rest of the great Christmas stamps from this month's release HERE.  Have a wonderful day!


Wednesday, October 19, 2022

Believe and Embellished Merry Christmas

 Hi! Tracy Shultz, The Hopeful Crafter, here with two Holiday Cards featuring two new stamps from Technique Junkies. Check out all the new release stamps here: https://techniquejunkies.com/october-2022-stamp-release/ Use code TJ10Tracy to save 10% off your order. 

For my first card, I heat embossed the new Believe Stamp (SD1195) with silver embossing powder. I die cut it with a stitched rectangle die. I ink blended the edges of the rectangle with Tranquil (light blue) ink from Catherine Pooler. For my night sky I used a piece of navy blue card stock and splattered it with Frost White Fantastix Ink by Tsukineko. I die cut this with a stitched rectangle die. I used a large silver foil circle to represent the moon in the upper right hand corner.  I used silver foil cardstock cut with a stitched rectangle die for a mat layer. I adhered everything to an A2 card base. 

For my second card, I embossed the Embellished Merry Christmas stamp (SD1198) with dark green embossing powder, then die cut that with a stitched rectangle die. I then used the Quirky Little Trees Stencil  from A Colorful Life Designs with Later Gator (green) Lunar Paste on white cardstock. I used green foil cardstock as a mat layer and adhered to an A2 card base. I then added some foiled ephemera stickers from my stash (a Christmas Tree, a red pickup truck and holly leaves). 
Thank you for visiting the blog today!


Wednesday, December 15, 2021

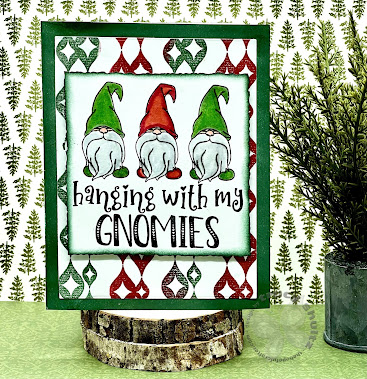
Hanging with my Gnomies

 Hello. Tracy Shultz, The Hopeful Crafter here with you to share a holiday card.  Today I have a cute card that features two stamps from Technique Junkies. But, before I give you the details on my card, I need to remind you that today, December 15, 2021 is the last day for the Technique Junkies Inventory Reduction Sale.  Over 200 stamps have been reduced to 35% off plus you can use my code: TJ10Tracy to save an additional 10%  Here's a link to the inventory reduction page: https://techniquejunkies.com/december-inventory-reduction-sale/

The card that I made features the Hanging with My Gnomies Stamp (SD1015) which I colored with red and green Karin markers. I colored the beards with Aqua Shimmer and trimmed with the Deckle Trimmer. I used a domed foam blending tool to ink blend Spruce Catherine Pooler ink along the deckled edges. Technique Junkies now sells Catherine Pooler inks. The background stamp is Baubles (S713), which I stamped with Spruce and Rouge Catherine Pooler Inks. I ink swiped the card base with Catherine Pooler Spruce Ink, thus creating a perfectly matched mat layer.  

Links to products used:

Thank you for visiting!


Tuesday, October 26, 2021

Wintery Poinsettia Christmas Card


It’s always nice to put some extra time and effort into a few of your holiday card projects. I like to have special, detailed cards to give to those few people who appreciate cardmaking or who live far away. For me, this project was one of those special, detailed cards - where the card itself will be the Christmas gift.


I started with the Bird and Poinsettia Border Stamp by Technique Junkies. This stamp is so lovely and is really versatile for Christmas, holiday and also general winter cards. I also think this would be the perfect stamp to use for those “winter birthday” cards as well.


I stamped with brown Archival Ink and then used my Nuvo Waterbrush Pens and a combination of Distress Oxide inks and regular Distress Inks to color in the image.


Then, I used my craft knife to carefully cut out all the INSIDE spaces… look carefully in between the branches and the little pinecones. This was all hand-cut out with my craft knife and some time. :)


After I cut out the INSIDE spaces, then I could easily fussy-cut around the outside of the stamped image. I used Nuvo Deluxe Adhesive to glue the stamped, fussy-cut image to a piece of patterned paper from the "Frosty Sparking" paper collection by Craft O’Clock.


I stamped the Dotted Merry Christmas stamp with black Archival Ink and used a rectangle stitched die from my stash to cut it out and add to my card.


The paper collection has lots of coordinating fussy-cut elements, so I simply found a bird, a candy-cane, two leaves, one anise seed, and a few flower elements to add on top of the stamped image. I used a combination of hot glue and my Nuvo liquid adhesive (the hot glue adds dimension). 


I mounted the whole thing on top of a black card base. This card did take me quite a while, but I enjoy the detail work every now and then. When I showed my husband the finished card, he said, “Wow… you really put some time into that one!”


Hope this inspires you! Thank you for looking! 


Thursday, October 21, 2021

Christmas Tag Card Idea


Mass-produce holiday cards easily by creating large "gift tags" to use as card panels! 


I used the "Retro Ornaments" background stamp for this project. This background stamp is part of the October 2021 NEW STAMP RELEASE, but any background stamp would work great!


Create tags easily by trimming out the background-stamped area to about 4" x 3" (or whatever size you like). Then, LIGHTLY FOLD the rectangle in half (but be careful not to crease). While holding the folded paper, cut the corners off of one edge and unfold. Magic! Keep the cut corners and use on other projects!


Ink the edges of the tags, and add embellishments and sentiments of your choice. For this project, I used the "Snowflakes Set of 9" and a little ribbon and patterned paper from my craft stash.


I also used some snips of green scrap glitter paper instead of ribbon at the top of the tag. And I used one sequin instead of a brad... just because. 😊

REMEMBER you can save 10% on your next order at techniquejunkies.com with coupon code TJ10ERIN 


Here's a look at the finished card:


Thank you for looking! 


Tuesday, October 12, 2021

Stamping & Fussy Cut Christmas Card


Want to add some extra special detail to a few Christmas cards this year? Adding a little effort to one or two cards in your project stash is well-worth the effort, especially when the card itself is the gift. I like to do this with my older family members or for those who live far away; they always appreciate the time it clearly takes to stamp, color and fussy-cut a lovely card.


This new release set is absolutely gorgeous, and you will be able to make SO many lovely projects with the stamps! (Make sure when you shop, enter coupon code TJ10ERIN to save 10% on your entire order!)


I used Archival Ink to stamp the Christmas Card Frame onto white cardstock. Then I stamped one of the "Light of Faith Sentiments" in the center. After that, I used Distress Inks and Distress Oxide Inks and a water brush to add color to the leaves, pine boughs, pinecones, and star.


With some "Dragon's Blood" Shimmering Bliss Spray, I added the red color to the ornament and the berries. I love the shimmer it gives!


Once it was colored, I used a craft knife to cut out the intricate details inside the branches. Then I used detail scissors to fussy cut the outside of the entire stamped image. I mounted it on a piece of die cut patterned paper from "This Miracle Night" paper collection by Craft O'Clock and embellished the card with a few fussy-cut elements also from the same paper collection. As a final touch, I added a few sequins.

I did the same process on a second card, and created a video tutorial as a companion. If you are interested in this process and want to learn to color with inks or to fussy-cut stamped details, check out the video below:


Thank you for looking! 


Thursday, November 26, 2020

Smallest Bell...

    Hi there!  Happy Thanksgiving from all of us at Technique Junkies!

It's my day to post here on the Technique Junkies Design blog, and I'd like to share a beautiful card that I created, using some gorgeous November release products!

This card was another easy, clean and simple (CAS) card. To create this card, I used the new release Technique Junkies Jingle Bell Stencil, and 'SD1046 Joyful Jingle', from the October release. After cutting the panel to size, I placed the stencil over the panel, and applied Versamark Ink. I quickly sprinkled on some silver embossing powder, and used my heat gun to get this beautiful silver shine. To finish off this panel, I added a strip of Silver Washi Tape.  The sentiment was stamped onto the blue cardstock with Versamark Ink, and was heat embossed in silver, as well. This panel was then adhered to the focal panel.


Technique Junkies products make such beautiful cards!  

This November release is amazing! So glad you stopped by today!

Don't forget!!! You can always save 10% on any order by entering TJ10Patti at checkout.


Now, be sure to head over to the Technique Junkies store and check out the incredible new stamps this month! 

Thanks for stopping by,

Patti J.

Sunday, October 25, 2020

Deckled Ombre Holy Night


 Have you started on your Christmas cards yet?  I have a nice little stash started, and this is one of the latest ones that I created.  I used the beautiful new Brightly Shining stamp from Technique Junkies along with a Deckled Rectangle stencil to create this clean and simple card.  Even better, it's perfectly flat for mailing with just one first class postage stamp.

I began by placing the 4" Marvelous Masks Deckled Rectangle stencil (A Colorful Life Designs) over some white cardstock.  With the ink blending brushes, I added Distress Oxide inks starting with Peacock Feathers at the bottom, then Chipped Sapphire in the middle, and finally Wilted Violet at the top.  After I rubbed an anti-static bag over the stenciled inks, I stamped the Brightly Shining sentiment with Versamark and embossed it with white embossing powder.  

Think of all the different color combos you could use with this stamp.  Change up the embossing powders to silver or gold and try different inks in the background.  Go wild and use neon inks for a really colorful card or go non-traditional with a pink and yellow background.  The possibilities are endless!


Thursday, October 22, 2020

Silver Bells


Hi Junkies!  It's Holly posting today, and I've got another fun and easy Christmas card to share with y'all.  I started by stamping the beautiful new Joyful Jingle from Technique Junkies onto black cardstock with some Versamark ink and heat embossed it with silver embossing powder.  Then I took the matching Jingle Bells stencil and placed it over some black cardstock.  I smooshed a juicy Versamark ink pad over the stencil, carefully took the stencil off, and covered the inky areas with silver embossing powder.  The powder was melted with a heat tool and then I was able to put the card together.

Wouldn't this be fun to recreate in different colors?  Set up an assembly line and you'll have a bunch of Christmas cards ready in no time!


Sunday, July 26, 2020

Christmas in July - last two days!


We are in the last two days of Technique Junkies' Christmas in July, and I have a one layer card for you today!

I used the Silent Night Stamp with brown ink on Kraft card stock, then Over-stamped it with the holly from the Season's Greetings Set. I colored the holly sprig with alcohol markers, then used Diamond Glaze over the top (also known as Glass Glaze, Glossy Accents, etc) to give it a shiny 3-D texture.


Today and tomorrow are the last two days to save 25% on Technique Junkies Christmas stamps using the code JULYXMAS. Don't miss out!

Have a great Sunday,
Pat Huntoon

Thursday, December 12, 2019

May Peace Be Your Gift AND A SALE!

Happy Thursday!

Technique Junkies Inventory Reduction Sale!


PLUS…
Take another 10% off by using the code TJ10Jeanne
The total discount amount on the sale items is a whopping 45%!

How to redeem…

1. Select items in the Inventory Reduction Category – they will be discounted automatically in your shopping cart 35%
use discount code TJ10Jeanne
Apply the code at checkout to save an additional 10% off!

This is one of the sale stamps! 

 I used Rustic Pine (on sale!) and Gifts of Christmas (set of 5) I used ink pads to swipe ink onto my 
background in various colors and the used a paintbrush and bleach to remove some color. 
I stamped the tree image (Rustic Pine) in brown ink and then added some green to the tree. 


SD838 Rustic Pine

SS081 Gifts of Christmas


Hope you enjoyed my project!

Monday, December 2, 2019

St. Nick and a HUGE SALE!!!

Happy Monday!

Technique Junkies Inventory Reduction Sale!


PLUS…
Take another 10% off by using the code TJ10Jeanne
The total discount amount on the sale items is a whopping 45%!

How to redeem…

1. Select items in the Inventory Reduction Category – they will be discounted automatically in your shopping cart 35%
use discount code TJ10Jeanne
Apply the code at checkout to save an additional 10% off!

This is one of the sale stamps! 
It's called St. Nick. I used the Messy Diamond Grid stencil from A Colorful Life Designs in the background.  


Hope you enjoyed my project!