Hello, it's Beth Norman here with a tutorial that was originally printed in the June 2009 issue of the Technique Junkie Newsletter. For 10% off your order please use TJ10Beth.
I love this technique because it's so unique. It may look like a lot of work, but trust me, it goes together quickly.
I used Birthdays and Donuts. Ah, donuts, my weakness in life.
Supplies: 5" x 5" cardstock, black ink, three colours of coordinating ink, scissors, round stamp (or punch), brayer, fine black pen (not in photo), copier paper (not in photo)
Stamp out circles all over your cardstock
Stamp out a circle in the center of your full-sized copier paper. Cut out the circle with your scissors to leave a hole.
Place your hole over top of your coloured circle and stamp out the words on your circle. Repeat until every hole is covered.
Stamp out your circular stamp on a sticky note, ensuring you have the sticky part on the edge of your stamp is placed in the same direction
Cover all of your circles with the circles you just cut out. TIP: Make sure the sticky part of the circles are all in the same direction so that when you brayer, your circle does not lift
With your third colour, brayer over top of your cardstock. It will need several coats to ensure a nice crisp even colour. TIP: Brayer in one direction. If you rol back and forth you risk the lifting of your circle.
Using your fine pen, draw around your circles once, or twice, to cover up white space, or simply to add interest.
I hope I have inspired you to try this technique out. It's a fun one!
Tuesday, January 16, 2018
Sunday, January 14, 2018
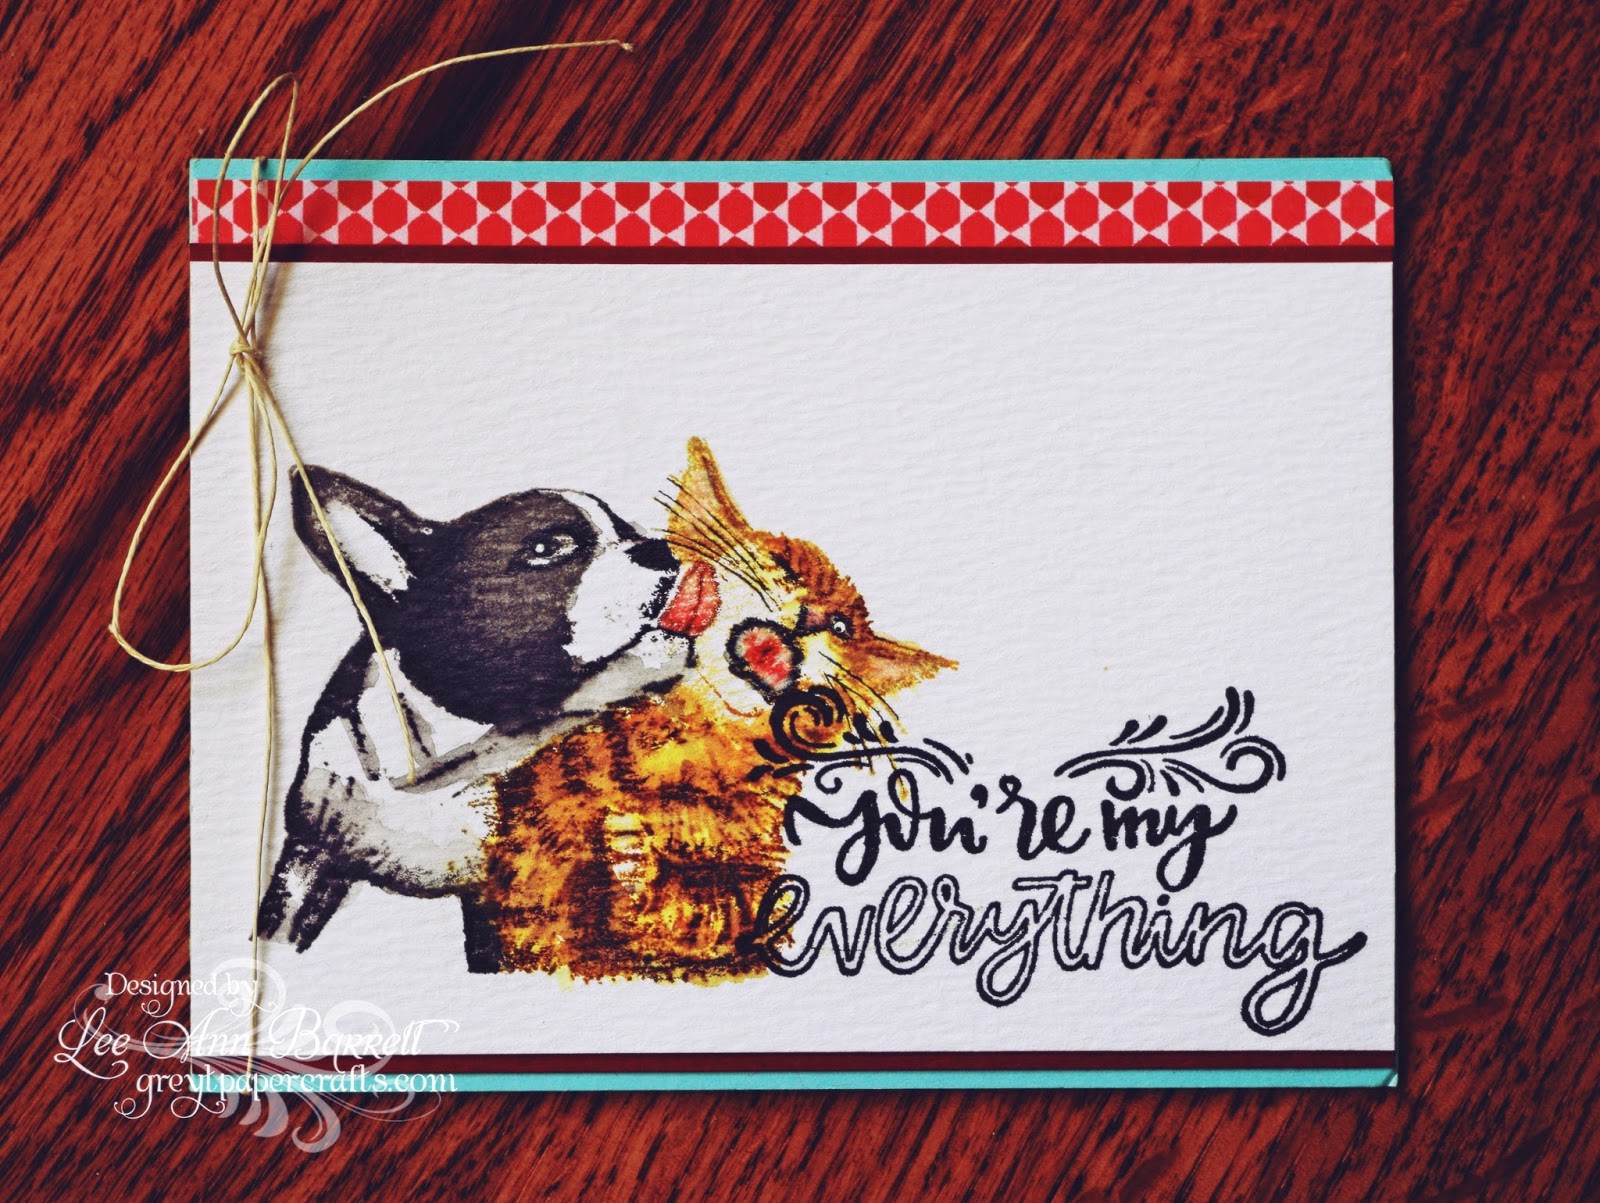
The Kiss!
Hello, Hello!
Hope everyone is staying warm this January!
We have entered my favorite card making season- Valentine's prep! There are so many fun images out there and it seems everyone is wanting to give (and receive) a valentine card. The Kiss has become one of my top favorite Valentine images. You can get 10% off of it, or any other stamp with code TJ10LeeAnn.
I paired it with a sentiment from the Love You More set.
I kept it very simple, focusing on the two cuties. They were watercolored with distress inks. I used my MISTI to get precise placement of color.
Using watercolor paper, I inked up precise areas of the image, masking off some areas as I went along; this allowed me to put the color where I wanted it. Once the color was down, I moved it around some with water. I repeated this process until I reached the desired look.
Thats it for me; when I am not here, you can find me at Greytpapercrafts.blogspot.com.
Have a wonderful and crafty week all!
Lee Ann
Hope everyone is staying warm this January!
We have entered my favorite card making season- Valentine's prep! There are so many fun images out there and it seems everyone is wanting to give (and receive) a valentine card. The Kiss has become one of my top favorite Valentine images. You can get 10% off of it, or any other stamp with code TJ10LeeAnn.
I paired it with a sentiment from the Love You More set.
I kept it very simple, focusing on the two cuties. They were watercolored with distress inks. I used my MISTI to get precise placement of color.
Using watercolor paper, I inked up precise areas of the image, masking off some areas as I went along; this allowed me to put the color where I wanted it. Once the color was down, I moved it around some with water. I repeated this process until I reached the desired look.
Thats it for me; when I am not here, you can find me at Greytpapercrafts.blogspot.com.
Have a wonderful and crafty week all!
Lee Ann
Labels:
Distress Ink Watercoloring Technique,
Lee Ann Barrett,
Love You More,
MISTI,
Technique Junkies Stamps,
The Kiss
Saturday, January 13, 2018
You Are So Loved
Hello Junkies!
It's Ceal, here to share with you today I am gearing up to make lots of Valentines cards, and this stamp is perfect, so perfect that you don't even have to use it for valentines, you can use it anytime of the year to let someone know how much they are loved. I also have a code at the bottom of this post where you can save 10% off your order at Technique Junkies, now how cool is that to save 10% and let someone know how much you love them. Scroll down to get your code
To make this card I started with a white top folding card base, a Powder Pink panel embossed with a heart embossing folder and of course this fabulous stamp You Are So Loved.
Using the Mini Misti, I stamped the image on a scrap piece of cardstock in Versamark ink and then wiped off the hearts and sprigs and embossed just the greeting in gold embossing powder. Because I used the MISTI I was able to go back and color the hearts and sprigs with Tombow markers and stamp again to give it more color. I then used a stitched heart die to cut it out and attached to the front of my card using foam tape.
Friday, January 12, 2018
TJ Inkspirations: Pretty Pearlescent Watercolors, Part 2 of 2
| ||||||||||||||||||||
| ||||||||||||||||||||
Thursday, January 11, 2018
Birthdays Are Like Donuts Card
Greetings from the cold northeast U.S. Lynda Joy here, with a card using a stamp from the new January release. Just a reminder, if Santa didn't bring you all the TJ stamps you wanted, you can get 10% off your stamp purchase of any non-release stamps by using my code TJ10Lynda.
I used the TJ stamp Birthdays and Donuts .
Before stamping, I did a little surgery on my stamp, and cut off the donuts, so that I could use them individually, separate from the verse. This is very easy to do, just cut the stamp where you want with scissors, leaving a little area around the image. I figure I can always use it the way it was intended by just placing the stamps in that order. Here's how my set looks now.....
I wanted to create this background of scattered donuts. I stamped with Ranger archival ink in the color 'coffee,' and used watercolor and markers to color the donuts. For the verse, I used the same 'coffee' ink, and mounted it onto coordinating card stocks, wrapped bakery string around the bundle, and attached to my card with foam tape. I fussy-cut one of the donuts, and added that, also.
To finish off the card, I attached the panel to a brown A2 card, and added some tube beads to resemble sprinkles.
Would you like to WIN $25 worth of TJ stamps? FREE stamps...wow! All you have to do is enter the Technique Junkies Challenge HERE for a chance to win. You have nothing to lose, so come on over. It's a win/win. We get to see your artwork, and you qualify to win a prize.
Be sure to check out our TJ Facebook Page. There are lots of ideas there, and we would love for you to post some of your cards there. And don't forget to check out the release stamps and other stamps over on the Technique Junkies website. If you find any goodies you just have to have, don't forget to add TJ10Lynda at checkout for 10% off.
Blessings,
I used the TJ stamp Birthdays and Donuts .
Before stamping, I did a little surgery on my stamp, and cut off the donuts, so that I could use them individually, separate from the verse. This is very easy to do, just cut the stamp where you want with scissors, leaving a little area around the image. I figure I can always use it the way it was intended by just placing the stamps in that order. Here's how my set looks now.....
I wanted to create this background of scattered donuts. I stamped with Ranger archival ink in the color 'coffee,' and used watercolor and markers to color the donuts. For the verse, I used the same 'coffee' ink, and mounted it onto coordinating card stocks, wrapped bakery string around the bundle, and attached to my card with foam tape. I fussy-cut one of the donuts, and added that, also.
To finish off the card, I attached the panel to a brown A2 card, and added some tube beads to resemble sprinkles.
Would you like to WIN $25 worth of TJ stamps? FREE stamps...wow! All you have to do is enter the Technique Junkies Challenge HERE for a chance to win. You have nothing to lose, so come on over. It's a win/win. We get to see your artwork, and you qualify to win a prize.
Be sure to check out our TJ Facebook Page. There are lots of ideas there, and we would love for you to post some of your cards there. And don't forget to check out the release stamps and other stamps over on the Technique Junkies website. If you find any goodies you just have to have, don't forget to add TJ10Lynda at checkout for 10% off.
Blessings,
Wednesday, January 10, 2018
Bless Your Heart!
Hey, Junkies! Toodle Noodle Ro here with you today. I hope your New Year has been kind to you. Since I received a brand new grandson on New Year's Day, I am filled with a whole lotta love! So of course I want to share a Valentine with you!
In case you missed out on the Blog Hop sale, and there are still some goodies on your "want list", you can still save 10% by using the code TJ10Ro. Just click HERE to go shopping!
Well, Valentine's Day is just a little over a month away and I was feeling very in love with the new stamp set, Butter My Butt. What does that have to do with love, you ask? Oh, this set of sentiments has a little fun for everyone. With 8 sentiments from which to choose, you're sure to find a something fun and fitting for any type of card. I chose "Bless Your Heart". A great southern term to cover a LOT of meanings! lol
Here is a little peek at the sentiments that are included in this fun set:
To start my card, I used Messy Love for my background. Using Gelatos in three shades of red and pink, I randomly colored the stamp and stamped onto some white cardstock. I generously sprayed with water, then dried it with a heat tool. I loosely stamped the whole panel with Versamark and added some chunky clear embossing powder. I then added a little Merlot Colorburst and sprayed it lightly with water. After drying and trimming down the piece, I die cut a heart in the center.
On a slightly larger piece of red cardstock, I lightly marked where the heart would fall that was die cut from the stamped panel. Using masking, Versamark, and white embossing powder, I added the "Bless Your Heart" sentiment. I erased the pencil marks, added dimensional tape to the stamped panel and adhered it to the red panel. That was then adhered to the white card base.
I hope you're inspired to spread a little love of your own. Don't forget you can save 10% on your orders using the code below.
Thanks for visiting!
Til next time,
Keepin' it inky!
In case you missed out on the Blog Hop sale, and there are still some goodies on your "want list", you can still save 10% by using the code TJ10Ro. Just click HERE to go shopping!
Well, Valentine's Day is just a little over a month away and I was feeling very in love with the new stamp set, Butter My Butt. What does that have to do with love, you ask? Oh, this set of sentiments has a little fun for everyone. With 8 sentiments from which to choose, you're sure to find a something fun and fitting for any type of card. I chose "Bless Your Heart". A great southern term to cover a LOT of meanings! lol
Here is a little peek at the sentiments that are included in this fun set:
To start my card, I used Messy Love for my background. Using Gelatos in three shades of red and pink, I randomly colored the stamp and stamped onto some white cardstock. I generously sprayed with water, then dried it with a heat tool. I loosely stamped the whole panel with Versamark and added some chunky clear embossing powder. I then added a little Merlot Colorburst and sprayed it lightly with water. After drying and trimming down the piece, I die cut a heart in the center.
On a slightly larger piece of red cardstock, I lightly marked where the heart would fall that was die cut from the stamped panel. Using masking, Versamark, and white embossing powder, I added the "Bless Your Heart" sentiment. I erased the pencil marks, added dimensional tape to the stamped panel and adhered it to the red panel. That was then adhered to the white card base.
I hope you're inspired to spread a little love of your own. Don't forget you can save 10% on your orders using the code below.
Thanks for visiting!
Til next time,
Keepin' it inky!
Labels:
Ro Donner,
Technique Junkies,
TJ Stamps,
Toodle Noodle Ro
Tuesday, January 9, 2018
PARCHMENT CRAFTING HAPPY WINTER WISHES
Hello Junkies,
I've got a fun technique for you to try. Have you ever heard of Parchment Crafting (Pergamano)? It's a parchment paper art which came from the Netherlands. You can find lots of interesting examples on Pinterest, so I won't link any here.
The proper way to do this is with parchment paper, but not having it, I decided to try it on heatable vellum paper because it's heavier than regular vellum and not easily torn. I really like the results and will be doing more of it, but thought I'd share this attempt using "Happy Winter Wishes" stamp set from the new January 2018 release with you.
After stamping the bunny with VersaMark ink and heat embossing it with white ep, on the vellum, I turned the piece over, face down, on a foam board I use for piercing. Taking a stylus I used for dry embossing, I rolled it around the interior of the bunny's body. Once that was done I decided I would color the scarf and coat with Copic markers (again on the reverse side). When I was satisfied with the look, I fussy cut the bunny out of the vellum and mounted it on a pale blue cs panel I had already prepared with inked "hills" and the sentiment. A touch of Copic markers for shadow/grounding, a few sequins and this card was done.
Don't you love Technique Junkies Stamps? There are so many creative ways to use them. Go grab a bunch and use my discount code TJ10Cheri for 10% off your ENTIRE order!!!!
I've got a fun technique for you to try. Have you ever heard of Parchment Crafting (Pergamano)? It's a parchment paper art which came from the Netherlands. You can find lots of interesting examples on Pinterest, so I won't link any here.
The proper way to do this is with parchment paper, but not having it, I decided to try it on heatable vellum paper because it's heavier than regular vellum and not easily torn. I really like the results and will be doing more of it, but thought I'd share this attempt using "Happy Winter Wishes" stamp set from the new January 2018 release with you.
Don't you love Technique Junkies Stamps? There are so many creative ways to use them. Go grab a bunch and use my discount code TJ10Cheri for 10% off your ENTIRE order!!!!
When you get your new stamps, (using my discount code) come on over to our Design Junkies blog and join in on our monthly challenge for a chance to win even more Technique Junkies Stamps.
Thanks so much for stopping by. I hope you found some inspiration here and if you did please join us on our FaceBook page and share your creations with us. We love seeing them.
Have a happy day!
Subscribe to:
Posts (Atom)