Thursday, February 25, 2016

Those Who Wish To Sing

{jane bosi} Greetings, Junkies!!  Today's project is a colorful one I created using my Gel Press Printing Plate, some acrylic paint and a few other odds and ends!  I love using the printing plates and have found need for one of every size!  Even my kiddo's like to use them.  I wish I had discovered them years ago when we were heavy into finger painting!  I was lucky enough to get several background pieces from just one inking of the plate--so, you are likely to see this combo of colors on some upcoming projects, as well!

Once dry, I punched several differently sized circles from the background piece and then layered it over a second background.  For the second background, I used kraft cardstock, black ink and one of my favorite background stamps, Fresh Chevron.

To finish things off, I added Rain Dance and Always Find A Song.

Enjoy!  Be Awesome--Jane

Tuesday, February 23, 2016

Bookworm Bookmarts

Good morning Junkies!  I don't know about you, put I love a good read.  For those that still prefer printed materials over electronic media, I've created a couple of bookmarks.  These are all standard size and embossing figures heavily in their creation.


1)  Cut your bookmark paper to 2-1/8 x 6-1/2
2)  Stamp Le Tour Eiffel on a piece of mixed media paper and emboss with Silver Moon Turquoise embossing powder.
3)  Spray stamped image with Art Anthology Plush and Wild Orchid Colorations.
4)  Trim to 1-7/8 x 6
5)  Stamp one of the sentiments from Bookworms, Set of 6 onto a piece of velum using black Staz-On ink.
6)  Glue your trimmed, stamped image to your piece of bookmark paper, leaving room at the top to punch a hole.
7)  Add a little purple fiber and VOILA!  You have a bookmark

The next bookmark is created in a similar manner:


1)  Cut your bookmark paper to 2-1/8 x 6-1/2
2)  Stamp Books Background onto mixed media paper with Versamark ink and emboss with black embossing powder.
3)  Spray with Art Anthology Granny Smith Colorations.
4)  Trim to 1-7/8 x 6
5)  Stamp your sentiment from Bookworms Set of 6 onto a small piece of yellow card and trim.
6)  Glue everything down, leaving enough room to punch a hole.
7)  Run coordinating fiber though the hole.

That's it!  Two really sturdy bookmarks to use with paperbacks, hardbacks, or magazines.  I had so much fun making these I think I'm going to do a few more.  I have several magazines that could use some good bookmarks.

Until later.


Marilyn

Monday, February 22, 2016

Circle Strip - Day 6 of my Personal Challenge


This Circle Strip Technique comes from the December 2013 issue of the Technique Junkie newsletter.  I used a variety of Vintage papers to create the look  for this card.  I added a strip of lace in the middle of the card. I placed the Circle strips on white card stock and layered it on dark green card stock.

First I stamped the Technique Junkie Live Laugh Love frame stamp http://techniquejunkies.com/live-love-laugh-frame/ on a piece of white card stock. Then I stamped the couple from Technique Junkies Vintage Travel Cases http://techniquejunkies.com/vintage-travel-cases-set-of-5/ in the middle of the frame. I colored the couple and the grass with my Copic markers.  Then I used my glitter marker and carefully went over the words and the squiggly frame line around the edge.

I layered this focal image on dark green card stock and adhered it over the lace on foam tabs to pop it up a bit.  Then I stamped the words on with brown ink in the bottom right corner of the white card stock.

Have a great day -- and get inky.


Wednesday, February 17, 2016

Coffee Anyone????


Hello Junkies!

The Crafty Nurse here with more inspiration using the February Technique Junkies release.  I am a coffee JUNKIE!  Starbucks to be specific. I've also found a really cool treat called "Topperfino." They are little chocolate discs that you put in your coffee that are actually pieces of art.  They are only 25 calories and so beautiful to look at.  The best thing is it combines both my loves, art and coffee.

Now on to my card.  I used "Drinking and Thinking SD656 with the  Acrylic Gesso Tutorial from the Artistic Effects CD.  To add a little pizazz, I added book paper under the gesso, then stamped my image.  In addition, I took "Kona" Velvet  by Art Anthology and framed my stamped image. 

I liked the versatility of this stamp so didn't even give her a sentiment.  Pick up a cup of coffee, add a Topperfino and stop by Technique Junkies to pick up some great supplies!


I hope you've been enjoying some of the inspiration using the February release.  

Happy Crafting!


Tuesday, February 16, 2016

How to Mask and Create a Picket Fence

Hello, Beth Norman here.  I had so much fun making this card that I made four of them.  Don't you just love the distressed look of the fence?  Today I will show you how to mask your image to create clouds around the cat, and create this distressed fence.

Supplies:
Kitty Watching SD635 stamp; Distress Inks (I used Spiced Marmalade, Faded Jeans and Old Paper); blue ink (for sky); score board with bone folder; cloud die cut (I cut mine by hand); (2) card stock 4 x 5 ¼; scissors; wide sticky note; sponge dauber; water spritzer; grass/icicle punch; paper flowers; colouring medium (not in photo); paper cutter (not in photo); adhesive (not in photo); green card stock (not in photo); matt card stock 4 1/4 x 5 1/2 (not in photo)

Cut your card stock to 4" x 5 1/4" and score at every 1/4"


Turn your cardstock over so the embossed lines are raised.  With your lightest colour, streak your colour onto your cardstock.

 Spritz your cardstock with water.

As done previously, streak inks onto card stock.  To avoid horizontal streaks, glide your colour from top to bottom without stopping.


Stamp your kitty out onto white card stock ensuring the whiskers touch the top of your cardstock.  Next, stamp out your image on a wide sticky note.  Ensure the ears are at the top of the sticky note so that when you cut, the stickiness is on the top half of the cat.  It doesn’t matter that the whiskers go over the edge of the sticky note.  Cut out the cat’s face.


Stick the sticky note over top of the stamped out kitty.


Create a cloud.  I like to use watercolour paper so I have a sturdy piece of paper that can be reused over and over again.  Place your cloud down and sponge ink along the top of the cloud.  Repeat until the whole area around the cat is finished.

Picture of finished sky.

Colour your kitty as desired.

Along the black line and side and bottom, add adhesive.

Once you adhere your fence, turn over your card and cut along the bottom to create a 4 1/4 x 5 1/2 inch card.  Embellish as desired.


Monday, February 15, 2016

London Eye

Hello Inky Friends!

The background technique I chose for today's London Eye card is the Glimmer Ink Smash from the Shimmer, Glimmer, Sparkle & Shine CD.  It's so difficult for the camera to catch the shimmer but it really is there and looks gorgeous IRL!! I added the sentiment from American Proverbs on top of some sequin trim, added a few rhinestones colored with Copics and called it finished!

Thanks for stopping by today!!

Until next time, Happy Creating!
-oxox-
Tonya :)


Thursday, February 11, 2016

Sometimes.....Things Fall Apart

Happy Thursday, Friends!!  Last week, the Technique Junkie Designers kicked off the new month spotlighting a brand new release from Technique Junkies! I had so much fun with the new images, I just couldn't stop!

I started by inking the London Eye image in a variety of distress inks.  After misting lightly with water, I stamped the image on white card stock.  Once dry, I reinked with black and stamped again. It's a simple process, but one that produces interesting results.  I'm all for the complicate techniques, but I love it when art is easy, too!

To complete the card, I added Better Things--a fun Marilyn Monroe quote!

TTFN--Jane

Wednesday, February 10, 2016

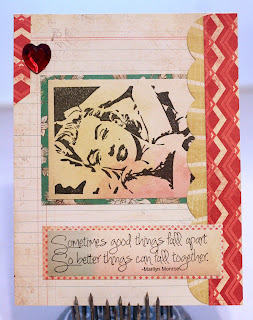
Marilyn

Yay!  It's Wednesday!  I'm glad to see you here so I can share the card I made with you.

First, I stamped SD655 Marilyn onto a neutral piece of patterned paper using black ink.
Then, I mounted it onto another with a 1/8" border.

Next, I stamped SDX063 Better Things onto the same piece of paper, again with black ink.
Then, I mounted it on another with a 1/8" border.

I layered a couple of strips of patterned paper onto the right side of the card with an accent of patterned paper and a red heart 'crystal' on the upper left corner.

 All of this on a piece of ledger designed pattern paper for the base of this card.

Until next time...


Tuesday, February 9, 2016

Valentine Mixed Media Card and a Tag

Good morning Junkies!  I've got a couple of items to share with you today.  So without further ado, here they are:


I started with a 4x6 watercolor mixed media card (the kind you use with Project Life).  I inked up Le Tour Eiffel with Memories Delicate Rose ink and stamped it in the center of the card.  Next, I punched out some hearts and embossed them with red and white embossing powder.  I added a die cut cupid I had laying around in my stash.  Finally, I stamped a fitting sentiment from Mae West Sentiments at the top and bottom of the card.


For this large #12 tag, I started off by stamping Batik Flourish on a smaller, scalloped tag and embossed the flowers with Lindsay's Stamp Gang Angel Wings Mauve.  Next I painted my embossed image with Art Anthology Vegas Gold & Chocolate Sorbets and Silks Emerald Green.  I then added the circles from Batik Elements Set of 6 and painted them the same colors as my flourish.  Once the paint was dry, I sprayed the tag with Art Anthology Wild Orchard Colorations.  I then set the tag to one side.

I sprayed a #12 tag with Art Anthology Plush Colorations and let it dry.  I then stenciled with one of the Art Anthology Off The Grid Stencils (they come in a set of three) and Gold Texture Luxe.  Using my scalloped tag to figure out placement, I used some floral die cuts from a Tattered Lace die and adhered everything down.  I stenciled DREAM using the Art Anthology Soliloquy stencil and Black Leather Jacket Sorbet.  Finally, I flicked some watered down Tuxedo Velvet across the tag.  Yes, it was a very involved tag.

Hope you enjoyed today's projects.  Until later..........................


Marilyn

Monday, February 8, 2016

Vintage Hats


I created a panel strip with the Technique Junkie Hats Off background stamp http://techniquejunkies.com/hats-off/.  I chose the section of the stamp that had the larger hats. I used the Houndstooth Check Technique Junkie background stamp http://techniquejunkies.com/houndstooth-check/ with a dark brown ink on a light tan card stock.

Then I wondered what colors to use for layering and just couldn't decide.  I knew I wanted to tie a ribbon around the panel -- but what ribbon? So I chose this ribbon with dark brown, pink and green stripes.  Then I used  oink and light green papers to match for the layer.  Have you ever done that -- used ribbon as the basis for choosing your layering?  Usually i do just the opposite I choose the ribbon to go with the colors I chose to use.  So this was a different way to decide on my ribbon for this card.


Have a great day and get inky!

Thursday, February 4, 2016

Paris Dreaming

Hello All,
Karen McAlpine with you today ....Let's talk about dreaming.....
My dreamy project today is made with one of the February New Releases, Paris Dreams.  This romantic image is so versatile and works perfectly with a Kaleidacolor pad. Use Blue Breeze, to ink up the stamp.


To add texture, I dry embossed the white layer and die cut the image.  To keep the color palette simple, only blue and white were used.


This image is so elegant, it really doesn't need a lot of embellishing.  So, a lovely card can be made quickly and easily with this pretty stamp.


Thanks for stopping by today to dream with me.  Note:  This stamp and all the other February New Releases are 15% off until Feb. 8!!   See you next time.  I hope you are having a lovely day--with plenty of time for stamping.
Karen McAlpine
Dreaming and Creating

Wednesday, February 3, 2016

Vintage Travel Page

Hello Fellow Junkies!

The Crafty Nurse here with a mixed media journal page using some of the new February Technique Junkie Stamps.  I hope you've had a chance to check out this fabulous release on the Technique Junkie Design Team page, if not, I encourage you to do so.  Pat is also offering all February Release stamps at 15% off until February 8th.

I began my page with Tim Holtz tissue paper then applied distress paint in Vintage Photo, Broken China, and Walnut Stain.  I then added a watery layer of gesso and wiped that around with a baby wipe.  I then took "Houndstooth Check S665" and stamped over the page in Versamark mark ink.  So that you don't get hard edges, just curl your stamp and roll instead of stamping the entire thing.  I then added gold perfect pearls for some shimmer.  Over that, I stenciled gold ferro paste over a Tim Holtz's "traveler" stencil.

The numbers, Paris Tower, and tag are all My Favorite Things dies cut from travel themed paper.  On the tag, I stamped the couple from "Vintage Travel Cases PS012" in Sepia archival ink and the sentiment in black archival ink.  I like the way the fade off on the bottom.

The suitcases are also from "Vintage Travel Cases PS012."  I began by stamping different suitcases with a variety of inks.  I stenciled over them with Art Anthology "Cracked" stencil and then layered that with rock candy distress stickles and let them dry.  I then adhered all the elements with matte gel medium and created shading with a Faber Castell Pit pen in brown. To finish I colored up some wooden planes also with the pitt pen  and called it a Technique Junkies Vintage Travel Page.


Well, that's my page for today, I hope you've enjoyed a a little inspiration.  I'll see you in a couple weeks for more fun with the February release at Technique Junkies.

As always, Happy Inking!


Hey Junkies!!

The Crafty Nurse here with some inspiration from the February Technique Junkies release.  I love all the releases, but this one for me was super fun with the quirky crime theme and of course the travel theme.

For my card today I've used new release stamp "Mug Shot SD638" to create the "Gesso Frame Technique from the Artistic Effects CD."  You might say, where's the gesso???  Its there, it's black gesso!  This is a super fun technique and made for a perfect "cell" for my bad little girl.


I hope you've already checked out the new release, if not, please stop by the Technique Junkies store and the Design Teams Blog for some more great inspiration.  Pat is offering 15% off the release until the 8th, so that is even more motivation!

Bye, Bye for now

The Crafty Nurse!

Tuesday, February 2, 2016

You Go, Girl!


Hi, it's Beth Norman here with a puuurfect new stamp from February's release called Hang in There, which was coloured with Prismacolor pencil crayons and OMS.

My background was stamped out using Random Circles background stamp, and the technique I used is called Distressed Rainbow Strips from the August 2013 issue of the Technique Junkie Newsletter.   The sentiment I used came from the Simple Sentiments 2a set.  These two stamps are not part of the February release.

Don't forget, February released stamps are on sale until February 8th.  

Monday, February 1, 2016

It's release day! Welcome to the HOP!

 
Welcome! Today is release day at Technique Junkies, and we are celebrating the new stamps with inspiration from our Design Team. We have a fun hop in store for you today, AND we have a 15%discount on the February Stamps, too.

Today I am featuring the New York New York stamp.

To start, I stamped the image on white cardstock with black StazOn ink.

To make the image look instantly vintage, I sprayed the stamped image with Sandcastle Colorations. After a few moments I wiped the image with a paper towel, then dried it with a heat tool.


To make the images at the bottom pop, I simply colored them with colored pencils.
 
There are 15 new image with this release! To preview the other images, it's time to start hopping!
This is the first stop of the hop, and it continues below:
Design Team Blog http://techniquejunkies.blogspot.com
Judy Jackson 
http://judysstampart.blogspot.com
Karen McAlpine 
http://dreamingncreating.blogspot.com
Sally Lynn MacDonald 
http://www.sallylynnmacdonald.com
Marilyn Hughes 
http://DollsEtc.blogspot.com
Kathy Stacy 
http://craftynurse4u.wordpress.com
Jane Bosi 
http://janembosi.blogspot.com
Tonya Davidson 
http://stampintonya.blogspot.com
Beth Norman 
http://sunflowers-dragonflies.ca/blog
Pat Huntoon 
http://patstamps.blogspot.com

Have fun at the hop - I hope you are inspired today!