Showing posts with label Christmas Card. Show all posts

Friday, December 20, 2024

Who Wore It Better? Christmas, Hanukkah, or Pepsi?


Who Wore It Better? 

Hello everyone. Welcome to Who Wore It Better...Christmas, Pepsi, or Hanukkah?

You might be wondering where this idea came from. 
Let me explain. 

The other day I noticed this Pepsi Twist can on the shelf and I immediately thought of the Vortex stamp in my stash at home, and I started to think of ways to combine this stamp and the Pepsi can into a card idea.  

Then I thought of those "Who Wore It Better" memes and decided to make a Christmas and Hanukkah card, coloring each with only 2 markers representing the colors of each holiday - and see, "Who Wore It Better".  

And that, my friends, is where this out-of-this-world idea came from.  LOL

To make the cards:

  • I stamped the Vortex stamp on white cardstock using Tuxedo Black ink from Memento because that ink is one of the inks that work well with Sharpie markers.  Then I die-cut each stamped image using a 3.75" x 5" stitched rectangle die.


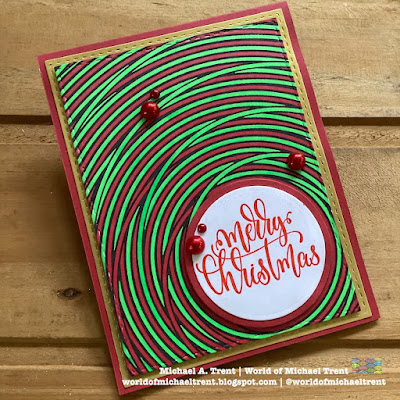
  • I colored the Christmas piece using a red and green Sharpie marker.  I also colored the Hanukkah piece using a blue and yellow Sharpie marker.  Turned out the yellow was Neon...but I think it worked?

To finish the Christmas card:
  • I made an A2 card base using red cardstock.  
  • I die-cut a piece of gold cardstock using a 4" x 5.25" stitched rectangle die and adhered it to the red card base.
  • I adhered a piece of fun foam to the back of my colored Vortex and then to the card front. 
  • I stamped a Merry Christmas sentiment (sadly, sold out) but you could use A Very Merry ChristmasSeason of Joy, or the Season's Greetings Sentiment, in place of the Merry Christmas.  I die-cut it using a circle die, then the next size up to die-cut a piece of red cardstock.  I adhered a piece of fun foam under the sentiment and then to the card front.
  • Lastly, I added some red crystals to the card front.   

To finish the Hanukkah card:
  • I made an A2 card base using blue cardstock.  
  • I die-cut a piece of silver glitter cardstock using a 4" x 5.25" stitched rectangle die and adhered it to the card base.
  • I adhered a piece of fun foam to the back of my colored Vortex piece and then to the card front. 
  • Using Happy Hanukkah, Set of 2, I stamped Happy Hanukkah on a piece of white cardstock, layered it on a piece of blue, then to the front of the card.  Then I stamped the inside sentiment on a piece of white cardstock and adhered this to the inside.  
  • Lastly, I adhered some blue crystals to the card front. 


So, be honest, which card wore the can of Pepsi Twist better?  Christmas or Hanukkah?  Or both!  Let me know in the comment section.  

Thanks for joining me on the blog today.  Until next time...

Hugs from Brasil.

~Michael

Saturday, November 11, 2023

Yes, You Can Make a Holiday Card in 5 Minutes (or less)


Hello everyone and Happy Saturday!  Ity's Design Team Member Michael here and, yes, you read the title of this blog post correctly.  Holiday cards in 5 minutes (or less). I made these two Christmas cards using embossing folders from my stash and the new Scripted Merry Christmas

Let me explain how...start the clock.  

Card 1 - Holly Leaves Background


  • I made an A2 card base using white cardstock and adhered a piece of Christmas paper to the front.
  • I die-cut a piece of white cardstock using a 4" x 5.25" stitched rectangle die, embossed it with the Holly Embossing Folder (37-1987) from Cuttlebug/Provocraft (retired), and adhered it to the card front.
  • Using an oval scalloped die, I die-cut a piece of red mirror cardstock.
  • Next, I stamped Scripted Merry Christmas on a piece of white cardstock, die-cut it using an oval die, adhered it to my red scalloped oval piece, and then to the card front.
  • To finish off the card, I added a few red enamel dots.  
Card 2 - Christmas Ornaments Card


  • I made an A2 card base using white cardstock and adhered a piece of Christmas paper to the front.
  • I die-cut a piece of white cardstock using a 4" x 5.25" stitched rectangle die, embossed it with the Christmas Ornaments Embossing Folder (37-1989) from Cuttlebug/Provocraft (retired), layered it on a piece of white fun foam, and then adhered it to the card front.
  • Using a scalloped circle die, I die-cut a piece of red mirror cardstock.
  • Next, I stamped Scripted Merry Christmas on a piece of white cardstock, die-cut it using a circle die, adhered it to my red scalloped oval piece, and then to the card front.
  • Because of all the texture in the embossed image, I did not add any enamel dots. 
I really made these two cards in less than 5 minutes.  I love how the embossing folder kicks them up a notch and by using a simple sentiment like the Scripted Merry Christmas, you have a card worthy of sending to anyone on your list.  

Thanks so much for stopping by the blog today.  I'd love to know if you like this idea and if you use embossing folders for your holiday cards.  If you like the Scripted Merry Christmas stamp or anything else on the Technique Junkies website, you can save 10% at checkout by using my code - TJ10Michael.

Until next time...

Hugs from Brasil.

~Michael 

Sunday, October 23, 2022

Santa Shaker Card


Good morning!  It's Holly posting today, and I have a fun shaker card to share with y'all today.  I used the beautiful new Classic Santa stamp from Technique Junkies and stamped it with red ink onto some white cardstock.  Then I cut down some clear packaging and taped three sides onto the back of the Santa panel.  With one side left open, I poured some sequins into the front of the Santa panel and then taped the last edge to the back to create the shaker piece.  I die cut some letters from black cardstock to create the fun sentiment - Ho Ho Ho.  After I glued the letters down, I adhered the shaker panel to some black cardstock and then to a red card base.

Please feel free to use this code, TJ10Holly, when you shop at Technique Junkies.  You will save 10% off your entire order, so grab this Classic Santa and check out the rest of the great Christmas stamps from this month's release HERE.  Have a wonderful day!


Sunday, October 16, 2022

Pink and Green Christmas


Good morning!  It's Holly posting today, and I have a fun pink and green Christmas card to share with y'all.  I thought I'd change it up and use a bright pink and green color combo instead of a traditional red and green.  That pink just makes me smile!

I stamped the new Embellished Merry Christmas stamp from Technique Junkies with a bright green ink and then added a bright green card layer behind this.  Next, I pulled out the Snowflakes set and randomly stamped some snowflakes in pink and green all over a white card panel.  I adhered this snowflakes panel to a bright pink card base, wrapped some pink and white baker's twine around the card, and then added the green Christmas sentiment over the twine with some foam tape.

Please feel free to use this code, TJ10Holly, to save 10% when you shop at Technique Junkies.  Check out all the great new Christmas stamps in this month's release HERE.  Don't forget the Shimmering Bliss, the new Catherine Pooler ink pads, and the great selection of stencils.  Have a wonderful day!


Sunday, October 9, 2022

Misty Trees Believe


Good morning!  Have you started on your Christmas cards?  I've got a pretty good start on mine, and one of them is today's card that I created with stamps from Technique Junkies.

I love the Misty Trees stamp, and when I saw the new Believe stamp, I just knew they would be perfect together.  I stamped the Misty Trees with a soft green ink onto white cardstock, and then I stamped the Believe with a dark evergreen ink.  It's hard to tell, but I added some iridescent gems to the stars in the sentiment.

Please feel free to use this code, TJ10Holly, to save when you shop at Technique Junkies.  You can grab these two stamps that I used today, Misty Trees and Believe, and you can stock up on some more Christmas stamps from this month's release HERE.  Have a wonderful day!


Wednesday, October 5, 2022

Big Santa Background

Hello, Tracy Shultz, The Hopeful Crafter here with a jolly card that features the new Big Santa Background stamp from Technique Junkies. You can find this stamp here: https://techniquejunkies.com/big-background-santa/ 
Save 15% off all new release stamps until Oct. 8.  Save 10% off everything else with my code TJ10Tracy. 
To create my card I stamped the image onto a piece of off white cardstock using Versafine Clair Nocturne Ink. I trimmed this with a stitched rectangle die. I added a piece of plaid paper, cut with a stitched rectangle die, as the mat layer. These layers I adhered to an A2 white card base. 
Stamp used:

Check out all the new stamps including the Got To Have It All Bundle:

Thank you for visiting the blog today.