Good Day, Junkies! Scraphappy Ro here with you today to share a couple of cards made with one of the July Releases, Zen Waves.
I really like the versatility of this stamp. I achieved two very different looks with just one stamp. What do you think?
If you didn't look closely, you would not think these were both the same stamp!
For the first card, I stamped and embossed the background on white cardstock using Zen Waves, Versamark Ink and Nuvo Embossing Powder in Serenity Blue. I then stamped again on a black piece of cardstock using Zen Waves, Versamark Ink and Nuvo Embossing Powder in Shimmering Pearl.
Using a set of circle dies, I cut out four areas from the black cardstock in four different sizes. From the largest circle, I cut a smaller offset circle to use as a frame for the sentiment. Each of the four circles was mounted using foam tape, aligned with the background image.
I then stamped the sentiment from the set, Things I Want To Do, using Versamark Ink and Nuvo Serenity Blue Embossing Powder. I again used a circle die to cut out the sentiment. That was mounted with a slightly thicker foam tape. I also mounted the circle frame (turning it so the pattern did not match up the bottom layers) with thicker foam tape. I added the layers to a black card base. I love how the shimmery on black really stands out from the blue on white background.
For the second card, I stamped the image on white cardstock using Zen Waves, Versamark Ink and Nuvo Embossing Powder in Glitter Noir. I used the Zig Wink of Stella Markers to color in the various areas of the background. These markers have a shimmery effect and gave the background a nice shine. I trimmed the piece down and mounted it on a white card base.
I stamped the sentiment, Advice From A Sea Turtle, on white cardstock using Versamark and Nuvo Embossing Powder (Serenity Blue), trimmed it down and adhered it to the base. See how twinkly that background is!
Let's see those two cards one more time, side by side:
What a difference using just one background stamp! I hope I gave you some ideas on how to maximize your stamp collection. If you would to save 10% on these or any other TJ stamp, simply use the code below!
See you soon!
Til next time,
Keepin' it inky!
Wednesday, July 12, 2017
Tuesday, July 11, 2017
JUST A NOTE
Hi there Junkies!
Using a masking technique and watercoloring, here's a card I created for today's post.
For this card, I used Margot's Flower, Sentimental Sayings and Crosshatch.
I first stamped the flower on a watercolor panel with Distress Markers, coloring the various areas on the stamp with the markers starting with the lightest and working to the darker ones. After applying each color, I used a lightly wet brush and blended the color. Each layer of color was dry and another applied, building the layers and the intensity of the color.
Using masking tape, I taped the panel and sponged some Distress Inks along just the edges. While the masking tape was still in place I lightly inked and stamped the "Crosshatch" giving a little more detail and dimention to the area. Removing the mask, I then stamped the sentiment.
I have a coupon for you if you'd like to get a 10% discount on the stamps I used as well as all TJ stamps (excluding the July release stamps). Just use it at check out and enjoy your purchase.
INVITE: We have a FB page....we'd love you to join.
INVITE: We have a new challenge...we'd love you to play along!
Hope you found some inspiration and get some crafting time today.
Monday, July 10, 2017
Technique Junkies Challenge - Crinkled Watercolors
Welcome to our newest challenge!
You will have a whole month to complete the challenge. Enter as many times as you wish using the link list at the bottom of the post for a chance to win a $25 Technique Junkies Gift Certificate!
You have until August 13th to enter. Winner will be announced August 14th.
A few simple rules.
You must use Technique Junkies stamps to be chosen to win a prize.
If you don't have any Technique Junkies stamps feel free to play along and link your project but you will not be in the drawing for a prize.
You must use the challenge technique in your project (that's the challenge!)
No linking old projects. Projects must be new.
Please list Technique Junkies stamps with links in your project posts.
Please link directly to your project (not a general blog).
If you have a problem linking to the challenge contact Jeanne
The challenge is... Crinkled Watercolors!
You can see the original tutorial HERE
For this technique you will need:
watercolors (or a pigment powder like Color Burst)
watercolor paper
paint brush
white tissue (the type you would use for gift wrap)
a paint palette (or other non porous surface)
I used Color Burst for my paint. I added a bit of powder to a palette.
I added a few drops of water.
Using a wet paintbrush I added my paints to the watercolor paper in a random pattern. One color at a time, rinsing my brush between colors.
While the paint is still wet place crumpled tissue on top and move it around a bit so you get wrinkles. Leave tissue on until paint is totally dry. I didn't time this... but give it a good half hour to dry.
When dry you'll be left with some pretty textures.
Supplies used:
Stamps Swirl Turtle, Watermelon Summer Set
Nuvo Glitter Markers (directly on my stamps!),
Color Burst
Watercolor paper
Take a closer look at the shimmer!
Have a great day!
Mister Linky's Magical Widgets -- Thumb-Linky widget will appear right here!
This preview will disappear when the widget is displayed on your site.
If this widget does not appear, click here to display it.
This preview will disappear when the widget is displayed on your site.
If this widget does not appear, click here to display it.
Drips Technique Challenge Winner!
Thank you to everyone that entered our challenge. Look for a new challenge tomorrow!
The winner of our Drips Technique Challenge:
Please contact Jeanne for prize information within 7 days.
Look at Karen's beautiful card!

Have a great day!
Saturday, July 8, 2017
You are one in a Melon
Good Morning!!!
Vicki here with a bright and cheery share for you this morning!
This Watermelon Summer set just makes me smile!!!!
It's a wonderful large square shaped stamp, but I wanted to show a little versatility in presenting it in a different shape!!!
Before I even coloured it, I stamped it with my IO Stamps Most intense hybrid ink pad before cutting it out with a spellbinders large circle die
I then coloured it using my Copic and Touch Markers
I used a fine tipped sharpie to darken the watermelon seeds, followed by a dash of white gel pen highlights to each seed.
Finally, I stamped the sentiment in black and added some sparkly watermelon coloured gems for a little pizzazle!!! Hope you like!!!!
Have a wonderful weekend,
--Vicki~~
Friday, July 7, 2017
TJ Inkspirations: Mousse Painted Calendula
| There are so many ways to use Nuvo Embellishment Mousse, and I am thrilled to share the video below showing you how to paint with them. They are lovely as paints, drying with a pretty metallic sheen. I use the Calendula Stamp - a new July release stamp in the video. Remember that all New Stamps are 15% off through the end of Friday, July 8th. Hurry and get yours today! Here is the video: .
Here is the finished project: ![]() |
I hope you are a little inkspired by today's issue. See you next week!
Sincerely,
Pat Huntoon Technique Junkies LLC |
Thursday, July 6, 2017
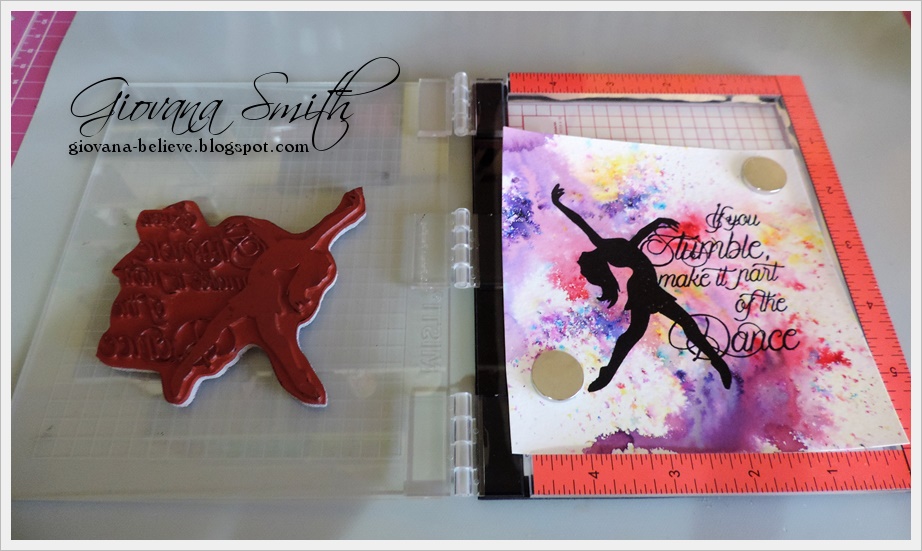
If you Stumble, make it part of the Dance
Hello friends!! Hope you all are having a great day! Today I want to share a card I made with one of my favorite stamps just released few days ago!!! This image is called "Part of the Dance" is so pretty and has a lot of possibilities. Here I want to share with you how I did it.
- First, tab little bits of Color Burst, here I used Fuchsia, Orchid and Lemon Yellow, then mist water and let the magic begin! You can spray as much or less water as you want.
- After the background has dried completely, stamp the image in Stazon Jet Black, since this is a silhouette stamp, some times it requires several stamping, so the MISTI is super handy, just keep inking your image until you are happy with the result.
- Finally, I added a piece of Purple Mirror Cardstock behind the image and added stitches. Also added few sequins and the card was done!
Remember, you can get this image and/or any of the new released images with a 15% off until July 8th!! Plus you can add any other stamps and get a 10% off using my super code {wink, wink} TJ10Giovana
Hope you like it and give this technique a try!
Have a fantastic day!!
Subscribe to:
Posts (Atom)