Showing posts with label Tutorials. Show all posts

Tuesday, August 17, 2021

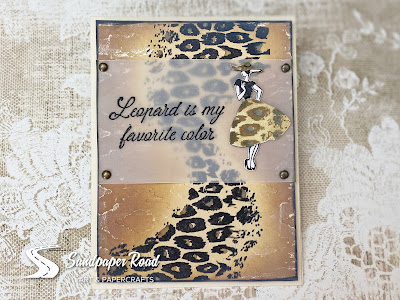
Cardmaking Tutorial | Stamping Leopard Print


Leopard print goes with everything!

This is the leopard-print stamp you have been waiting for! Learn to used your Distress Oxide inks to EASILY color this stamp from Technique Junkies! 

Follow along with me in my step-by-step video tutorial for making this fun and glamorous card!


I actually combined the "Leopard Set of 6" stamp set with the "More Fabulous" stamp set. The lady on the "More Fabulous" stamp was just perfect to embellish the leopard print and the sentiment! 


I just happened to have an animal-print embossing folder in my stash! 

See the slightly raised leopard-print pattern? So cool...

I had to use a mask to achieve the leopard print skirt and hat for the lady. I just used a scrap piece of vinyl to create the mask. Once I stamped the basic image, I pulled the mask off of the skirt and hat and put the "outline" mask over her. Then, I could easily color in the skirt and hat with oxide inks. Feel free to check out the video tutorial to see how this is done! 


I stamped and embossed the sentiment on a piece of vellum and attached the vellum over the card panel with brads. After fussy-cutting the lady, I attached her to the vellum using Zots Mini Dots.


I love how this card turned out! 

Save 10% on your order at Technique Junkies with the code TJ10ERIN


Tuesday, April 21, 2020

How to Make a Waterfall Card


Today I have a waterfall card tutorial for you.  It's an old technique which I'm bringing to the foreground.  When I saw my background, called Farm Animals, I wanted to pair it with a variety of farm-related stamps.

Typically, this card requires an extreme amount of photos.  Wanting to stay with my personal "10 photos or less" you will see my completed embossing, stamping, and inking throughout this tutorial.

Paired with Farm Animals, is Chicken Wire 2, and funky chickens Keep Chickens-set of 13.


1- Standard card 5 ½” x 4 ¼” (yellow mat)
1- 1” x 4 ¼ “ Brad Strip (black, embossed with gold Chicken Wire 2)
1- 5 ½” x 4 ¼” Layering Piece (black)
1- 5 ¼” x 4” Layering Piece (green/blue bg stamped with Farm Animals)
1- 1 ¾” x 8 ½” Waterfall Strip (black)
3- 2¼” x 2 ¼” Squares (black)
3- 2″ x 2″ Squares (White stamped with Keep Chickens)
1- Tab (yellow with gold embossed Chicken Wire 2)

Score the waterfall strip at 1 ¾, 2 ¾, and 3 ¾. There will be an area of 4 ¾ remaining
On your unscored portion of your tab, decorate and or stamp as desired.  Add tab along the right hand side of your long strip.  If you do not have a tab, you can hole punch and use ribbon or string.
To further explain my background and images I took this photo to show you a close up of them.  For my background I stamped out Farm Animals with black Momento and let dry overnight.  You can use a heat gun to speed up drying time, but I tend to let everything air dry naturally.  Using Shimmering Bliss "Miami Vice", I gave a light spray to my stamped background before I added my mattings and card front.

My funky chickens called Keep Chickens was stamped out on my white 2" x 2" squares, and coloured with Prismacolor coloured pencils.  Using my blending brushes, I blended a coordinating ink around the edges.  These brushes are the bomb!  Not only for the flawless blending results but in price.  These brushes sell for double the cost on many websites.
My small strip was heat embossed in gold using Chicken Wire 2.  Adhere that strip to the card front.  From the bottom of the strip, to the bottom of the yellow outside edge, is 1".
Turn your tab strip over and adhere your first image just a little to the right of the score line.  If you put it right on the score line, the waterfall will not be as effective.

Add your second image just to the right of the score line.
Add your third image just to the right of the score line.
Using glue dots or Redline tape, add your strong adhesive to the top of the long strip on the underside of the long strip where I added my 2" squares.  WARNING:  A strong adhesive has to be used, or this waterfall technique will fall apart and not work.  Tape runner is not strong enough.
Taking the strip in hand, draw upwards and press the edge where you added strong adhesive, down on the right hand side of your strip (here it is where I stamped Chicken Wire 2).


Your waterfall card is now ready to use.  Have fun!!


Tuesday, December 17, 2019

Wine Tag Tutorial

35% off a huge assortment of stamps at Technique Junkies.

These stamps are on sale for 35% off.  Use my code TJ10Beth to receive an additional 10% off.  45% off sounds great, doesn’t it?!


Hello fellow stampers.  I am in the need for a wine bottle tag for a large open house I'm attending this weekend, and I always like to give the hostess a bottle of wine, and wanted to make it extra special this year.  I thought a handmade wine bottle tag would fit the bill.  

Using my most-used Christmas stamp, called Merry Christmas, I coloured it up with Prismacolor coloured pencils.

To receive a 10% discount on this stamp, and any other regularly-priced product at Technique Junkies, simply use my code below. 


Cut your cardstock (here I used Kraft cardstock) paper to 9.5" x 3".  Score at 3".  This will be the top of your tag.


Using a ruler, draw a line from each corner, at an angle, and where the line intersects, cut up to that point to create two points for the bottom of your tag.
Emboss your tag up to the 3" line, or you can carry the embossing right up to the top of your tag.
Cut out your image and layer it as much or as little as you like.  Here, my red edges are a little rough because I hand cut my red matt.  I think it gives my tag a rustic feel, so if you do the same, look at it as a little rustic.
Close-up of my tag, using Merry Christmas
This will be my last post before Christmas, so I want to wish you all Merry Christmas and Happy Holidays.

.


Tuesday, December 4, 2018

How to Layer your Stamps


Hi fellow stampers.  Beth Norman-Roberts here today with another snowflake card.  I think this is one of my favourite winter/Christmas stamp sets because there is so much that can be done with it.  It is Called Snowflakes, Set of 9 and can be purchased at 10% off if you use my code TJ10Beth.

Today I'm sharing a tutorial on how to layer your stamps in a unique fashion.

Supplies, cardstock cut to 4 1/4" x 5 1/2", stamps, VersaMark, three or more colours of embossing powder, embossing buddy, heat gun, ink, sponge (not seen in photo)
Using a darker colour of ink than your cardstock, sponge around the edges.
Take your largest stamp and stamp once or twice.  Here I love to use my Misti because I can get a deep shade of colour by stamping two or three times.
Using your embossing buddy, rub where you want your sentiment to go.
Heat emboss your sentiment and stamp out the smallest snowflake several times.
You want to ensure your ink is dried completely before completing this step.  Use or heat gun to set your ink, or air dry for an hour like I did.
Using your VersaMark and embossing powders, randomly stamp out your snowflakes and heat emboss each snowflake.  You are now ready to embellish your card with ribbon if you wish.


Tuesday, February 27, 2018

How to Create Men's Jeans

Hello fellow stampers.  Today I'm going to share with you how to make men's jeans which is a nice masculine card for that someone special.  If you want to receive 10% off these stamps, or any other product, simply use TJ10Beth in your shopping cart to receive the price reduction.

These jeans are a breeze to make.  Who knew they could sew up so quick!

Start by stamping out your Blue Jeans background stamp

Using red, or another colour of choice, stamp out Cheers! from Simple Sentiments 2a
Adhere the Cheers! to the left side of the seam from Simple Sentiments 2a
To make the leather patch cut a 2" x 2" piece of Kraft paper and distress the edges with brown ink.  Stamp out Happy Birthday 3 in the centre then add some holes around the edges.  Take a fine tip marker and draw from hole to hole to make it look like it is stitched
Attach to the left side of your stamped image.  Add a brad to the pocket. You are now ready to finish your card as desired.  Have fun!


Tuesday, November 21, 2017

Metal and Brad Tutorial

Hello fellow stampers.  Today I am sharing a metal and brad tutorial with you which was inspired by a card I saw in the UK Cardmaking and Papercrafts magazine.  My card measures 5" x 5".  I was lucky enough to find shiny bristol board at the dollar store in 10 x 14 sheets.  After I embossed and got great results I went back to purchase more packages, but they were all gone :(

Cut various sizes of your cardstock, or shiny designer paper.
Emboss your pieces
You can't tell where my white 5" x 5" cardstock is because I never thought to use a dark background when filming.  The gold metallic paper is placed along the edge of the white cardstock.  Next, start overlapping your paper using just a small amount of adhesive so you can move your paper if you have to.
Continue to overlap your cardstock, ensuring your pieces are flush against the edges of your white cardstock.
Use a poking tool to make holes in each corner of each piece of paper.  You do not have to add a brad underneath your stamped image.  Finish off your card by adding a brad to each corner of your stamped image.

Image used:  Stay Humble