
Today, I am pleased to share some card inspiration with everyone! This project was a creative "retreat" for me, as I played with lots of inks and supplies from my stash.
Here's how I created this encouragement card:
Save 10% on your next order at Technique Junkies with the code TJ10ERIN
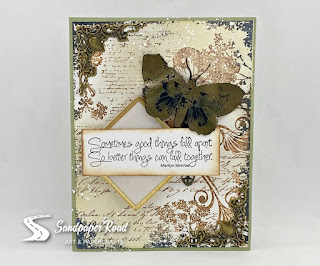
I started with the "Butterfly Flourish Collage" stamp from Technique Junkies, part of their July 2021 New Release. I'm also using a combination of brown and black Distress Inks and Distress Oxide Inks. A stamping platform is essential for this kind of layered stamping. You can see in the step-by-step photos (below) the order in which I stamped and the ink colors I chose for each layer of stamping.
 |
| Tea Dye Distress Ink |
 |
| Frayed Burlap Distress Oxide |
 |
| Vintage Photo Distress Oxide |
 |
| Black Soot Distress Oxide |
 |
Lovely how this looks around the outside!
|
After I created the background / base, I cut out the stamped image and blended around with a little Tea Dye Distress ink and a foam blending tool. Then, it was on to the fun part...
 |
| "Wendy Vecchi Clearly for Art Blackout" by Ranger |
In my stash, I had some sheets of "Clearly for Art Blackout". This is a hard material that you can stamp, ink and heat; once heated, the material becomes soft and moldable. After cooling for a few seconds, the material becomes solid again. I have had this in my stash for years, and I especially love it when it comes to stamping butterflies because I can heat and mold the butterfly wings.
I used Archival Ink to stamp the "Better Things" sentiment stamp. Then, I finished off the card with some metal embellishments I had in my stash. It turned out fabulous!
Thank you for looking! Hope you were inspired!


No comments:
Post a Comment