Showing posts with label stamping. Show all posts

Tuesday, November 9, 2021

Courage Encouragement Card


Multi-layer stamping and gorgeous patterned paper make this encouragement card EASY to create!


I used the "Courage" stamp, which is part of the November 2021 new stamp release.

You can take advantage of 10% off your entire order at techniquejunkies.com ! Just enter coupon code TJ10ERIN

Look closely at the lion's face and head... the face itself is stamped with "Antique Linen" Distress Oxide Ink and blended with a water pen. Then, a "Vintage Photo" Distress Oxide Ink is stamped on top and blended with a water pen.

Finally, Jet Black Archival Ink is stamped on the FACE ONLY. It's easy to ink the whole stamp and then just wipe off ink around the outside of the stamp. 

WATCH the short video to see me do this EASY technique! 

WATCH me create this entire project in my YouTube tutorial HERE! (or click the photo below)


Here's a look at the finished card! Thank you for looking!


Tuesday, October 12, 2021

Stamping & Fussy Cut Christmas Card


Want to add some extra special detail to a few Christmas cards this year? Adding a little effort to one or two cards in your project stash is well-worth the effort, especially when the card itself is the gift. I like to do this with my older family members or for those who live far away; they always appreciate the time it clearly takes to stamp, color and fussy-cut a lovely card.


This new release set is absolutely gorgeous, and you will be able to make SO many lovely projects with the stamps! (Make sure when you shop, enter coupon code TJ10ERIN to save 10% on your entire order!)


I used Archival Ink to stamp the Christmas Card Frame onto white cardstock. Then I stamped one of the "Light of Faith Sentiments" in the center. After that, I used Distress Inks and Distress Oxide Inks and a water brush to add color to the leaves, pine boughs, pinecones, and star.


With some "Dragon's Blood" Shimmering Bliss Spray, I added the red color to the ornament and the berries. I love the shimmer it gives!


Once it was colored, I used a craft knife to cut out the intricate details inside the branches. Then I used detail scissors to fussy cut the outside of the entire stamped image. I mounted it on a piece of die cut patterned paper from "This Miracle Night" paper collection by Craft O'Clock and embellished the card with a few fussy-cut elements also from the same paper collection. As a final touch, I added a few sequins.

I did the same process on a second card, and created a video tutorial as a companion. If you are interested in this process and want to learn to color with inks or to fussy-cut stamped details, check out the video below:


Thank you for looking! 


Tuesday, September 28, 2021

Card Inspiration | Encouragement Card Ideas


Looking for encouragement card ideas? Today I am sharing with you two card variations using the “Rain Sentiments Set of 6” stamp set and the new “Rain Stencil” both from Technique Junkies. 

Both the stencil and the sentiments set are part of the September 2021 New Release, which features lots of seasonal items, including autumn and Halloween-themed stamps. But, for as much rain as we have been getting lately, I was inspired to play with the rain-themed stamps and stencil first.


I started with some watercolor cardstock and the rain stencil. I used a bit of Liquitex modeling paste (a really nice texture paste) with a palette knife and created a basic stenciled image.


The texture paste is porous, so I knew that I was really just creating an “embossed” looking background for my card. In other words, if I added sprays or other color, it would color the paper AND the stenciled image as well. Once the paste was dry, I sprayed ONE SPRITZ of Shimmering Bliss (Dolphin Cove) aimed from one corner of the card panel. 


On my craft mat, I mixed some Aladine Izink Ice with some glitter and used a palette knife to push it through the stencil. Once it was dry, I used a circle punch to punch out “raindrop” circles for my card. I used a scrap from an inked background to stamp my sentiment and emboss in white embossing powder. With a black Micron pen, I doodle-outlined the umbrella and my punched circles. As a finishing touch, I drew little circles here and there on the card to complete the “doodling” look. 


For the second card, I really just played around with some of my Shimmering Bliss Sprays… a few colors here and there… red, yellow, brown, just created a nice inky background. When it was dry, I used some Pixie Spray to hold down the rain stencil and then I pushed some brown Izink Ice Glaze through the umbrella. 


I had some leftover glitter glaze from my previous card, so I used that for the raindrops. I added a few pieces of random washi tape, and stamped and die cut the sentiment. Finally, I had some leftover raindrop-punched circles, so I adhered them every here and there and then I inked the edges of the card.


I like the combination of glittery rain against the neutral tones of the rest of the card because it provides a nice contrast.


You can check out a bonus card using the "Rain Stencil" and the Aladine Izink Ice mixed with glitter - watch my latest process video HERE!


Hope these projects inspire you to get creating! Thank you for looking!


Tuesday, August 31, 2021

Cardmaking Inspiration | Patience Tested


Sometimes a new sentiment is all it takes...

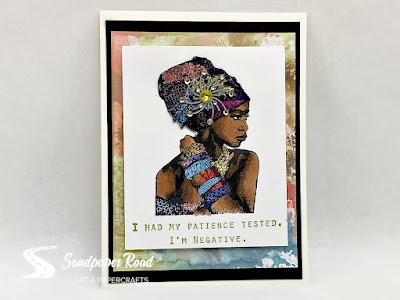
Today I am pleased to present some cardmaking inspiration for you featuring the "Patience Tested" sentiment stamp from the August 2021 New Release.


I have used the "Beautiful Strength" stamp many times in earlier projects, but when the "Patience Tested" sentiment was released, I immediately thought of how the two stamps would look together.


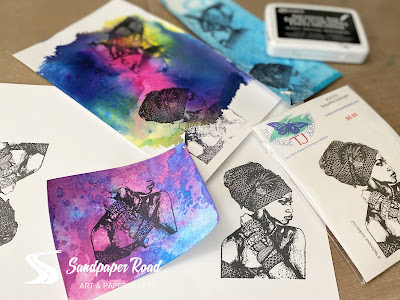
I found scraps of the most colorful inked and sprayed backgrounds I could find. In fact, I didn't have to create any new backgrounds at all... I simply rummaged through my scraps to find the most colorful pieces I had. Then, I stamped "Beautiful Strength" several times on the scraps and also on plain white cardstock. 

I rummaged through my most colorful scraps...

Then, I used detail scissors to cut out individual pieces in a variety of colors. I played around with the individual pieces, fitting them like puzzle pieces onto the base stamped image. You can see in the photo above, I am working on the pieces on the woman's arm. 


When my pieces were ready, I first colored in the woman with a Spectrum Noir 3-part blending marker. Then, I glued all the individually cut paper pieces down using Nuvo Deluxe Adhesive.


To finish off the card, I stamped the sentiment below the woman and rubbed some glitter here and there (fun fact - I do this to get sticky glue off my fingers)! For a final touch, I added a metal embellishment onto her head scarf and mounted everything on an inked background I had in my scrap pile.


Thank you for looking!

Save 10% on your next order at Technique Junkies

with the coupon code TJ10ERIN


Tuesday, August 17, 2021

Cardmaking Tutorial | Stamping Leopard Print


Leopard print goes with everything!
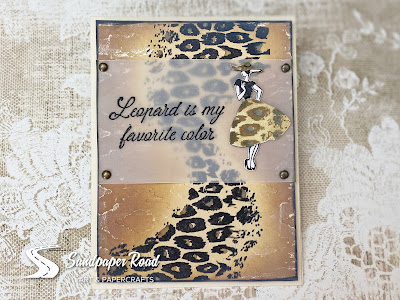
This is the leopard-print stamp you have been waiting for! Learn to used your Distress Oxide inks to EASILY color this stamp from Technique Junkies! 
Follow along with me in my step-by-step video tutorial for making this fun and glamorous card!


I actually combined the "Leopard Set of 6" stamp set with the "More Fabulous" stamp set. The lady on the "More Fabulous" stamp was just perfect to embellish the leopard print and the sentiment! 


I just happened to have an animal-print embossing folder in my stash! 

See the slightly raised leopard-print pattern? So cool...

I had to use a mask to achieve the leopard print skirt and hat for the lady. I just used a scrap piece of vinyl to create the mask. Once I stamped the basic image, I pulled the mask off of the skirt and hat and put the "outline" mask over her. Then, I could easily color in the skirt and hat with oxide inks. Feel free to check out the video tutorial to see how this is done! 


I stamped and embossed the sentiment on a piece of vellum and attached the vellum over the card panel with brads. After fussy-cutting the lady, I attached her to the vellum using Zots Mini Dots.


I love how this card turned out! 

Save 10% on your order at Technique Junkies with the code TJ10ERIN


Tuesday, August 3, 2021

Card Ideas for Tennis Lovers


Know any tennis lovers?

Today, I am pleased to share two ideas for creative tennis-themed cards. These cards were created using two stamp sets from the Technique Junkies August 2021 New Release.


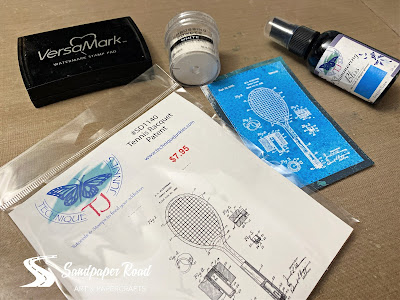
I used Dolphin Cove Shimmering Bliss Spray to create a "blueprint-looking" background. Then, I die cut a simple stitched rectangle after stamping and embossing the "Tennis Racquet Patent" stamp.


I used VersaMark ink and Ranger White Embossing powder for my stamping.


Next, using the same rectangle die set, I die cut a navy blue frame. I stamped the "Kiss My Ace" sentiment on vellum and embossed the sentiment with white embossing powder. I also die cut a piece of clear acetate, glued the side edges of the vellum to the acetate, and glued the whole thing to one side of the navy blue frame. I had some dimensional foam squares in my stash, so I lined the blueprint panel with the foam and sprinkled in some pale green sequins.


In my stash, I had some pre-cut card bases along with some "magic mesh" that I have had literally for decades. The mesh is more like a rubbery plastic with a light tack on one side, and it really accentuates the tennis racquet image. So, I used a piece behind my shaker panel.


I love the finished look of this shaker card! And the look of the white sentiment on the vellum doesn't take away from the tennis racquet stamp or the shaker element. 

Check out my video tutorial for more examples of stamping on vellum! 


Using the same Tennis Racquet Patent stamp and the same Tennis Sentiments Stamp Set, I created a second card without a shaker. 


For this card, I simply stamped the racquet twice in brown ink. I stamped the sentiment over top using VersaMark ink and black embossing powder. Then, I die cut the panel and inked around the edges with some Tea Dye Distress Ink.

After that, it was just a matter of layering... a card panel made with patterned paper from my stash, a die cut panel of scrap orange cardstock, more magic mesh (in green, this time), and a few lime green brads on top of the stamped panel. I mounted the whole thing on a piece of white cardstock and then mounted THAT on a sand-colored card base.


Don't forget...

Save 10% on the rest of your Technique Junkies order with coupon code TJ10ERIN

Thank you for looking!