Showing posts with label Sandpaper Road. Show all posts

Tuesday, November 23, 2021

Create "Anyday" Cards All Year Round!


We MUST remember to create “anyday” cards to keep on hand, and today I am sharing a lovely variation with the “Leaves and Berries” stamp. This stamp is part of the November 2021 New Stamp Release from Technique Junkies. 


I suppose it is intended to produce more “holiday-themed” projects, but when I saw this stamp I immediately thought of bright oranges, pinks, yellows and navy blue. 


First, I stamped “Leaves and Berries” in VersaMark ink and embossed with a navy blue embossing powder. This creates significant border lines inside all the leaves, which is essential when coloring in with watercolor or ink.
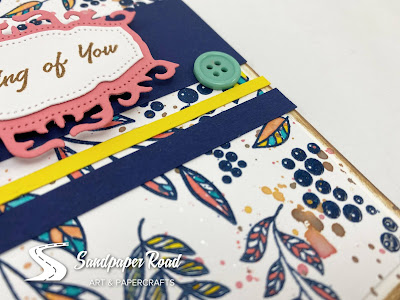


To color in the leaves, I simply used my Nuvo Water Pen and my Distress Oxide Inks. I just “smooshed” the ink onto a slick surface (I use an acrylic block or my craft mat). Then, I treated the ink like watercolor and just colored in the lines. For final touches, I used the remaining smooshed ink to create a “spatter” around the edges.

The “Thinking of You” sentiment is one of the “Four Little Sentiments” set. I stamped it with Archival Ink and die cut with a Spellbinders die that I had in my stash. Honestly, this card design is perfect to make a set of cards and then customize each card with a different sentiment from the set. I really like the nice font and it stamps beautifully!


Before I adhered all the parts together for my card, I used scrap pieces of navy blue and yellow cardstock to create some grounding for my sentiment. Just imagine this card without the navy blue strips of cardstock… the sentiment would be “floating” around on the background. If your cards look like they “need something”, try adding a solid color strip or two (or three) across the entirety of the card and THEN add the sentiment. It should be just what your project needs!


Thank you for looking!


Technique Junkies Stamps Used:

Leaves and Berries Stamp Set

Four Little Sentiments Stamp Set


Tuesday, November 9, 2021

Courage Encouragement Card


Multi-layer stamping and gorgeous patterned paper make this encouragement card EASY to create!


I used the "Courage" stamp, which is part of the November 2021 new stamp release.

You can take advantage of 10% off your entire order at techniquejunkies.com ! Just enter coupon code TJ10ERIN

Look closely at the lion's face and head... the face itself is stamped with "Antique Linen" Distress Oxide Ink and blended with a water pen. Then, a "Vintage Photo" Distress Oxide Ink is stamped on top and blended with a water pen.

Finally, Jet Black Archival Ink is stamped on the FACE ONLY. It's easy to ink the whole stamp and then just wipe off ink around the outside of the stamp. 

WATCH the short video to see me do this EASY technique! 

WATCH me create this entire project in my YouTube tutorial HERE! (or click the photo below)


Here's a look at the finished card! Thank you for looking!


Tuesday, October 26, 2021

Wintery Poinsettia Christmas Card


It’s always nice to put some extra time and effort into a few of your holiday card projects. I like to have special, detailed cards to give to those few people who appreciate cardmaking or who live far away. For me, this project was one of those special, detailed cards - where the card itself will be the Christmas gift.


I started with the Bird and Poinsettia Border Stamp by Technique Junkies. This stamp is so lovely and is really versatile for Christmas, holiday and also general winter cards. I also think this would be the perfect stamp to use for those “winter birthday” cards as well.


I stamped with brown Archival Ink and then used my Nuvo Waterbrush Pens and a combination of Distress Oxide inks and regular Distress Inks to color in the image.


Then, I used my craft knife to carefully cut out all the INSIDE spaces… look carefully in between the branches and the little pinecones. This was all hand-cut out with my craft knife and some time. :)


After I cut out the INSIDE spaces, then I could easily fussy-cut around the outside of the stamped image. I used Nuvo Deluxe Adhesive to glue the stamped, fussy-cut image to a piece of patterned paper from the "Frosty Sparking" paper collection by Craft O’Clock.


I stamped the Dotted Merry Christmas stamp with black Archival Ink and used a rectangle stitched die from my stash to cut it out and add to my card.


The paper collection has lots of coordinating fussy-cut elements, so I simply found a bird, a candy-cane, two leaves, one anise seed, and a few flower elements to add on top of the stamped image. I used a combination of hot glue and my Nuvo liquid adhesive (the hot glue adds dimension). 


I mounted the whole thing on top of a black card base. This card did take me quite a while, but I enjoy the detail work every now and then. When I showed my husband the finished card, he said, “Wow… you really put some time into that one!”


Hope this inspires you! Thank you for looking! 


Thursday, October 21, 2021

Christmas Tag Card Idea


Mass-produce holiday cards easily by creating large "gift tags" to use as card panels! 


I used the "Retro Ornaments" background stamp for this project. This background stamp is part of the October 2021 NEW STAMP RELEASE, but any background stamp would work great!


Create tags easily by trimming out the background-stamped area to about 4" x 3" (or whatever size you like). Then, LIGHTLY FOLD the rectangle in half (but be careful not to crease). While holding the folded paper, cut the corners off of one edge and unfold. Magic! Keep the cut corners and use on other projects!


Ink the edges of the tags, and add embellishments and sentiments of your choice. For this project, I used the "Snowflakes Set of 9" and a little ribbon and patterned paper from my craft stash.


I also used some snips of green scrap glitter paper instead of ribbon at the top of the tag. And I used one sequin instead of a brad... just because. 😊

REMEMBER you can save 10% on your next order at techniquejunkies.com with coupon code TJ10ERIN 


Here's a look at the finished card:


Thank you for looking! 


Tuesday, October 12, 2021

Stamping & Fussy Cut Christmas Card


Want to add some extra special detail to a few Christmas cards this year? Adding a little effort to one or two cards in your project stash is well-worth the effort, especially when the card itself is the gift. I like to do this with my older family members or for those who live far away; they always appreciate the time it clearly takes to stamp, color and fussy-cut a lovely card.


This new release set is absolutely gorgeous, and you will be able to make SO many lovely projects with the stamps! (Make sure when you shop, enter coupon code TJ10ERIN to save 10% on your entire order!)


I used Archival Ink to stamp the Christmas Card Frame onto white cardstock. Then I stamped one of the "Light of Faith Sentiments" in the center. After that, I used Distress Inks and Distress Oxide Inks and a water brush to add color to the leaves, pine boughs, pinecones, and star.


With some "Dragon's Blood" Shimmering Bliss Spray, I added the red color to the ornament and the berries. I love the shimmer it gives!


Once it was colored, I used a craft knife to cut out the intricate details inside the branches. Then I used detail scissors to fussy cut the outside of the entire stamped image. I mounted it on a piece of die cut patterned paper from "This Miracle Night" paper collection by Craft O'Clock and embellished the card with a few fussy-cut elements also from the same paper collection. As a final touch, I added a few sequins.

I did the same process on a second card, and created a video tutorial as a companion. If you are interested in this process and want to learn to color with inks or to fussy-cut stamped details, check out the video below:


Thank you for looking! 


Tuesday, September 28, 2021

Card Inspiration | Encouragement Card Ideas


Looking for encouragement card ideas? Today I am sharing with you two card variations using the “Rain Sentiments Set of 6” stamp set and the new “Rain Stencil” both from Technique Junkies. 

Both the stencil and the sentiments set are part of the September 2021 New Release, which features lots of seasonal items, including autumn and Halloween-themed stamps. But, for as much rain as we have been getting lately, I was inspired to play with the rain-themed stamps and stencil first.


I started with some watercolor cardstock and the rain stencil. I used a bit of Liquitex modeling paste (a really nice texture paste) with a palette knife and created a basic stenciled image.


The texture paste is porous, so I knew that I was really just creating an “embossed” looking background for my card. In other words, if I added sprays or other color, it would color the paper AND the stenciled image as well. Once the paste was dry, I sprayed ONE SPRITZ of Shimmering Bliss (Dolphin Cove) aimed from one corner of the card panel. 


On my craft mat, I mixed some Aladine Izink Ice with some glitter and used a palette knife to push it through the stencil. Once it was dry, I used a circle punch to punch out “raindrop” circles for my card. I used a scrap from an inked background to stamp my sentiment and emboss in white embossing powder. With a black Micron pen, I doodle-outlined the umbrella and my punched circles. As a finishing touch, I drew little circles here and there on the card to complete the “doodling” look. 


For the second card, I really just played around with some of my Shimmering Bliss Sprays… a few colors here and there… red, yellow, brown, just created a nice inky background. When it was dry, I used some Pixie Spray to hold down the rain stencil and then I pushed some brown Izink Ice Glaze through the umbrella. 


I had some leftover glitter glaze from my previous card, so I used that for the raindrops. I added a few pieces of random washi tape, and stamped and die cut the sentiment. Finally, I had some leftover raindrop-punched circles, so I adhered them every here and there and then I inked the edges of the card.


I like the combination of glittery rain against the neutral tones of the rest of the card because it provides a nice contrast.


You can check out a bonus card using the "Rain Stencil" and the Aladine Izink Ice mixed with glitter - watch my latest process video HERE!


Hope these projects inspire you to get creating! Thank you for looking!