Friday, September 17, 2021

TJ Inkspirations: Halloween Cards with Stenciled Shards


Halloween Shards Cards
You have to try this!
The Shards stencil from A Colorful Life Designs is simply AWESOME for Halloween cards. Today we have a video for you showing how to use this fun stencil two ways with two of the new Halloween cards from Technique Junkies.

I don't have a kit for you this week, but I gathered all of the items used in the tutorial into a category and put a 10% discount on them. If you want any of the pieces or parts used, simply add them to your shopping cart and the 10% will be applied automatically. You may find them HERE:
https://techniquejunkies.com/halloween-stenciled-shards-cards/

Here's how!
Halloween Cards with Stenciled Shards TJ
On the Road Again!

Meet us on the Road at our next show:

Hampton VAOctober 23 - 24

Allentown PA: October 30 - 31

Thursday, September 16, 2021

Pile of Leaves

 Hello creative friends!


I'm here on the Technique Junkies blog to share two pretty cards featuring items from from the Technique Junkies new release. 

Here's what I created:


For this first card, I stamped the background, #S941 Pile of Leaves with Versamark Ink, and heat embossed with gold powder onto black cardstock.  I then stamped #SS138 Leaf Corner Sentimentsset of 3 and heat embossed in gold onto craft cardstock. Using an Ink Blending Brush, I distressed the sentiment panel a bit prior to matting with black cardstock. The sentiment panel was popped up on the card base with dimensional foam pieces.

Here is my 2nd card:


I love the way this card looks! The image was stamped once, the cardstock turned around, and stamped again, creating a lovely frame around the sentiment. I chose a greenish tan color of cardstock, and heat embossed everything using Tim Holtz Rustic Wilderness Embossing Glaze. The pieces were assembled, and a tiny twine bow was added.

What a fun release to work with! 

These were both fun to create - I've so enjoyed this release!

So glad you stopped by today!

Now, be sure to head over to the Technique Junkies store and check out the incredible July release!

Hugs and smiles,
Patti J.

Tuesday, September 14, 2021

Ideas for Background Stamps | Easy Window Card


Give your projects a little variety when it comes to using your background stamps! One way to create variety is to simply add a window. You don’t need special fancy acetate sheets (if you don’t have them); simply use a deli container or any clear flat packaging. Using Archival Ink, stamp your background on a pre-cut white card panel. Today, I am using the “Pile of Leaves” background stamp from Technique Junkies.


The "Pile of Leaves" stamp is part of the September 2021 NEW Release! You can save 10% every day at Technique Junkies with my personal coupon code to YOU: Use TJ10ERIN at checkout!


Use washi tape to temporarily adhere the stamped panel onto the front of your actual card base. Open up the card base and die cut a circle or other shape out of the front of the card. Then, remove the white stamped panel and glue the acetate (or clear plastic) to the back. It won’t matter that you can see the glue; it will be hidden when you adhere it to the card.


You can add any sentiment inside the card you want. I added a simple “Thank You” stamped image and embossed in white. To get my placement just right, I used my stamping platform and I also used the packaging from the stamp to help line up the sentiment on the platform. I wanted to make sure you could see the entire sentiment through the window, even when the card was closed.


I wanted to add one single colored leaf over top of the outline-stamped pile of leaves. So, I used some Shimmering Bliss Spray on some scrap cardstock and after the spray was dry, I stamped the background stamp on top. Then, I fussy-cut out one single leaf from the spray-inked paper.


The leaf was going to hang over the window a little bit, which was a nice touch. But when a leaf accent hangs over the window in the front, that means that you will also see the back side of the leaf accent through the window when the card is open. So I stamped again on a second piece of inky paper and glued it to the inside of the card, against the leaf showing through. 


For a finishing touch, I added some metal corner embellishments. And that’s it!


Thank you for looking! 


Monday, September 13, 2021

Autumn Fold Out Card


I saw a card that was similar to this on a blog.  Mine is very different from that one because I used different measurements all together.  

I used  a verse from Leaf Corner Sentiments and Pile of Leaves.    I stamped Pile of Leaves on the front panel and added color from mica sprays.  I  stamped Pile of Leaves on top of the leaves that were die cut.

The main card is a standard A2 size - 5 1/2 by 8 1/2  and scored at 4 1/4.   The inside yellow panel is 5 1/4 x 8 1/4.  It is scored  at 4 inches, and again 2 1/8 from the other side.  

Use a die of the shape and size of your choosing for the front. Then choose a similar shaped die that is 
slightly larger than the front cut out.  Choose the images and embellishments of your choosing for the front and the inside.

There is a "Gotta Have It All" price and as usual it is offered to you at a significant savings.   

The September Release stamps are on sale for 15% off the regular price through September 8.   The discounted price will show up when you check put.  And you can use TJ10Judy as a coupon for anything NOT on sale when you check out.  

Have a wonderful day, and get inky!!


Sunday, September 12, 2021

Autumn Collage Card Set


Hi Junkies, it's Holly posting today.  Is it feeling like fall where you are yet?  This week the early morning temperatures have been down around 67 and 66, and it feels wonderful!  Then it heats up to 97 and reminds us that it's still summer here.  LOL  I've been enjoying the cool temps by walking outside early in the morning while the sun is rising.  The leaves are not changing yet, but wouldn't it be wonderful if our leaves could look like the ones on these cards?  

I pulled out some distress ink pads and randomly inked up the beautiful new Leaf Collage stamp from Technique Junkies.  I love all these color combinations!  I then paired them with different sentiments that I stamped on vellum.  I have listed the stamps and inks used in the pictures below.


Scattered Straw, Dried Marigold, Stormy Sky distress inks


Antique Linen, Wild Honey, Peeled Paint, Peacock Feathers distress inks


Shabby Shutters, Peeled Paint, Dried Marigold, Seedless Preserves distress inks


Mustard Seed, Wild Honey, Crushed Olive, Peeled Paint distress inks


If you'd like to go shopping at Technique Junkies, please feel free to use this code, TJ10Holly, to save 10% off your order.  You will find hundreds of stamps in the store as well as stencils and Shimmering Bliss sprays and even some new glitter paint.  Have a great weekend!


Saturday, September 11, 2021

A Little Witch in all of us


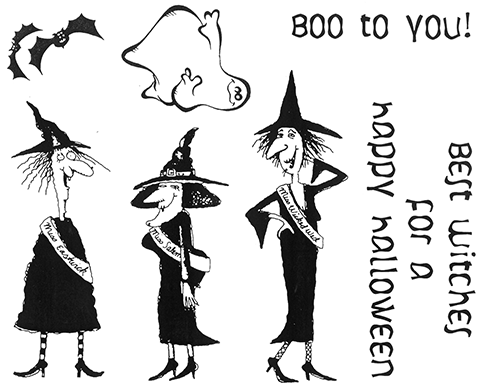
Okay, so I would like to say that this isn't true for me...but it is. This playful Witch in all of Us sentiment stamp works so well with the Best Witches Set. These witches are so much fun; almost blasé. Here is the whole set - take a look at the words on the sashes - they are so much fun!


So...do you have a little witch in you?

Pat Huntoon

Friday, September 10, 2021

TJ Inkspiration: Glittering Rain


Glittering Rain with Stenciled Diamonds
You have to try this!
Technique Junkies and A Colorful Life Designs Stencils collaborated this month to create a matching stencil and sentiment combination that are perfect together. Today we have a video using the Rainy Stencil and the TJ Rain Sentiments with the awesome Diamonds from Aladine for a sparkling effect.

We have featured Aladine Diamonds in the past, but the great new is that the Diamonds now come in packs of 5, allowing you to have a few of each color at a super reasonable price! The best part about the Diamonds is that they stay put - no loose glitter with these!

I have a kit for you today, too, so that you can make the example I show in the video, plus so many more combinations! You can find the Glittering Rain Kits here, along with all of the individual pieces and parts if you would rather get them separately.

One last thing! We just added the Hampton VA Stamp Show to our schedule! The show is scheduled for October 23 & 24 - the link to the show is below the artwork.

Here's how!
Glittering Rain Stenciled Diamonds
On the Road Again!

Meet us on the Road at our next show:


Westminster MD: September 10 - 12

Hampton VAOctober 23 - 24

Allentown PA: October 30 - 31