Sunday, September 18, 2022
Box of Crayon Leaves
Tuesday, November 23, 2021
Create "Anyday" Cards All Year Round!
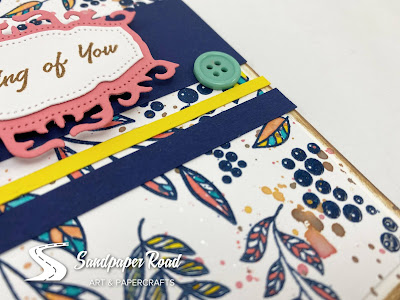
We MUST remember to create “anyday” cards to keep on hand, and today I am sharing a lovely variation with the “Leaves and Berries” stamp. This stamp is part of the November 2021 New Stamp Release from Technique Junkies.
I suppose it is intended to produce more “holiday-themed” projects, but when I saw this stamp I immediately thought of bright oranges, pinks, yellows and navy blue.
First, I stamped “Leaves and Berries” in VersaMark ink and embossed with a navy blue embossing powder. This creates significant border lines inside all the leaves, which is essential when coloring in with watercolor or ink.
The “Thinking of You” sentiment is one of the “Four Little Sentiments” set. I stamped it with Archival Ink and die cut with a Spellbinders die that I had in my stash. Honestly, this card design is perfect to make a set of cards and then customize each card with a different sentiment from the set. I really like the nice font and it stamps beautifully!
Thank you for looking!
Technique Junkies Stamps Used:
Tuesday, September 14, 2021
Ideas for Background Stamps | Easy Window Card
Give your projects a little variety when it comes to using your background stamps! One way to create variety is to simply add a window. You don’t need special fancy acetate sheets (if you don’t have them); simply use a deli container or any clear flat packaging. Using Archival Ink, stamp your background on a pre-cut white card panel. Today, I am using the “Pile of Leaves” background stamp from Technique Junkies.
The "Pile of Leaves" stamp is part of the September 2021 NEW Release! You can save 10% every day at Technique Junkies with my personal coupon code to YOU: Use TJ10ERIN at checkout!
Use washi tape to temporarily adhere the stamped panel onto the front of your actual card base. Open up the card base and die cut a circle or other shape out of the front of the card. Then, remove the white stamped panel and glue the acetate (or clear plastic) to the back. It won’t matter that you can see the glue; it will be hidden when you adhere it to the card.
You can add any sentiment inside the card you want. I added a simple “Thank You” stamped image and embossed in white. To get my placement just right, I used my stamping platform and I also used the packaging from the stamp to help line up the sentiment on the platform. I wanted to make sure you could see the entire sentiment through the window, even when the card was closed.
I wanted to add one single colored leaf over top of the outline-stamped pile of leaves. So, I used some Shimmering Bliss Spray on some scrap cardstock and after the spray was dry, I stamped the background stamp on top. Then, I fussy-cut out one single leaf from the spray-inked paper.
The leaf was going to hang over the window a little bit, which was a nice touch. But when a leaf accent hangs over the window in the front, that means that you will also see the back side of the leaf accent through the window when the card is open. So I stamped again on a second piece of inky paper and glued it to the inside of the card, against the leaf showing through.
For a finishing touch, I added some metal corner embellishments. And that’s it!
Thank you for looking!


