Showing posts with label Tutorial. Show all posts

Tuesday, March 7, 2023

Super Sized Impossible Card (tutorial)

 Hi Junkies! It is Chris and I'm here to share the impossible with you today!

Impossible cards were really popular years ago. I wanted to see if I could make a Super Sized Impossible Card. It would allow us to use our larger stamps on the same fun card format. It totally worked. In the video I will share lots of tips to make this card super easy.

Materials: STAMPS: use code TJ10Chris to save 10% Coffee Girl: Now I Wait: Pretty Line Florals:


You can see video here


You can see video here

Copics: click here for the best prices on copics

Copics used:

Lt. Skin: E000, E00, E11 E13, R20
Dk. skin: E31, E33, E34, RV34
Pink: R81, R83, R85
Dk Cup: E71, E74, E77
Lt. cup: E51, E53,
Dk. Hair: C10, C8, C6, E74
Lt. Hair: E21, E23, E25, E27

Tuesday, February 21, 2023

Let Me See Your Shamrocks!

Hi Junkies! 

Most of us have tons of background stamps.  I love them!  I'm always looking for new ways to use them.  Check out how I used ink cubes to get a multicolored background.  I hope you will give this a try.  It was so much fun to create!

Happy Crafting, 

Chris

STAMPS: use code TJ10Chris to save 10%: Shamrocks: Nothing but Happiness: See a full supply list on my blog

You can see the video here


You can see the video here


Tuesday, August 17, 2021

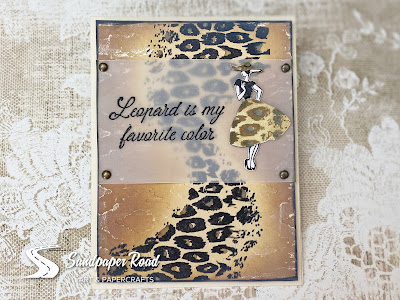
Cardmaking Tutorial | Stamping Leopard Print


Leopard print goes with everything!

This is the leopard-print stamp you have been waiting for! Learn to used your Distress Oxide inks to EASILY color this stamp from Technique Junkies! 

Follow along with me in my step-by-step video tutorial for making this fun and glamorous card!


I actually combined the "Leopard Set of 6" stamp set with the "More Fabulous" stamp set. The lady on the "More Fabulous" stamp was just perfect to embellish the leopard print and the sentiment! 


I just happened to have an animal-print embossing folder in my stash! 

See the slightly raised leopard-print pattern? So cool...

I had to use a mask to achieve the leopard print skirt and hat for the lady. I just used a scrap piece of vinyl to create the mask. Once I stamped the basic image, I pulled the mask off of the skirt and hat and put the "outline" mask over her. Then, I could easily color in the skirt and hat with oxide inks. Feel free to check out the video tutorial to see how this is done! 


I stamped and embossed the sentiment on a piece of vellum and attached the vellum over the card panel with brads. After fussy-cutting the lady, I attached her to the vellum using Zots Mini Dots.


I love how this card turned out! 

Save 10% on your order at Technique Junkies with the code TJ10ERIN


Tuesday, January 28, 2020

How to Make a Criss Cross Card

Today's tutorial uses two stamps:  Birthday Queen and You are Extraordinary.  You can get these, or any other regularly-priced stamp at 10% off by using the code TJ10Beth.

Hello fellow stampers.  Today, I have for you, an oldie but goodie Criss Cross tutorial.  I wanted to do something unique with my Birthday Queen stamp, so I decided to make a bookmark.  I have five of these images, stamped out on Kraft, and coloured, to turn into bookmarks.  Isn't that a fun idea?!
Supplies:
  • Two 4 1/4" x 11" cardstock for base
  • One 1 1/2" x 12" for band 
  • One 4" x 5" double-sided designer paper or Two one-sided paper
  • One 3 1/2" x 4 4 3/4" white/ivory cardstock
  • One 3 3/4" x 5 1/4" cardstock for inside mat
Using 4 1/4" x 11" base cardstock, score two pieces at 5 1/2".  Using card base #1, from score line, cut on an angle from top  of the score line to bottom left.  Using card base #2, cut from score line to bottom right.
Using 4 1/4" x 11" base cardstock, score two pieces at 5 1/2". Using card base #1, from score line, cut on an angle from top of the score line to bottom left. Using card base #2, cut from score line to bottom right. Place adhesive side to the top of the other piece of cardstock.  The bottom should level.


Place Designer Paper in paper cutter and cut paper on an angle.  Ensure the cut goes from tip-to-tip. Repeat again if you have single-side paper.
You should have two pieces cut as above.
Adhere Designer Paper to the top of the triangular shaped sides of cardstock.  Your piece should look like this.
Using heavy duty tape, such as Red Line tape, place tape along the bottom, and up the side for approx 1 1/2".  On the right side repeat with tape going along the bottom and up approximately 1 1/2".
Fold in the right panel and press firmly to adhere the adhesive to the cardstock.  Place left panel over the right panel and press hard.  Adhere neutral carstock to coloured matt.  Stamp a sentiment inside on your inside panel.  Here I used You are Extraordinary.
Score the elongated Designer Paper at 5 5./8" x 11 1/4".  Add heavy duty tape to the end of the elongated Designer Paper.  Place it between the outside and the score line. Slide band over your card.
Embellish your band as desired.


.


Tuesday, January 14, 2020

How to add depth to your stencilling


Let your stenciled background shine!  This super easy, and fun, technique uses ink, a bold stamp and markers to add depth. This stencil is available at A Colorful Life Designs (the stencils that Technique Junkies carry).   You can see all the stencils that Technique Junkies carry here.

Anything purchased at Technique Junkies is 10% off  by using my code TJ10Beth .  Clearance items have already been reduced.

Tape your stencil down well with tape, touching the sides of your paper.  If you have the fabulous new Pixie Spray, use that.  Unfortunately, I live in Canada and cannot have it shipped across the border so I'm on the lookout at local stores.


Sponge ink over entire surface of stencil.  Here I blended my Distress Oxides with the Ink Blending Brushes in colours: Picked Raspberry, Twisted Citron, Broken China.
Using fine-tip markers you will be adding depth to your pretty card front.  I filmed, and started using, Distress markers, but personally I found it too bright.  You may like that look.  Ended up switching over to SU markers.  It's all about what you like to use.  When adding marker, use a darker version of what has been sponged on.

Using your markers, trace around various areas of your stencil as seen in the photo.  You can add as little, or as much, as you like.  For this tutorial I traced lines on most of the stencil.  Tip:  if you have two different colours in one spot, you can use two coordinating markers in that one spot.
Here you can see the added depth because a shadow was created.
By using a bold stencil such as You are so Loved, as above, a sentiment is all you need.  This allows your hard work to shine.

I hope you enjoyed this tutorial. 


Tuesday, October 9, 2018

How to Create with Metallic Shimmering Bliss

Hi it's Beth Norman-Roberts with a tutorial for you today.

Can you believe that I didn't use metallic paper on my card?  Instead I used Technique Junkies metallic Shimmering Bliss.  You can receive these gorgeous sprays or any other product at 10% off simply by using the code TJ10Beth.  It's that simple.

The stamp I used is called Dream Big.  It is a large stamp so I cut it in half and used the bottom portion of the stamp which I gold embossed on black cardstock.

The cost of purchasing metallic paper is expensive so when Pat offered metallic Shimmering Bliss, I got a hold of them.  Here I used Golden Olive, Silver, Smoldering Ash, and Chestnut Mare.

You may be interested to hear that Pat is offering bundles now, so check them out.
Get it all Spray Bundle
Now on to my tutorial...
Spray your cardstock with the colours I listed (you can use any colour of Shimmering Bliss for a different look).  Let dry completely.

Emboss your dried cardstock.
I wanted a masculine-looking card so I picked out masculine embossing folders.
Cut into a variety of shapes as seen here.
Using your unembossed background lay it flat and arrange your embossed pieces of cardstock, leaving space between your cardstock to represent grout.  I used my ATG gun to adhere the cardstock.  You can also lightly use glue to attach your cardstock to your background as well.
Once you have your card covered you may chose to mat your background.

I hope I inspired you to pull out your Shimmering Bliss.

Tuesday, March 13, 2018

How to construct a mixed media project

Hello fellow stampers.  Beth Norman here with some mixed media.  I had a ton of fun making this as it is far from my norm.  I dabbled in mixed media when I spent years working on altered books.  Boy, was that fun!  On any of these stamps, or any other stamps and supplies you can use my code TJ10Beth to receive 10% off your order.  Have you seen the new Color Bursts by Ken Oliver?  You can get them at 10% off as well.  Go wild with your mixed media!

Stamps:  Love Harlequin, Big Flourish, Paint Rings, Be Silly, Rose Doodles
Stencil:  A Colorful Life Stencils


Start by stamping on white tissue paper.  On my tissue I used Love Harlequin and Big Flourish.
Use Modge Podge to adhere your tissue paper to your cardstock.  Place Modge Podge on the cardstock to prevent the ink from bleeding.
Colour entire surface with Gelatos.
Burnish Gelatos with your finger.
Optional:  Place a stencil over any open area and spritz with water.  This will leave a pattern.  I ended up taping my stencil down which is not shown in this photo.
I got some water on my tissue, so I tore pages from a book to cover up the smudging.
Take a stencil and paint light layers of colour using paint over top of your stencil.
Next, I added Paint Rings background stamp to my piece

Finish as desired.