Saturday, October 31, 2020

Have a Sandy Christmas


Hello everyone.  It's Ceal, here to share with you today. I am sharing a card using Sandy Christmas. from the October release. 
You can save 10% on thi stap and the rest of your order by using my code TJ10Ceal. 

To create this card I started with a sea glass card base, a black pane and a white panel. I stamped the image an colored it using Copic markers. I also used the pointillism technique for the sand. 


Friday, October 30, 2020

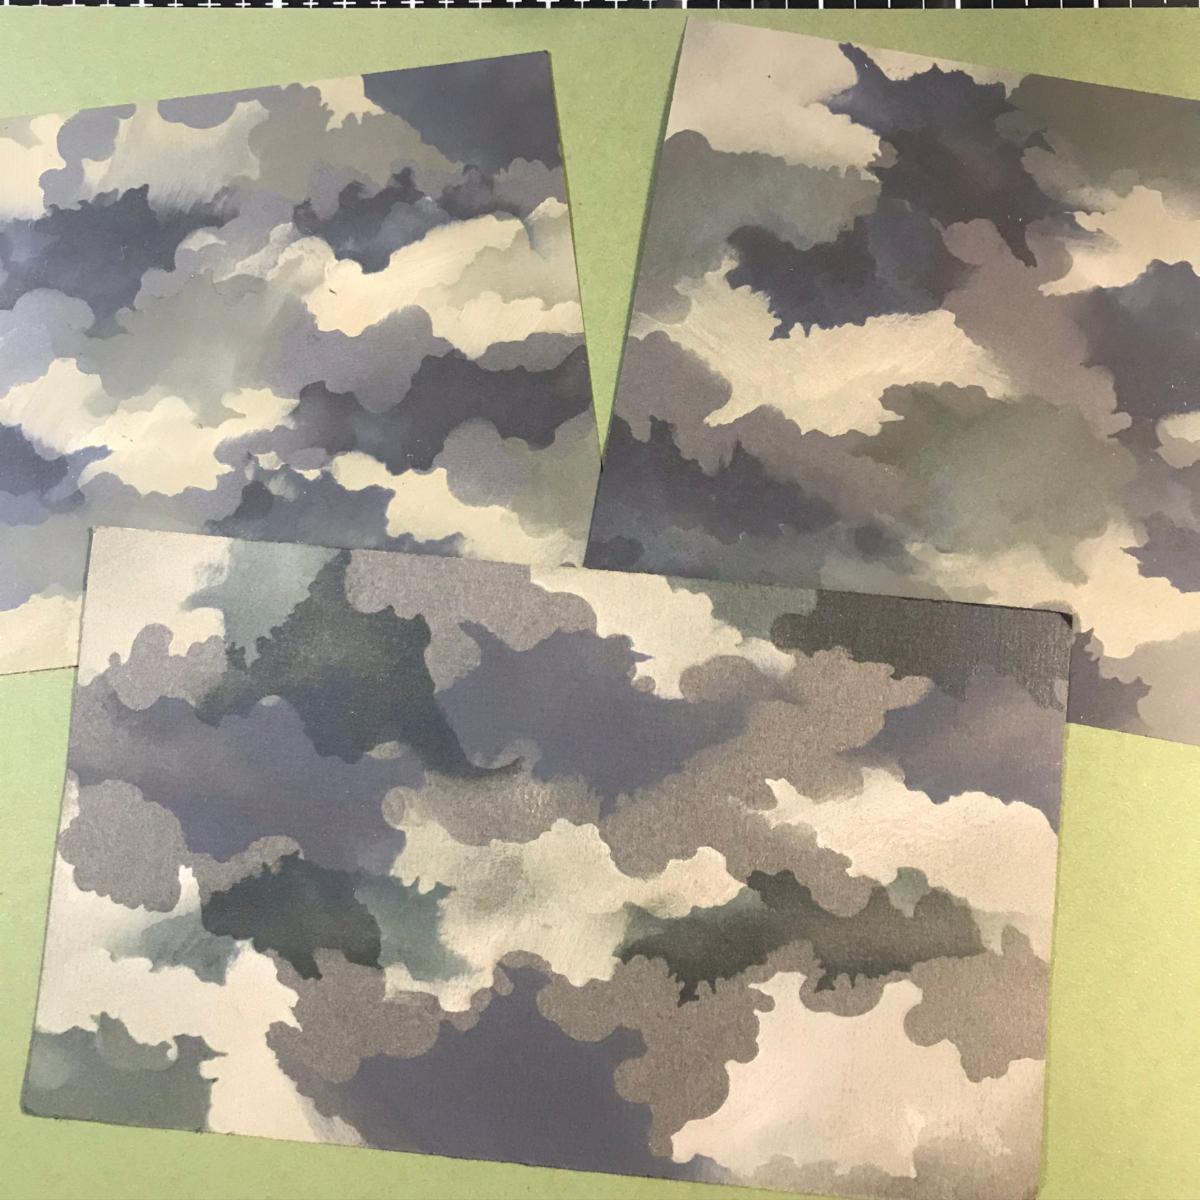
TJ Inkspirations: Cloud Edger Camouflage


I had this idea rolling around in my head for a few days before I tried this and I am thrilled with the results! 


The Cloud Edger Stencil makes gorgeous Camouflage with just Blending Brushes and Distress Oxide Ink. What a fun background to make for the fall! 
Creaking Trees stamp with Camouflage background

I have a kit for you, in case you need the supplies. Here is the kit:
Cloud Edger Camouflage Kit


Here is the another artwork piece made from the tutorial:
Game Warden Stamp with Camouflage Background

And the video:
Making Camouflage with the Cloud Edger Stencil

And one more piece of art:
Framed Deer


I hope you are a little inkspired by today's issue. See you next week!
 
Sincerely,
 

Pat Huntoon
Technique Junkies LLC 

Thursday, October 29, 2020

Dreaming of a White Christmas

   Hi there!

It's my day to post on the Technique Junkies Design blog, and I'd like to share two beautiful cards that I created, using some gorgeous October release stamps!


This first card front was stamped using 'Snow Covered Pines', with a beautiful blue ink. The panel was trimmed, and using the Ink Blending Brushes and a bit of blue ink was blended over the edges of the panel. The sentiment from 'Oh Christmas Tree' was stamped, and the edges of the sentiment panel was also blended prior to adhering to focal panel. The panel was adhered to a white card base. To finish the card, a white glitter pen was used for some of the snowflakes in the sky, and on the tree tops.

Next up, 'Brightly Shining' was stamped with Versmark, and heat embossed with gold embossing powder.  The background was also heat embossed using a stencil that is no longer available. The panels were layered, and adhered to a black card base. What a stunning card this made!


Technique Junkies stamps make such beautiful cards!  

This October release is amazing! So glad I could share it with you!

Don't forget!!! You can always save 10% on any order by entering TJ10Patti at checkout.


Now, be sure to head over to the Technique Junkies store and check out the incredible new stamps this month! 

And don't forget about our 'Gotta Have it All Bundle'!  You get 15 stamps, and 2 stencils! This would normally be $144.78, but the discounted price is $108.59!!!

Thanks for stopping by,

Patti J.

Wednesday, October 28, 2020

Jingle Bells

Halloween is right around the corner, so that means Christmas isn't too far off, right? Well, I've been busily making Christmas cards and I have one to share with you today. It features two new finds for this month: Joyful Jingle and Jingle Bells Stencil.

I used some Christmas paper I had in my stash to cover the base of the card. I pressed a Versamark pad through the stencil onto a piece of cardstock and embossed it with. a glittery gold embossing powder. I trimmed that piece down, added some ink with a blending brush, and attached a burgundy cardstock mat. I added that to my card base. I then stamped the sentiment on another piece of cardstock, once in black and once with versamark, and embossed with the same powder. I also added ink to that and a burgundy mat. On the back of that I added some foam tape and a cut of twine. That was attached to the card base, along with a couple of gold embellishments to finish off the card.

Now, just in case you were really hoping to see a Halloween card, here is one I made last year using Howl-o-Ween. Still a favorite of mine.

Don't forget you can save 10% off your purchases at Technique Junkies by entering the code below at checkout:

Happy Halloween, Merry Christmas, and all that jazz!

Til next time,
Keepin' it inky!


Tuesday, October 27, 2020

Technique Junkie - Brightly Shining

  We are almost ready to turn the calendar over to November.  Despite the challenges of this year - I often wonder "where has the time gone"?  I want to share with you a few more of my Christmas cards from the new October release of Technique Junkies Stamps - what a fun collection this is, I was able to really get a great start on my Christmas cards.

For my first two cards I used  Brightly Shining this stamp is a "stand alone stamp" as you will see below:


For the first card I used a pretty star die as a mask and blended yellow distress oxide ink lightly around the star mask so as to cast a glow.  I used blue distress oxides inks to cover the remaining card.  In the middle of the star, using my stamp positioner, I stamped my focal image in navy blue ink.  Using star punches in various sizes I used glitter cardstock  to punch out my stars and blued them around my image.   Note the rounded corners, the punch not only rounded the corner but punched out a little star.  

For the second card I used a label die to stamp my focal image - embossed with silver tinsel embossing powder.  Love the sparkle.  I went around the edge of the label using a Krylon silver pen.   Going to my stash I had some pretty card stock with tiny stars which I used for my base card.  I popped up the focal image just to add a bit of interest.  


I used Misty Trees and O Christmas Tree for this card.  After stamping and clear embossing  my image  I "found" my gelatos and with a finger I spread the purple color over the entire area, - I was so happy with the way it turned out.  Using one of the sentiments I stamped in black versa-mark ink and choose to put the sentiment at an angle.  A pretty little white/silver bow and card was complete.


Using Wise Men, and Cloud Edger Stencil I made the final card.  I die cut a very pretty delicate frame.
I masked off the edges of my frame  and with  blending brushes I blended blue, purple and yellow distress oxide inks to make the background.  I then splattered some water to give some added interest, then stamped my image in black versa-fine ink.  

You can use the discount below by entering TJ10Shirley you can add this beautiful stamp to your Christmas collection. 


Monday, October 26, 2020

Fir Forest


I used Dotted Merry Christmas,  Fir Forest,  and the Cloud Edger Stencil to create this Christmas card.  I used the Ink Blending Brushes to apply the ink around the stencil.   I used Dazzle Shimmering Bliss Topper over all.  I added some iridescent Nuvo drops for snow falling from the sky.


Use TJ10Judy when you check out to save 10%.  


But if you are really enamored with all of the release -- then take advantage of the "GOTTA HAVE IT ALL!"  That sale is 25% off all of the October Release.
 

Have a marvelous day and get inky!


Sunday, October 25, 2020

Deckled Ombre Holy Night


 Have you started on your Christmas cards yet?  I have a nice little stash started, and this is one of the latest ones that I created.  I used the beautiful new Brightly Shining stamp from Technique Junkies along with a Deckled Rectangle stencil to create this clean and simple card.  Even better, it's perfectly flat for mailing with just one first class postage stamp.

I began by placing the 4" Marvelous Masks Deckled Rectangle stencil (A Colorful Life Designs) over some white cardstock.  With the ink blending brushes, I added Distress Oxide inks starting with Peacock Feathers at the bottom, then Chipped Sapphire in the middle, and finally Wilted Violet at the top.  After I rubbed an anti-static bag over the stenciled inks, I stamped the Brightly Shining sentiment with Versamark and embossed it with white embossing powder.  

Think of all the different color combos you could use with this stamp.  Change up the embossing powders to silver or gold and try different inks in the background.  Go wild and use neon inks for a really colorful card or go non-traditional with a pink and yellow background.  The possibilities are endless!


Saturday, October 24, 2020

Inside Out: 12 Cookies Set of 10

Beverly joining you today with fun new stamps which are part of the October release.  I was so excited when I saw the set Inside Out: 12 Cookies, Set of 10 stamps.  I loved all the humorous sentiments and knew I could use them for both the inside and outside of cards.  My first card I simply heat embossed the sentiments with white embossing powder on navy cardstock and used diecuts plus a few sequins.  This would be a fast and easy card to mass produce if you are running short on time with your Christmas cards.

My second card along with using the Inside Out: 12 Cookies, Set of 10 also uses Christmas Kitty for a simple card in one of my favorite color combos.  

For my third card, I was looking through my Christmas patterned papers. I immediately thought of the "Dear Santa" sentiment in the Inside Out:12 Cookies, Set of 10 when I saw this jolly Santa paper.  I knew it would make a pretty but also quick and easy card.  I'll bet if you take a peek at your Christmas patterned papers you will find some perfect for all the sentiments in the Inside Out set.

Thanks for taking time out of your busy day to stop by.  If you feel like shopping plus saving money, make sure to use the code above to save 10% off your purchase at Technique Junkies.  If there is one thing I like better than shopping for stamps, it is saving a money (so I can buy more stamps!)  


Friday, October 23, 2020

TJ Inkspirations: Shimmering Misty Trees


The Misty Trees Image from Technique Junkies stamps so easily and can be used successfully on both colored and neutral cardstock. Shimmer just makes it even prettier! I've made this quick 3 minute tutorial for you -  just a little Shimmering Bliss with one color ink results in sheer gorgeous-ness. 

Here is the artwork piece made from the tutorial:


The kit may be found here:
Shimmering Misty Trees Kit

And here is how we made these:
Shimmering Misty Trees by Technique Junkies


I hope you are a little inkspired by today's issue. See you next week!
 
Sincerely,
 

Pat Huntoon
Technique Junkies LLC 

Thursday, October 22, 2020

Silver Bells


Hi Junkies!  It's Holly posting today, and I've got another fun and easy Christmas card to share with y'all.  I started by stamping the beautiful new Joyful Jingle from Technique Junkies onto black cardstock with some Versamark ink and heat embossed it with silver embossing powder.  Then I took the matching Jingle Bells stencil and placed it over some black cardstock.  I smooshed a juicy Versamark ink pad over the stencil, carefully took the stencil off, and covered the inky areas with silver embossing powder.  The powder was melted with a heat tool and then I was able to put the card together.

Wouldn't this be fun to recreate in different colors?  Set up an assembly line and you'll have a bunch of Christmas cards ready in no time!


Wednesday, October 21, 2020

Joyful Jingle Cards

It's Beverly jingling in today and I have two cards using the pretty new October release of Joyful Jingle. My first card was simply done by stamping with black ink on red card stock.  I paired it with a patterned paper which has gold foil  and a gold foil die cut.  I also embossed gold foil card stock with  a pine bough pattern.  Easy card for those rushed holidays!

 My second card features the new Jingle Bells stencil which is the perfect match for the Joyful Jingle stamp.
I simply stenciled it on white card stock using a red ink pad and a blending brush.  I stamped the Joyful Jingle sentiment with the same red ink.  I love the way the Jingle Bells stencil looks with the stamped image.  I used a striped washi tape with green card stock plus colored twine to create the card front.  Another easy card to help me survive the holiday rush where I struggle each year to get everything done.  But with this pretty stencil and matching stamp, I'll practically breeze my way through making Christmas cards.

Thanks for stopping by and don't forget if you use the code above you get a 10% discount when you shop at Technique Junkies.  Check out all the fun new releases plus all the other great stamps too.  You will get a discount plus look forward to going to your mail box.  


Tuesday, October 20, 2020

Gnome for Christmas

Help, I've been invaded by these October gnomes in my studio. To be honest, these darling pinch-my-cheeks little fellas and gal are having a lot of fun with me.  Today I am showcasing a trio of tags to add that darling touch to my gifts, and even to wine bottles, handmade hot chocolate packages, etc.  Everyone loves a darling touch that says, "I love you."  Gnome for Christmas, and gnome all year long as far as I'm concerned.


 To get your 10% savings on your shopping cart (the gnomes are begging to be home with you), use the discount above.


Monday, October 19, 2020

Blue Snowy Pines


One of the easiest-to-use, and the most beautiful stamp, from the October 2020 New stamp release is the Snow Covered Pines stamp. A monochromatic color palette, like the Navy used on my card, makes this an easy way to add beautiful drama. I added glitter along the top edges of the trees to highlight the snowy look. The sentiment used is from the Oh Christmas Tree Set
Have a Great Day!
Pat Huntoon

Sunday, October 18, 2020

Winter Wonderland/Christmas Star


Hello, friends.  Lynda Joy here to bring you today's Technique Junkies blog post.  My card features the Shining Stars stencil from the October release.
 
Technique Junkies Stamps/Stencil:
 
How I made it:
  • On a white card stock panel, I placed the Shining Star Stencil and added gold ColorBox pigment ink through a large star.  I was careful to tape off the other openings in the stencil so the ink didn't go through those to the panel.  I added gold embossing powder and heated it.
  • I inked a background around the star with blue distress inks, being darker around the edges, to very light where I wanted the focus on the star. 
  • With green distress ink, I stamped the Fir Forest , repeating and moving the stamp up and over a bit without reinking to give the appearance of receeding trees behind the row.  I added this panel to a blue A2 card front.
  • I added the verse from the Gifts of Christmas Set of 5 on a scrap, and added it to the card.

That's it.  I hope you like it, and hope you've enjoyed this release.  I am loving the stencils that complement the stamps and enhance our cards.  

Thanks so much for visiting.  I have another card using the same Fir Forest trees, and a verse from another new TJ stamp set, Oh Christmas Tree Set of 4
 
Full directions for this card, along with details are on my blog, PaperArtsCafe today.  You can find it HERE. 
 
Don't forget to use my code, TJ10Lynda, for 10% off your entire TJ order.
 
Thanks for stopping by!

Blessings,

Lynda Joy