Showing posts with label Heat Embossing. Show all posts

Tuesday, January 24, 2023

Underneath the Moon with Tutorial

 Hello all, 

I have a love/hate relationship with embossing powder.  It can be challenging to get a clear image without flecks all over.  Well... What if you want the flecks?  Check out this technique where I turn the flecks into stars on my evening sky card. You can see the video here

Stamps: 
Under the Moon: Use Code TJ10Chris to save 10%

Check out Full supply list on www.purplelakestamps.com


Tuesday, December 27, 2022

Happy New Year

Hello Junkies!  

Today I stepped (more of a creep than a leap) outside my comfort zone.  When I think Navy I usually think silver.   I've seen a lot of other card makers using gold with Navy.  I was inspired to give it try.  I have to say I LOVE it!  What do you think?  Do you have color hangups?

Materials:

STAMPS: use code TJ10Chris to save 10%: 

Other supplies can be found on my blog


Tuesday, May 31, 2022

Delicate Bouquet

Hello, Tracy Shultz, The Hopeful Crafter up today! Today we say goodbye to May as tomorrow is the first day of June. Here's one more card from the May 2002 release using the new Delicate Bouquet stamp. Save 10% off your order using my code: TJ10Tracy  Purchase your stamps here: https://techniquejunkies.com/may-2022-new-stamp-release/


Check out my YouTube Video of how I created this card:
To create my card I first heat embossed the Delicate Bouquet stamp using black embossing powder onto a piece of Hammermill Premium Color Copy Cover paper (80 lbs.) I then used foam domed blending tools to ink blend a rainbow background using Catherine Poolers inks (Cummerbund, Chiffon, Catching Rays and Pucker up). I framed it using a die from my stash cut with pink pearlescent card stock. I then cut out the sentiment using a die from my stash. I adhered everything onto a black A2 card base. 

Thanks for checking out my card and the blog!

Wednesday, March 9, 2022

Rainbow Zen Edges

 Hello! The Hopeful Crafter, Tracy Shultz, sharing two colorful cards with you today. The new Zen Edges stamp set is highly versatile and so bold! You can purchase the stamp set here: https://techniquejunkies.com/zen-edges/  Don't forget to use my code: TJ10Tracy to save 10% off your order!

For my first card, I used a piece of 4.25" x 5.5"Accent Opaque card stock and heat embossed the edges with the edges positioned at the top and the bottom. I used black embossing powder. After embossing the flourishing Zen Edges, I ink blended a rainbow using Catherine Pooler Inks. I started from top to bottom using foam domed blending tools. The colors that I used were:
  1. Pucker Up
  2. Catching Rays
  3.  Chiffon
  4. In the Park
  5. Cummerbund
  6. Serenade
Next, I used a stitched rectangle die to cut the panel down to 4" x 5.25" and, using Versafine Claire Nocturne Ink, stamped the Happy Birthday Sentiment from the Technique Junkies Inside Out Young at Heart Stamp set: https://techniquejunkies.com/inside-out-young-at-heart-set-of-10/   Finally, I adhered the panel to a black A2 card base and applied rainbow colored gems to the flourish at the bottom of the panel.  
 
For my second card, I used a piece of 4.25" x 5.5"Accent Opaque card stock. I positioned the Zen Edges in the middle of the card panel, leaving a space between the two. I heat embossed the stamped images with black embossing powder. I then ink blended the panel with my foam domed blending tools. I blended at a diagonal angle, using Distressed Oxide Inks in the following colors:
    1. Picked Raspberries
    2. Mustard Seed
    3. Twisted Citron
    4. Lucky Clover
    5.  Prize Ribbon
I heat embossed the sentiment I believe in You, https://techniquejunkies.com/i-believe-in-you/ from the new release for March 2022. I sprinkled a bit of water on panel, dried it with my heat panel, then sprayed Dazzle Shimmering Bliss Spray https://techniquejunkies.com/dazzle-shimmering-bliss-topper/ on top the panel. After the panel dried I used a stitched rectangle die to cut the panel down to 4" x 5.25" and adhered the panel to a black A2 card base.                    

Save 10% on all non-sale items with my code: TJ10Tracy   (excludes sale items).
https://techniquejunkies.com/

Thanks so much for visiting today!


Wednesday, January 26, 2022

Dotted Hearts - Trio of Cards - Technique Junkies

 Hello!  Today's cards are from The Hopeful Crafter, Tracy Shultz. I created a trio of cards that feature the new Technique Junkies Dotted Hearts background stamp. This stamp is part of  the January 2022 New Release stamps: https://techniquejunkies.com/january-2022-new-stamp-release/   All of the new stamps are still available at the link above. Save 10% off non-sale items with my code: TJ10Tracy

My first card (above) was created by first ink blended on Hammermill Color Cover Copy Paper using Catherine Pooler inks (DoSiDo and Rouge).  These inks are amazing and they are available at the Technique Junkies shop! These inks are water reactive, so I spritzed some water on the panel and it created white spots on the red ink blended panel. I dried the ink blended panel with my heat tool, then stamped the Dotted Heart stamp using Versamark Watermark Ink. I then heat embossed with gold embossing powder. I cut the word "Love" in gold foil cardstock using a sentiment from my stash. I used a black A2 card base.
My second card has most of the same elements as the first, but I used white embossing powder and the inks I used to blend with were Pucker Up and DoSiDo Catherine Pooler Ink. 
My third card features silver embossing powder and I ink blended the background with Pucker Up Catherine Pooler Ink.  

 This release is so much fun. If you're like me and you have to have all the stamps in this collection, there is a "Gotta Have It All" bundle: https://techniquejunkies.com/january-2022-gotta-have-it-all-bundle/

You can save 10% off on all sale items if you use my code: TJ10Tracy (excludes sale items and bundles). Thank you for visiting today. 


Wednesday, January 12, 2022

Falling Confetti Hearts - Batch of Galentine's Day Cards

 Hello. Tracy Shultz, The Hopeful Crafter here today with a batch of cards that I created for the Technique Junkies Design Team using the new Falling Confetti Hearts and Happy Galentine's Day stamps. You can find these at www.TechniqueJunkies.com   Use my code: TJ10Tracy to save 10% off all non-sale items

Rose Gold Embossed Falling Hearts and Sentiment

Silver Embossed Falling Hearts and Pink Embossed Sentiment

Pink Hearts (Catherine Pooler Inks: Rouge, Pucker Up and DoSiDo)
and Pink Embossed Sentiment

Pink Ink Blended Background (Catherine Pooler Inks: DoSiDo and Pucker Up)
and Rose Gold Embossed Sentiment

Pink Falling Hearts (Catherine Pooler Inks: Rouge, DoSiDo and Pucker Up) and
Pink Embossed Sentiment

All of the card panels (backgrounds) were either heat embossed or inked. I used a piece of holographic foil cardstock as a mat beneath each panel. I embossed all the sentiments and matted them with holographic foil cardstock. All the cards are size A2 (4.25" x 5.5"). 

These stamps are from the beautiful January new release stamps:


Thank you for visiting the Design Team Blog today!


Wednesday, October 20, 2021

Sleigh Bells Ring Snow is Glistening

 Hello. Tracy Shultz, the Hopeful Crafter, here with today's card. I used the new Sleigh Bells Ring stamp from the October New Release and the previously released Star Power stamp. Check out the Technique Junkies store to see these and so many other amazing stamps: www.techniquejunkies.com and, if you use my coupon code, TJ10Tracy you can save 10% off your order. 

To create this card I first heat embossed with silver sparkle embossing powder the Sleigh Bells Ring Stamp. I love this stamp and it's flowy font. Then I used regular silver embossing powder to heat emboss the Star Power stamp. This stamp is a must have staple for all your holiday cards: Christmas, Hanukkah, New Year's, and for Birthday's and other Celebrations. I matted the Sleigh Bells Stamp with silver shimmery cardstock. I matted the Star Power stamp with silver glitter cardstock.   
Here's a list of the stamps I used today:
Star Power: https://techniquejunkies.com/star-power/


Thursday, March 5, 2020

Better in the Country...

It's my day to post here on the Technique Junkies Design blog, and I wanted to share another card using 'Better in the Country' from the March new releases.  I love this stamp! 

The background was stenciled using 'A Colorful Life Designs 6 x 9 Stencil 'Messy Diamond Grid'.


I took this photo at an angle, so you could better see the embossing.

This was so easy to create! Hope you will give it a try!

Now, be sure to head over to the Technique Junkies store and check out the incredible new stamps this month! 

Thanks for stopping by,

Patti J.

Wednesday, November 8, 2017

30 Days of Christmas - Day 25 - Peace

Hello Junkies!

The Crafty Nurse here posting one of my all-time favorite holiday stamps for the 25th day of Technique Junkies 30 days of Christmas. Pat is offering 20% off all Christmas stamps during this celebration. 

This is such an easily reproducible card especially when you use the MISTI

Stamp:  Christmas Dove 
Technique: Heat embossed with Platinum embossing powder by Ranger. 


We'd love to see you are making for this holiday season over at the Facebook Group.

Happy Inking!

Wednesday, October 25, 2017

30 Days of Christmas - Day 11: Vintage Christmas


Hello Junkies!

The Crafty Nurse here with some holiday spirit.  I love to get my Christmas cards done early so I don't have to rush around in December when I need them.  I've used some new and old Technique Junkies stamps to create this vintage style card.


Supplies: MISTI, A Colorful Life's "Square Fade Stencil," Distress Paint in Frayed Burlap, Distress ink in Antique Linen, Gold Foiling, Holographic EP, Versamark, WPlus9 Die, Neenah Cardstock, gold cardstock, flitter-glu, and gold flakes.

Directions:  Stamp Arabesque using Distress paint on cardstock using MISTI, ink with Distress, DRY completely with heat tool, apply versmark through stencil,  apply holographic EP and heat, stamp sentiment using MISTI (a must because of texture), cut card panel using circle die, pop-up center die, stamp snowflake with flitter-glu, foil, buff, and back with gold cardstock.


We'd love to see your cards and projects over at the Facebook Group and in our Design Team challenge where you can win prizes for your entries!

Happy Inking!

Thursday, October 5, 2017

GIve Thanks: Using MISTI to Heat Emboss over your Prismacolor Pencil colored images

Hi everyone.  It's Chris here today, sharing a card made with one of the new October release stamps, Give Thanks.

Today I used Prismacolor pencils on kraft cardstock to create my colored image, and heat embossed in gold after coloring.


To create this card, I used my MISTI stamping tool.  First I stamped the image onto my kraft cardstock panel with kraft ink.  I left my stamp set up in my MISTI so I could restamp after coloring.

I used Prismacolor pencils to color within the kraft stamped lines, taking care to use a good variety of colors and intensity of color so that the contrast would show through after heat embossing.


I tried to create highlights with color since the size of the images would not lend terribly well to just variation of pressure.

Once I was happy with my coloring, I simply reinserted my card panel into the corner of my MISTI and stamped exactly over the kraft ink, using Versamark ink.  I then added gold embossing powder and heated with my pre-heated heat gun.  I love how the gold looks on the pumpkins!  It really highlights this gorgeous image.

The panel was then trimmed using a scalloped die, and added to a charcoal brown card base.

This Give Thanks stamp as well as all of the new October release stamps are still 15% off through October 8th!


Thursday, May 4, 2017

Call the Girls

Happy Thursday!

Chris here, sharing on the Technique Junkies Blog for the first time!

Today I am sharing a card made with the some of the fantabulous new May Release stamps, Make Lemonade and Call the Girls.


This background stamp was stamped with my MISTI tool in a yellow archival ink.  I left my stamp my stamp in place in my MISTI and added some color to the lemons with Copic Markers.  I then put my cardstock back in my MISTI and clear heat embossed over the top of my coloring.


My focal image was stamped with Memento and colored with Copics.  It is popped up from my card panel with foam tape, and then I added a bit of chunky bright yellow glitter to the lemon.

Thanks for stopping by!  


Monday, December 26, 2016

Creativity and Art


Happy day after Christmas!   Are you feeling the post Christmas lag?   I am  as I have had family for three different meals and three different sets of gift opening.  It was all good, but all tiring.  One adult son-in-law was ill so he and his family stayed home while the elderly relatives were here (age 89 and 90) so they would not get the virus.  Then after the elderly folks went home, they came out and opened gifts. Now my daughter and kids are here for a couple of days.  That will be fun. And in between gift openings  I had the opportunity to craft a couple of cards.  I will post one today and one on Wednesday. 

I used a variety of Technique Junkie stamps -- Veined Marble (http://techniquejunkies.com/veined-marble/), Return to Sender (http://techniquejunkies.com/return-to-sender/), and Art Mistakes (http://techniquejunkies.com/art-mistakes/).  I also used a dirty Versamark pad and Pan Pastels.  Pat Huntoon talked about this in her blog post on Friday - http://techniquejunkies.blogspot.com/2016/12/pan-pastel-backgrounds.html.  The dirty Versamark ink pad helps you to see the image you have stamped much easier.

Pan Pastels are unique in several factors.  You  can layer them and still see the individual colors as they are more transparent than other  pastels.  I have used both.  The fact that these are more translucent adds to their uniqueness.  Like nearly all kinds of pastels they are fragile and easily crack or break.  However, unlike traditional artist grade pastels, these can be repaired.    I was so impressed by the Pan Pastels that I bought a LOT of them at the York Heirloom stamp show in September.  One of the deciding  factors for me was how easy they can be repaired.  I have a LOT of other artist pastels in my craft room.  I used artist pastels in high school in art classes.  They are easy to blend with.  But we did not have  Versamark ink for the pastels to adhere to in those dark ages so long ago.   
To repair the Pan Pastels is relatively easy but it does take a bit of patience.  You need a toothpick or something thin and sturdy that you will not mind using for this or that you can throw away.  Add small drops of distilled water to the cracked pastel container.  You can start with a teaspoon drizzled slowly over the pastel pan. Add tiny amounts (drops) of water allowing the water to soak in.  Continue this process stirring carefully with the toothpick  until you have a thick soupy mixture.  You want to add the water slowly so you do not cause the (not cheap) pastel powders to overflow the container. Continue to stir until it is as smooth as you can get it.  There may still be some lumps left and the surface may not look the same as it did originally.  But it will work the same!  So if you are looking at these, choose the colors you want and ignore any cracks as now you know how to repair them.  (And I learned at the York show that you can do the same thing with your cosmetic compacts!)

Now for my card.  I first stamped the Veined Marble stamp on white card stock.  I used a sponge and a  purple Pan Pastel  and rubbed the pastels over the stamped image.  Then I just sort of heat set the ink with the pastels.  I don't think it is necessary but since I knew I was going to  stamp an image to heat emboss I wanted to be sure I didn't have embossing powder  sticking to the Versamark ink under the pastel powder.  Then I inked up the Return to Sender stamp without it being on an acrylic block. That way I could bed the stamp and apply the ink in sections which is what I did. I continued this process all over the card stock.  I applied a deep blue Pan Pastel over the purple. And I heat set it again.  My final stamping was with the Art Mistakes stamp.  I used Versafine Black ink and a detailed black embossing powder and heat set the powder.   I sprayed some pearlized  glimmer spray over the final card. 

The focal image was trimmed and layered with two different shades of purple card stock.   The ribbon was added before adhering to the base card stock.  A few Mylar snowflakes were glued down with  liquid glue.

So now, I am curious did you get any stamping stuff for Christmas?    Now you may have some time to get inky!

Judy Jackson

Wednesday, November 30, 2016

Welcome to Day 16 of the 30 Days of Christmas!

Welcome back, Inky Friends. It's Ro back to share with you the Technique Junkies Design Team 30 Days of Christmas! Remember, you will receive a 25% discount on all Christmas Stamps until December 15, 2016. The discount will be reflected at check-out.

For today's card, I used one of my favorite background stamps along with one of my favorite color combinations.


Supplies:

Build It:
  • On black cardstock, stamp the Pinecone stamp with Versafine Ink. On separate piece of black cardstock, stamp the All Is Calm sentiment with Versafine Ink. Using white embossing powder, heat set both images.
  • Trim down the pinecone background and mount to a piece of red cardstock cut slightly bigger than the pinecone panel.
  • Using an oval die, cut out the sentiment. Then cut out a red piece of cardstock using a scalloped oval die. Attach the two pieces together.
  • Wrap twine three times around matted pinecone panel, staggering where the string overlaps, and secure on the back of the panel.
  • Attach the panel onto card base. Then attach sentiment panel onto front of card.
This card is very quick and easy, yet leaves a very striking impression. Using the MISTI, it would be a cinch to mass produce a card such this.

Come back tomorrow for Day 17!!

Til next time,
Keepin' It Inky!


Monday, November 28, 2016

Day 14 of 30 Days of Christmas

There is nothing quite like silver and gold that speaks of Christmas to me -- and I suspect to most people.  I chose this lovely card stock color for this card.

Lest you think that Design Team member never mess up on cards -- let me change  your mind!  I "knew" that embossing powder often spread and I knew therefore you can have difficulty getting words to emboss and look good.  That is especially true if the font is small and close together.  I just didn't think that these words were in such a small font, but oh yes they are!  I had stamped them in Versamark and then covered with silver embossing powder.  Oh, it was bad!   I evidently do not have "detail" silver embossing powder!  The words were a total mess.  So I had to start over.

The second time I used Stazon silver metallic ink.  The problem with that ink is that it dries very quickly so you must get the stamp die covered and stamped quickly.  That took me several tries to get a successful image stamped. Then I cleaned it right away with Stazon cleaner.  This ink doesn't come off easily even with Stazon cleaner.  

I am using Technique Junkie Peace on Earth Dove - http://techniquejunkies.com/peace-on-earth-dove/.  Next I reinked with Versamark the area around the dove and the larger block words in the bottom right corner. I covered the ink with detail gold embossing powder and heart embossed.   Then I  "fussy cut" out the dove and used dimensional to pop it up. I did the same the block words at the bottom. 

I layered it on gold and then on the burgundy card stock to complete the card.  

Don't forget all Technique Junkie Christmas stamps are on sale 25% through December 15.

Now to finish the rest of my cards, get presents wrapped and under the tree, and start on Christmas baking!  -- Have a great day and get inky.

Judy Jackson

Wednesday, June 8, 2016

Cloudy By The Sea

Hello fellow Junkies!!

Today is the last day to stop by the Technique Junkies store to get the June Stamp release for 15% off, so don't forget to pop on by and get some of the great summer stamps.

Today, I'm bringing you some inspiration using the gorgeous background stamp called, "Bold Shells #S687".  For my background I created a watercolor background using an oldie but a goodie from the December 02'/January 03' TJ Newsletter called "Watercolor Background".  I then used the Misti, to stamp Versafine Black Onyx ink and because I used watercolor paper, the Misti allows me to stamp twice and get it perfectly lined up and with great vibrancy.  Did you know you can also get extra magnets and replacement grid papers for your Misti at the Technique Junkies Store?

My sentiment is from the "By The Sea #SS060" Set of Six.  This is a gorgeous script sentiment which I stamped over a My Favorite Things stitched cloud die and embossed with Versafine Black Onyx Ink.


Thanks for checking out the inspiration I've created for you today and I'll be back shortly with some more inky goodness from the June release.

Happy Stamping!!

The Crafty Nurse

Monday, October 12, 2015

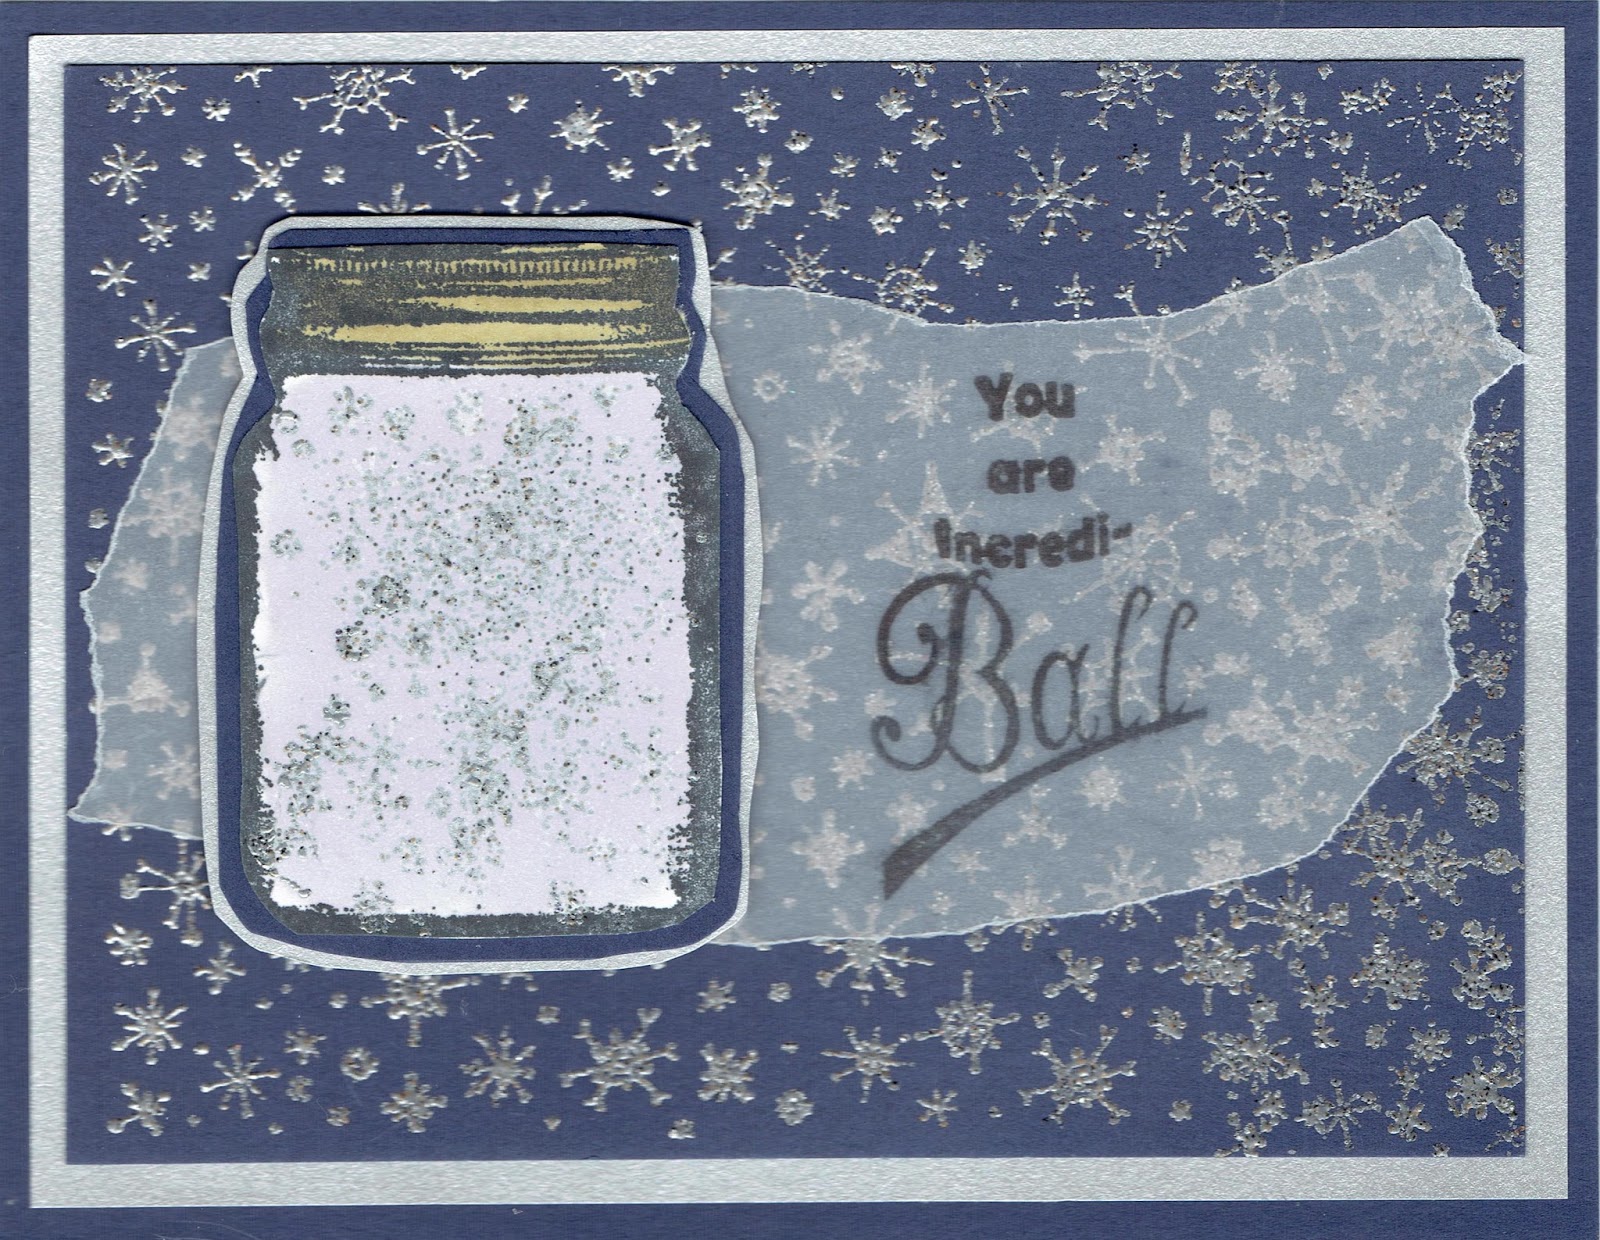
You Are Incredi-ball!

Hello from Judy Jackson!

There is nothing quite home canned goods in the middle of winter. On my canned goods shelves, I have tomatoes, tomato juice (only a few jars), spaghetti sauce, peaches, bread and butter pickles, dill pickles, Chili sauce for a condiment, and soon I will have apple sauce, and some apple pie filling.  In my freezer I have freezer jam with peach jam, strawberry jam, blackberry jam, and red raspberry jam.

My children and my grandchildren have all caught various bugs over the years in canning jars.  I am showing this kind of activity on this card. I used the Technique Junkie Stamps  jar set http://techniquejunkies.com/incrediball-canning-jar-set-of-2/  and this butterfly stamp http://techniquejunkies.com/butterfly2/.  


Those same children and grandchildren have made fairy dust that sparkles and shines from "glow sticks" broken open into canning jars.


To create this raspberry jam this is what I did.  I stamped the jars on clear acetate with black Stazon ink.  Then i flipped the acetate and colored the inside of the jar with a red Copic marker.  But now I need the "bumps" for jam.  I used the small dots on the Wasted stamp with red Stazon ink and stamped over the Copic ink.  The saying on the front of the card comes from Mae West Sentiment 2 set http://techniquejunkies.com/mae-west-sentiments-2-set-of-5/. 


Do you do any canning in your house to prepare for winter?   Have an inky day!

Wednesday, August 19, 2015

The Right Shoes...

Hello Fellow Junkies!!

It's The Crafty Nurse here with a clean and simple card share for you using the gorgeous Technique Junkies stamp called "The Right Shoes #SD610."  I colored them with Copic Markers in R05, R27, R46, which is one of my favorite red combinations.  The bottom of the shoes are C3, C5, and C7 and the skin colors are E50, E51, and E21.

The background was stamped with Versamark and heat embossed with clear powder using "Faint Scratches #SD518." This background stamp is perfect for so many design types and I find myself reaching for it often to add great texture.

The Right Shoes stamp is so striking on it's own I wanted to showcase it with a clean design.  The angle piece was cut using My Favorite Things Blueprint #15 die and I finished off the card with waxed linen bow.


Thanks for stopping by the Design Junkies Blog today and I hope you are finding some time to get inky.

The Crafty Nurse

Wednesday, July 8, 2015

Black & White

Hey Junkies!

The Crafty Nurse here with a Design Team post featuring more of the July stamp Release at Technique Junkies.    Pat's outdone herself again this month and given us so many great choices to work with.

Today I'm featuring a sympathy card.  It is often hard to motivate yourself creatively when a sympathy card is needed.  For that reason, I like to make them ahead of time and have them in my stash.

Using the theme of darkness felt during this time, I've chosen a black and white design using July Stamp release, "Peonies #S626" and the Sympathy set of 5 called, "With Sympathy #SS049".

The card is very straight forward stamping with black Versafine ink and heat embossing with clear powder.  The sentiment is also embossed on Bazzill heavy vellum.  I added a few gems to finish off the card and layered with white card stock.


Thanks so much for joining us today at the Design Team Blog.  Hope you've had a chance to check out all the great new product in the Technique Junkies store because today is the very last day of our July sale.

By for now,
The Crafty Nurse

Thursday, June 25, 2015

Stars and Stripes-An Americana Card using Star Stream

Happy Thursday Junkies!
Jerri here to share a patriotic card with you!  I really wanted to do something for the upcoming holiday so here it is.


I'll apologize right up front because I wanted to do a step-by-step tutorial on this but I've had a crazy week and I just couldn't get it pulled off in time.  So without pictures I"ll do my best to give you the step-by-step instructions.  It looks long but that is because I'm a little windy and not because the process is complicated ha ha. (no really I'm a talker hee hee).  This is a super easy card that can easily be modified to fit whatever supplies you have on hand.

  1. Cut a piece of Kraft cardstock to the dimensions of your card. I cut a piece of 8 1/2 x 11 cardstock in half to make a card that has dimensions of 4 1/4 x 5 1/2 when folded.
  2. I placed a star stencil by Heidi Swapp over the right edge of the card, then I sprayed over the stencil and card front using Glimmer Mist in the color Denim.  You could use any spray you have in red or blue, and you could use any stencil that would work with the theme.  There are several cool stencils available at the TJ Website.
  3. I found this cute red, white and blue ribbon at Wal-Mart.  I really wanted to hang a charm from the ribbon but since resources are pretty slim in my neck of the woods, I was unable to find what I wanted.  I dug through my paper stash and found some patriotic paper. I cut out the USA and then I used my Martha Stewart Ribbon Threader Punch to punch two holes so I could thread the ribbon through. If you don't have a punch like this, you can cut slits with a craft knife where you want to thread the ribbon.  I've done that many times and it works really well.  
  4. Once the ribbon was threaded through the tag, I wrapped it around my card.  The section where the ribbon comes together should meet in the front so it can be hidden by the flag. 
  5. Cut a piece of white cardstock to the size you want your flag to be. This will be the base for your flag.
  6. Tear a strip of blue cardstock in a length that will run along the left side of the flag.  Only tear one side of the blue paper. You will need a straight edge to run along the outside of your flag.  Also, make sure your strip is wide enough to accommodate the star stamp you are using.  \
  7. Using a Technique Junkies stamp called Star Stream, I stamped along the blue strip with Versamark Ink and then heat embossed it using an off white embossing powder. I wanted the flag to have an Americana feel so I didn't want the starts to be stark white. (I used Seafoam White)
  8. Tear strips of red and white paper to fit horizontally on the cardstock. Make sure the edges that will show along the top and right side of the flag are left with a straight edge..
  9. Once all of the red and white cardstock pieces are torn to size, make sure they fit on the piece of cardstock that you cut in in step 4, as your flag base.
  10. Glue your red and white stripes along the right edge of the flag base and layer them if desired.  I layered by starting at the bottom and working my way up the flag (like shingles).
  11. I used some Tim Holtz ink in Tea Dye along the edges of the red and white strips to give it an aged or an Americana look.
  12. Glue the blue paper with the stars along the left edge of the flag.  
  13. Now that the flag is assembled, cut a foam sheet just smaller than the size of your flag and glue it to the flag base before adhering it to the card. This will raise the flag slightly above the card to give it dimension.  You could use pop dots here but I really like using the thin foam sheets for larger areas like this.   You can refer to a post on my blog on June 1st regarding these sheets and how I use them- Technique Junkies Blog Hop- Happy June. I learned about using the foam sheets from the talented Jennifer McGuire Blog.

I hope you enjoyed today's card post. If you have any questions or comments please let me know. I would love to hear from you.

Have an AMAZING day.

Jerri