Showing posts with label Merry Christmas. Show all posts

Wednesday, December 18, 2024

An Embellished Christmas


Good day! Pam here with a super quick creation when you're needing to get those cards out in a hurry! I simply used a piece of lovely designer paper, some red satin ribbon and the wonderful Embellished Merry Christmas. The sentiment was distressed a bit with walnut ink.

Find all the wonderful stamps here and do some shopping with my code TJ10Pam.


Wednesday, December 4, 2024

A Pewter Merry Christmas

Greetings and happy December! The holidays are upon us and I thought I would share this simple creation. I used the gorgeous

Thursday, December 16, 2021

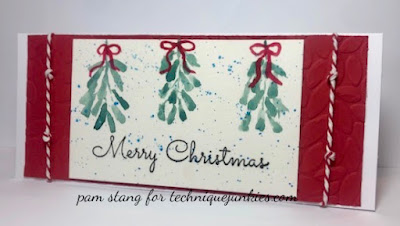
Retro Merry Christmas


 Happy Wednesday, everyone! I hope this day finds you relaxed and enjoying the holiday season. I have been working on my watercoloring and this Retro Merry Christmas sentiment was with TJ's latest release. Super simple card to create. I layered a red panel with an embossed leaves folder, some splatters and some bakery twine to finish it off. This is a small slimline card and they DO NOT cost extra to mail!

To get 10% off over in the store, use code TJ10Pam

My wish for everyone this week is to take a breath and enjoy what is.

Pam

Tuesday, October 26, 2021

Wintery Poinsettia Christmas Card


It’s always nice to put some extra time and effort into a few of your holiday card projects. I like to have special, detailed cards to give to those few people who appreciate cardmaking or who live far away. For me, this project was one of those special, detailed cards - where the card itself will be the Christmas gift.


I started with the Bird and Poinsettia Border Stamp by Technique Junkies. This stamp is so lovely and is really versatile for Christmas, holiday and also general winter cards. I also think this would be the perfect stamp to use for those “winter birthday” cards as well.


I stamped with brown Archival Ink and then used my Nuvo Waterbrush Pens and a combination of Distress Oxide inks and regular Distress Inks to color in the image.


Then, I used my craft knife to carefully cut out all the INSIDE spaces… look carefully in between the branches and the little pinecones. This was all hand-cut out with my craft knife and some time. :)


After I cut out the INSIDE spaces, then I could easily fussy-cut around the outside of the stamped image. I used Nuvo Deluxe Adhesive to glue the stamped, fussy-cut image to a piece of patterned paper from the "Frosty Sparking" paper collection by Craft O’Clock.


I stamped the Dotted Merry Christmas stamp with black Archival Ink and used a rectangle stitched die from my stash to cut it out and add to my card.


The paper collection has lots of coordinating fussy-cut elements, so I simply found a bird, a candy-cane, two leaves, one anise seed, and a few flower elements to add on top of the stamped image. I used a combination of hot glue and my Nuvo liquid adhesive (the hot glue adds dimension). 


I mounted the whole thing on top of a black card base. This card did take me quite a while, but I enjoy the detail work every now and then. When I showed my husband the finished card, he said, “Wow… you really put some time into that one!”


Hope this inspires you! Thank you for looking! 


Tuesday, October 13, 2020

Merry Christmas

   Good morning! Another beautiful fall morning, one of these mornings we will wake up to snow!!!


I am up on Techniques Junkies Blog to show you a couple more beautiful cards I made using stamps from the new October 2020 release.  My first card: uses the new Dotted Merry Christmas, love the font as well as the dots between the letters I used Santa in the Monlight  which stirs up memories of waiting for Santa as a child.  I went through my stamps and saw Good Night which I thought added to the card.   I always make my sons Christmas cards so this is the one he has chosen for me to make him this year.   I started by sponging a yellow "moon" on my blank card - then using my Misti I place my Santa in the Moonlight so that the reindeer would be in the moon.  I love to use silhouette stamps - no coloring and they stand alone.   I have a friend who has a sizzix die which I really like, of a city sky line so I die cut several of those to have on hand.  

For my next card 


I used Candy Cane and Merry Christmas .  I embossed he candy cane and sentiment using some red tinsel embossing powder - love the sparkle it added.  I fussy cut the candy cane out and popped it up on a die cut doily as well as a red doily I had in my stash. I ran my white layer with a snow embossing folder through my cuttlebug, left the script just plain white with red tinsel embossing powder .  I had some card stock in my never ending stash that was perfect for this candy cane image.  Hope you have enjoyed.

Don't forget to use the 10% discount (seen below) by entering TJ10Shirley so you can add these to your Christmas collection.